TTBaseUIKit
Build your project with programmatically UI. You can see more details in here: TTBaseUIKit - Framework to Build UI Programmatically
Add the following line to your Podfile:


Installation
Swift Package Manager
- File > Swift Packages > Add Package Dependency
- Add https://github.com/tqtuan1201/TTBaseUIKit.git
- Select "Up to Next Major" with "1.5.0"
Once you have your Swift package set up, adding Alamofire as a dependency is as easy as adding it to the dependencies value of your Package.swift.
dependencies: [
    .package(url: "https://github.com/tqtuan1201/TTBaseUIKit.git", .upToNextMajor(from: "1.5.0"))
]
or
dependencies: [
    .package(url: "https://github.com/tqtuan1201/TTBaseUIKit.git", branch: "master"),
]
If you encounter any problem or have a question on adding the package to an Xcode project, I suggest reading the Adding Package Dependencies to Your App guide article from Apple.
CocoaPods
CocoaPods is a dependency manager for Cocoa projects. Add the following line to your Podfile:
pod 'TTBaseUIKit'Carthage
Add the following line to your Cartfile:
github "tqtuan1201/TTBaseUIKit"Manual
- Put TTBaseUIKit repo somewhere in your project directory.
- In Xcode, add
TTBaseUIKit.xcodeprojto your project. - On your app's target, add the TTBaseUIKit framework:
- as an embedded binary on the General tab.
- as a target dependency on the Build Phases tab.
Usage example
A few motivating and useful examples of how your product can be used. Spice this up with code blocks and potentially more screenshots.
Basic config settings
When you use this framework. You have the ability to control Color, FontSize, UI size. It helps you a lot when you apply themes, build apps on different platforms and they are easy to change. Config setting in AppDelegate
let view:ViewConfig = ViewConfig()
view.viewBgNavColor = UIColor.blue
view.viewBgColor = UIColor.white
view.buttonBgDef = UIColor.blue
view.buttonBgWar = UIColor.red

let size:SizeConfig = SizeConfig()
size.H_SEG = 50.0
size.H_BUTTON = 44.0

let font:FontConfig = FontConfig()
font.HEADER_H = 16
font.TITLE_H = 14
font.SUB_TITLE_H = 12
font.SUB_SUB_TITLE_H = 10

TTBaseUIKitConfig.withDefaultConfig(withFontConfig: font, frameSize: size, view: view)?.start(withViewLog: true)

self.window = UIWindow(frame: UIScreen.main.bounds)
self.window!.rootViewController = UINavigationController.init(rootViewController: YourViewController())
self.window!.makeKeyAndVisible()
- With
ViewConfig, you can customize the most of colors forButton,Label,Background colors, ect. You can see all the config here: ViewConfig - With
SizeConfig, you can customize the most of size forButton,Label,Navigation,Conner radius,Icon,Textfield, ect. You can see all the config here: SizeConfig - With
SizeConfig, you can customize the most of font size forTitle,SubTitle,Header, ect. You can see all the config here: FontConfig
Apply config by:
TTBaseUIKitConfig.withDefaultConfig(withFontConfig: font, frameSize: size, view: view)?.start(withViewLog: true)
Usage
TTBaseUIKit dramatically simplifies writing to build UI programmatically. Let's take a quick look at some examples, using TTBaseUIKit from Swift.

Interface Customization
Show Message
let noti:TTBaseNotificationViewConfig = TTBaseNotificationViewConfig(with: window)
noti.setText(with: "WELCOME ^^", subTitle: "Just demo little element ui with write by  programmatically swift")
noti.type = .NOTIFICATION_VIEW
noti.touchType = .SWIPE
noti.notifiType = .SUCCESS
noti.onShow()

Show Popup
let popupVC = TTPopupViewController(title: "SOMETHING LIKE THIS", subTitle: "Lorem Ipsum is simply dummy text of the printing and typesetting industry. Lorem Ipsum has b", isAllowTouchPanel: true)
yourVC.present(popupVC, animated: true)
Show empty for table view
yourVC.tableView.setStaticBgNoData(title: "NO DATA", des: "Contrary to popular belief, Lorem Ipsum is not simply random text. It has roots in a piece of classical Latin literature from 45 BC, making ") {
  print("Touch handle!!!!")
            }
ViewCodable
This is a protocol use to easily organize UI handling code. You can see all configs here: ViewCodable
-
func setupViewCodable(with views : [UIView])
This function calls all other functions in the correct order. You can use it in an UIViewController viewDidLoad method or in a view initializer, for example.
-
func setupStyles()
This function should be used to apply styles to your customs views.
-
func setupData()
This function should be used to set data
-
func setupConstraints()
This function should be used to add constraints to your customs views
-
func setupBaseDelegate()
This function should be used to set delegate for views
Base UIViews
Custom View
import TTBaseUIKit

class YourCustomView : TTBaseUIView {
    override func updateBaseUIView() {
        super.updateBaseUIView()
    }
}

extension YourCustomView :TTViewCodable {

    func setupStyles() {
    }

    func setupCustomView() {
    }

    func setupConstraints() {
    }

}
BaseUIViewController
import  TTBaseUIKit

class BaseUIViewController: TTBaseUIViewController<DarkBaseUIView> {

    var lgNavType:BaseUINavigationView.TYPE { get { return .DEFAULT}}
    var backType:BaseUINavigationView.NAV_BACK = .BACK_POP

    override func viewWillAppear(_ animated: Bool) {
        super.viewWillAppear(true)
        self.updateForNav()
    }

    public override init() {
        super.init()
        self.navBar = BaseUINavigationView(withType: self.lgNavType)
        self.setDelegate()
    }

    public convenience init(backType:BaseUINavigationView.NAV_BACK) {
        self.init()
        self.backType = backType
    }

    public convenience init(withTitleNav title:String, backType:BaseUINavigationView.NAV_BACK = .BACK_POP) {
        self.init()
        self.backType = backType
        self.setTitleNav(title)
    }

    public convenience init(withNav nav:BaseUINavigationView, backType:BaseUINavigationView.NAV_BACK = .BACK_POP) {
        self.init()
        self.backType = backType
        self.navBar = nav
        self.setDelegate()
    }

    required init?(coder aDecoder: NSCoder) {
        fatalError("init(coder:) has not been implemented")
    }

}

// MARK: For private base funcs
extension BaseUIViewController {

    fileprivate func setDelegate() {
        if let lgNav = self.navBar as? BaseUINavigationView { lgNav.delegate = self }
    }

    fileprivate func updateForNav() {
        if let lgNav = self.navBar as? BaseUINavigationView {
            lgNav.setTitle(title: "TTBASEUIVIEW_KIT")
        }
    }
}

// MARK: For public base funcs
//--NAV
extension BaseUIViewController {

    func setTitleNav(_ text:String) {
        self.navBar.setTitle(title: text)
    }

    func setShowNav() {
        self.statusBar.isHidden = false
        self.navBar.isHidden = false
    }

    func setHiddenNav() {
        self.statusBar.isHidden = true
        self.navBar.isHidden = true
    }

}

extension BaseUIViewController :BaseUINavigationViewDelegate {
    func navDidTouchUpBackButton(withNavView nav: BaseUINavigationView) {
        if self.backType == .BACK_POP {
            self.navigationController?.popViewController(animated: true)
        } else if self.backType == .BACK_TO_ROOT {
            self.navigationController?.popToRootViewController(animated: true)
        } else {
            self.dismiss(animated: true, completion: nil)
        }
    }
    func navDidTouchUpRightButton(withNavView nav: BaseUINavigationView) {

    }
}
BaseUITableViewController
import TTBaseUIKit

class BaseUITableViewController: TTBaseUITableViewController {

    override var navType: TTBaseUIViewController<TTBaseUIView>.NAV_STYLE { get { return .STATUS_NAV}}

    var lgNavType:BaseUINavigationView.TYPE { get { return .DEFAULT}}
    var backType:BaseUINavigationView.NAV_BACK = .BACK_POP

    override func viewWillTransition(to size: CGSize, with coordinator: UIViewControllerTransitionCoordinator) {
        super.viewWillTransition(to: size, with: coordinator)
        DispatchQueue.main.async { [weak self] in guard let strongSelf = self else { return }
            guard let headerView = strongSelf.tableView.tableHeaderView else { return }
            headerView.layoutIfNeeded()
            let header = strongSelf.tableView.tableHeaderView
            strongSelf.tableView.tableHeaderView = header
        }
    }


    override func updateBaseUI() {
        super.updateBaseUI()
        self.navBar = BaseUINavigationView(withType: self.lgNavType)
        self.setDelegate()
    }

}


//For Base private funcs
extension BaseUITableViewController : BaseUINavigationViewDelegate{

    fileprivate func setDelegate() {
        if let lgNav = self.navBar as? BaseUINavigationView { lgNav.delegate = self }
    }

    func navDidTouchUpBackButton(withNavView nav: BaseUINavigationView) {
        self.navigationController?.popViewController(animated: true)
    }
}
Auto Layout
TTBaseUIKit to make easy Auto Layout. This framework provides some functions to setup and update constraints.
-
setLeadingAnchor: Set/Update value for current view or super view setTrailingAnchor(_ view:UIView? = nil, isUpdate:Bool = false, constant:CGFloat, isApplySafeArea:Bool = false, priority:UILayoutPriority? = nil)setTopAnchor(_ view:UIView? = nil, isUpdate:Bool = false, constant:CGFloat, priority:UILayoutPriority? = nil)setBottomAnchor(_ view:UIView? = nil, isUpdate:Bool = false, constant:CGFloat,isMarginsGuide:Bool = false, priority:UILayoutPriority? = nil)setCenterXAnchor(_ view:UIView? = nil, isUpdate:Bool = false, constant:CGFloat)setcenterYAnchor(_ view:UIView? = nil, isUpdate:Bool = false, constant:CGFloat)
Useful functions
TTBaseUIKit provides common handling functions for String, Date, Json, Device, Language, VietNamLunar , Validation, NetworkSpeedTest
Example Apps
For more examples and usage, please refer to example project TTBaseUIKitExample
Installed Applications
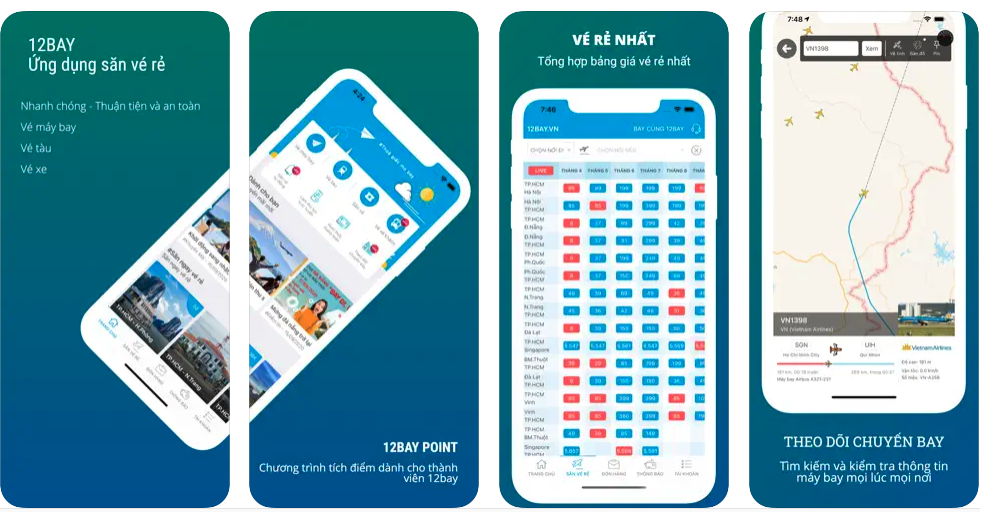
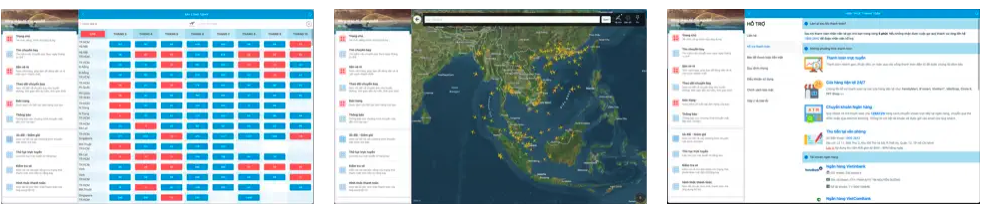
During my work, I have updated and used this framework in many projects. All my project using UI programmatically instead of using Storyboard. Here are some screenshoots of the apps:
-
12Bay iOS App
-
12Bay MacOS app
-
Aihealth iOS app

You can see all my projects here: Link
Advantages
- Reusable codes
- Speed up your project
- Easy to use
Disadvantages
- Must build app to see UI,
SwiftUIsolved that problem I was thinking about.
For more examples and usage, please refer to example project [TTBaseUIKitExample]
Meta
Truong Quang Tuan – @website/gmail – truongquangtuanit@gmail.com
Distributed under the XYZ license. See LICENSE for more information.
https://github.com/tqtuan1201/TTBaseUIKit
About my project
We build high quality apps! Get in touch if you need help with a project.
License
TTBaseUIKit is distributed under the MIT license. See LICENSE for details.
