VIPERBase
VIPERBase is an implementation of VIPER architecture for using in iOS platform.
This project aims to make VIPER usage and adoption easier, facilitating all needed settings for working with this architecture and trying to reduce as much as possible the manual work arised due to its characteristic.
Installation
CocoaPods
CocoaPods is a dependency manager for Cocoa projects. To integrate VIPERBase into your xcode project, specify it in your Podfile:
pod 'viper-base', '~> 2.1'Xcode template installation
The baddest experience you may have when using VIPER is to create, by yourself, all files, classes and protocols needed by this architecture. This affects a lot the productivity, making a simple task take a lot of time.
Xcode allows us to create personalized templates. With this resource available, we decided to create a template specially for VIPERBase. Using this template, there won't be manual work anymore.
To install and use our template, check this tutorial.
Module overview
A module represents a screen of the app.
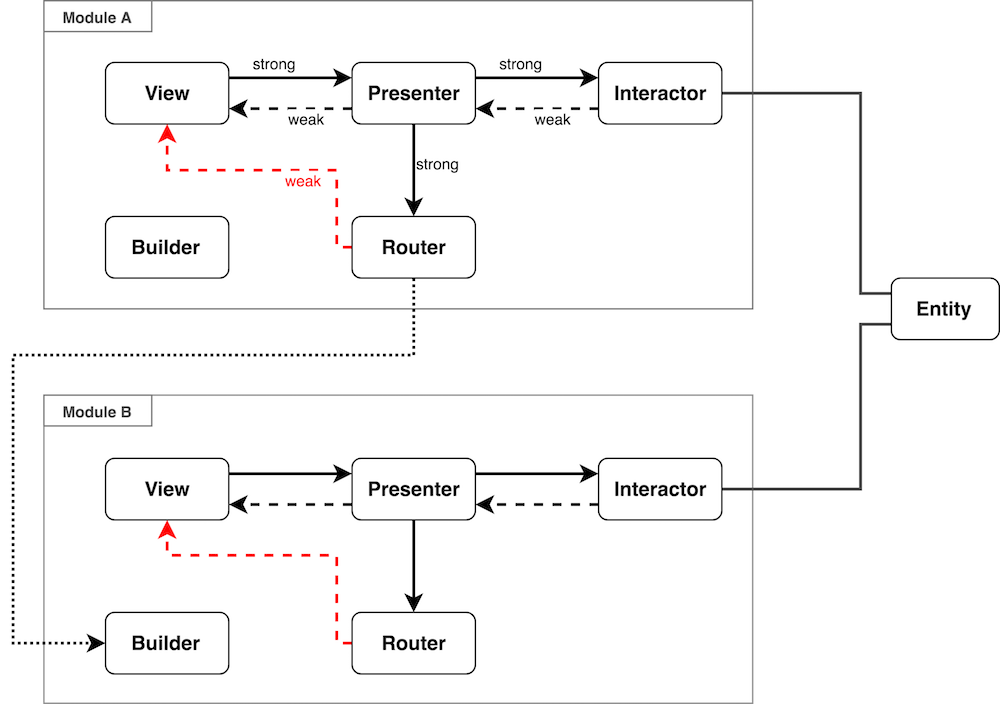
This implementation of VIPER, has some particularities:
- Builder component
Some approaches consider the module creation task as a responsibility of the router. But this violates the Single Responsibility Principle, since it is already responsible for navigation between modules.
To solve this problem, builder was created. It is in charge of creating all components of the module and make the respective connections.
- Decoupling between modules and entities
This way, entities can be used in one or more modules, since they are simple structures with no business logic.
- Router owns a reference to view
iOS architecture, the navigation is performed from a UIViewController to another UIViewController. Because of this, router has to own the refecence for the view of the current module, only for navigation purpose, and receive the view of the destination module, from its builder.
Module components
Contracts
The contracts define how the communication between the layers will be made. A module consists of 5 contracts:
View Contract
The view class conforms to this protocol. It defines the communication from presenter to view
//MARK: - View Contract

protocol MyModuleViewProtocol: class {

}
View Output Contract
The presenter class conforms to this protocol. It defines the communication from view to presenter
//MARK: - View Output Contract

protocol MyModuleViewOutputProtocol: class {

}
Interactor Contract
The interactor class conforms to this protocol. It defines the communication from presenter to interactor
//MARK: - Interactor Contract

protocol MyModuleInteractorProtocol: class {

}
Interactor Output Contract
The presenter class conforms to this protocol. It defines the communication from interactor to presenter
//MARK: - Interactor Output Contract

protocol MyModuleInteractorOutputProtocol: class {

}
Router Contract
The router class conforms to this protocol. It defines the communication from presenter to router
//MARK: - Router Contract

protocol MyModuleRouterProtocol: class {

}
View
Basic structure of a view:
final class MyModuleView: UIViewController, VIPERView {
    var presenter: MyModuleViewOutputProtocol!
}

//MARK: - MyModuleViewProtocol

extension MyModuleView: MyModuleViewProtocol {

}
You just need to implement the methods defined in the view contract.
Presenter
Basic structure of a presenter:
final class MyModulePresenter: VIPERPresenter {
    weak var view: MyModuleViewProtocol!
    var interactor: MyModuleInteractorProtocol!
    var router: MyModuleRouterProtocol!
}

//MARK: - MyModuleViewOutputProtocol

extension MyModulePresenter: MyModuleViewOutputProtocol {

}

//MARK: - MyModuleInteractorOutputProtocol

extension MyModulePresenter: MyModuleInteractorOutputProtocol {

}
You just need to implement the methods defined in the view output contract and interactor output contract.
Interactor
Basic structure of an interactor:
final class MyModuleInteractor: VIPERInteractor {
    weak var presenter: MyModuleInteractorOutputProtocol!
}

//MARK: - MyModuleInteractorProtocol

extension MyModuleInteractor: MyModuleInteractorProtocol {

}
You just need to implement the methods defined in the interactor contract.
Router
Basic structure of a router
final class MyModuleRouter: VIPERRouter {
    weak var viewController: UIViewController!
}

//MARK: - MyModuleRouterProtocol

extension MyModuleRouter: MyModuleRouterProtocol {

}
You just need to implement the methods defined in the router contract.
Navigation between modules
In the router, navigation can be done in two ways: presenting the module modally or pushing the module onto a navigation stack. To perform navigation, use the methods below:
- presentModule(withView:embedIn:animated:completion:)
This method presents the next module modally. Check parameters details below:
-
withView: View of the module to navigate to. -
embedIn:.navigationControlleror.none. The default value is.none -
animated: Whether or not to perform the animation of the transition. The default value istrue -
completion: Handler called when transition finishes. The default value isnil
- pushModule(withView:embedIn:animated:)
This method pushes the next module onto the navigation stack. It only works if the current module is embeded in a navigation controller or is part of a navigation stack.
-
withView: View of the module to navigate to. -
embedIn:.navigationControlleror.none. The default value is.none -
animated: Whether or not to perform the animation of the transition. The default value istrue
Builder
In the builder class, you specify the respective classes for View, Presenter, Interactor and router layers for the module.
final class MyModuleBuilder: VIPERBuilder<MyModuleView, MyModulePresenter, MyModuleInteractor, MyModuleRouter> {

    override class var defaultViewUIType: VIPERViewUIType {
        return .storyboard(name: "MyModuleView", bundle: nil)
    }
}

//MARK: - Builder custom methods

extension MyModuleBuilder {

}
You also define the way the view UI will be loaded, through the defaultViewUIType property. There are 3 possible values:
- Storyboard file: You just need to inform the name of the storyboard file, without extension, and the bundle, if needed.
.storyboard(name: "MyModuleView", bundle: nil)- XIB file: You just need to inform the name of the XIB file, without extension, and the bundle, if needed.
.nib(name: "MyModuleView", bundle: nil)- None: If you intent to implement the UI programmatically, use this option.
.noneBuilding a module
The 4 methods below can be used to build a module. Additionally you can create custom build methods, according to the module needs.
- build():
Creates the module and returns a VIPERModule struct containing the view and presenter references. You can use presenter reference for passing data between the modules.
//MARK: - MyModuleRouterProtocol

extension MyModuleRouter: MyModuleRouterProtocol {

    func goToNextModule() {
        let module = NextModuleBuilder.build()
        pushModule(withView: module.view)
    }
}
- build(viewUIType:):
This method works like the method above but it allows you to specify the UI type during method call. This method is convenient when you are using typealias to define the configuration of the module builder.
typealias MyModuleBuilder = VIPERBuilder<MyModuleView, MyModulePresenter, MyModuleInteractor, MyModuleRouter>

MyModuleBuilder.build(viewUIType: .storyboard(name: "MyModuleView", bundle: nil))
You can also use this method if you intent to perform unit tests around the module communication, mocking one or more layer classes, according to the test needs.
import XCTest

class ProjectTests: XCTestCase {

    //...

    func testModuleCommunication() {
        typealias MockModuleBuilder = VIPERBuilder<ModuleMockView, ModuleOriginalPresenter, ModuleOriginalInteractor, ModuleOriginalRouter>

        let module = MockModuleBuilder.build()

        //...
    }
}
- [DEPRECATED] buildAndAttachToWindow()
This is a special build method, usually used for starting the initial module of the app, called in AppDelegate class:
@UIApplicationMain
class AppDelegate: UIResponder, UIApplicationDelegate {

    var window: UIWindow?

    func application(_ application: UIApplication, didFinishLaunchingWithOptions launchOptions: [UIApplication.LaunchOptionsKey: Any]?) -> Bool {
        window = InitialModuleBuilder.buildAndAttachToWindow()
        return true
    }
}
[UPDATED]: Now you have to build module first, using either build() or build(viewUIType:) methods, then call attachToWindow() or attachToWindow(withNavigationController:) new methods:
window = InitialModuleBuilder.build().attachToWindow()window = InitialModuleBuilder.build().attachToWindow(withNavigationController: true)[IMPORTANT]: It is planned to remove the deprecated method in the next major release (v3.0)
- [DEPRECATED] buildAndAttachToNavigationController(tabBarItem:)
This method creates the module, attach it to a navigation controller and returns the navigation controller reference. If you intent to use the module inside a tab bar controller, you can use tabBarItem parameter to configure the tab bar item for this module.
let tabBarController = UITabBarController()

let bookmarksItem = UITabBarItem(tabBarSystemItem: .bookmarks, tag: 0)
let contactsItem = UITabBarItem(tabBarSystemItem: .contacts, tag: 1)
let downloadsItem = UITabBarItem(tabBarSystemItem: .downloads, tag: 2)

tabBarController.viewControllers = [
    BookmarksBuilder.buildAndAttachToNavigationController(tabBarItem: bookmarksItem),
    ContactsBuilder.buildAndAttachToNavigationController(tabBarItem: contactsItem),
    DownloadsBuilder.buildAndAttachToNavigationController(tabBarItem: downloadsItem)
]
[UPDATED]: Now you have to build module first, using either build() or build(viewUIType:) methods, then call attachToNavigationController() new method:
window = MyModuleBuilder.build().attachToNavigationController()[IMPORTANT]: It is planned to remove the deprecated method in the next major release (v3.0)
Custom build methods
If you have a specific module that expects to receive some data, it is convenient to create a custom build method for that module. That way, the builder will be in charge of pass this data to the presenter.
To create custom build methods:
- Define a static method in the builder class, defining the expected parameters and returning the type of the view of the module;
- Start the implementation calling the
build()method; - Pass the data to the
presenter, according to the implementation; - return the
view.
//MARK: - Builder custom methods

extension NextModuleBuilder {

    static func build(someData: Any, anotherData: Any) -> MyModuleView {
        let module = build()
        module.presenter.someData = someData
        module.presenter.anotherData = anotherData
        return module.view
    }
}
Routers can call this builder like this:
let view = NextModuleBuilder.build(someData: "Example of data", anotherData: "Another example of data")pushModule(withView: view)presentModule(withView: view)License
VIPERBase is released under the MIT license.
