Note: The primary fork of this project can be found at elm-community
WebGL for Elm
A simple API for rendering with WebGL. This is useful for both 2D and 3D rendering because it lets you take advantage of hardware acceleration with the GPU, meaning you can render things more quickly.
Here are some examples so you can get a feel for the API, but make sure you read on to learn how WebGL and the GPU really work!


Understanding WebGL
To get the most out of this library and out of the GPU, it is best to pair some examples with a fairly solid understanding of how information flows through the rendering pipeline. This section gives a high-level overview of the pipeline and the corresponding terminology.
At a high-level, there are two general concepts to understand: meshes and shaders. The details of each of these are crucial to using WebGL effectively.
Meshes
A mesh is all about triangles. By placing small triangles side-by-side, you can build up larger 3D shapes. We define each triangle by associating a bunch of attributes—like position and color—with each corner of the triangle.
We create and update our meshes on the CPU, so working with a model does not get any direct benefits from the GPU. Meshes are sent from the CPU to the GPU to be rendered. This transfer can be quite expensive, so it is best to try to avoid creating new meshes.
Some tricks to minimize this include breaking a mesh up into many smaller pieces that can be transformed independently. For example, if you want to render a skeleton, each bone could be a separate mesh, so rather than send a new version of the entire skeleton on every frame, you just send a transformation for each bone.
Shaders
A shader is all turning meshes into pictures. A shader is a program that runs on the GPU, so it benefits from lots of parallelization. As a general rule, you want to be doing computation here rather than on the CPU if possible.
In Elm, shaders are defined with a language called GLSL. These are programs that take in small high-level values and do a bunch of rendering based on that. For example, you can send over a matrix that represents where the camera should be and all of the meshes loaded onto the GPU will be transformed accordingly.
Combining Meshes and Shaders
The following diagram illustrates the entire pipeline. Keep reading past the diagram, all the terms will be explained!
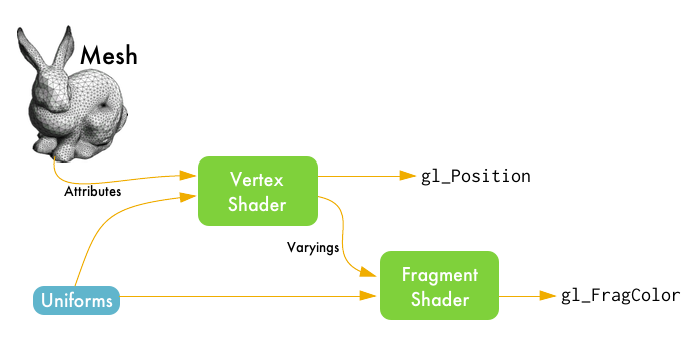
We start with a mesh. It's a bunch of raw data points that we want to render on screen. From there, the data flows through two types of shaders:
Vertex Shaders — Our mesh is made up of lots of triangles. Each corner of a triangle is called a vertex. The vertex shader has access to all of the attributes of each vertex, like position and color, letting us move triangles around or change their color.
Fragment Shaders — Also known as pixel shaders, these shaders are like filters on individual pixels. They let you work with pixels to add lighting effects or add postprocessing effects like blur or edge-detection.
The flow of data between the CPU and each of our shaders is very well defined. To send information, there are three kinds of specialized variables:
Uniform — these are global read-only variables that can be used in both the vertex and fragment shaders. They are defined on the CPU.
Attribute — these variables represent a particular vertex in our mesh. The vertex shader takes in these variables to compute some transformations on each vertex.
Varying — these are variables you can write in the vertex shader which then get passed along into the fragment shader, where they are read-only. This lets you pass information along as you compute things in your rendering pipeline.
Making the most of the GPU
A typical mesh may be quite large, with hundreds or thousands of vertices, each with a potentially large set of attributes. Working with a mesh on the CPU is expensive for two major reasons:
The CPU is sequential, so you must work on each vertex one at a time. On the GPU, you can work with tons of vertices in parallel with a Vertex Shader, making things much faster.
Transfering data from CPU to GPU is expensive. Ideally you want to transfer all of the vertices once and make any updates to the mesh by passing in uniform variables to the Vertex Shader. Not only is it cheaper to send a couple matrices to the GPU, but once they get there, the GPU can use them in parallel.
This library facilitates this by caching known meshes on the GPU. If you create a mesh and use it many times, it only gets transfered to the GPU once. Now if you update that mesh, the new version will need to be loaded onto the GPU separately. That means it is best to create a fairly general mesh and modify it with uniform variables in a Vertex Shader.
Writing Shaders
Shaders are written in a language called GLSL. This is a widely used language for shaders with websites devoted to sharing creative demos, so you will often be able to use that shader code directly in Elm. A basic vertex shader could be defined like this:
vertexShader : Shader { position:Vec3, coord:Vec3 } { u | view:Mat4 } { vcoord:Vec2 }
vertexShader = [glsl|

attribute vec3 position;
attribute vec3 coord;
uniform   mat4 view;
varying   vec2 vcoord;

void main () {
  gl_Position = view * vec4(position, 1.0);
  vcoord = coord.xy;
}

|]
Within the [glsl| ... |] block, you just write plain GLSL. Elm is actually
aware of the types of the attributes, uniforms, and varyings coming in and out
of the shader, so the shader block is given a type that enforces this API. The
type of vertexShader says that we have two attributes named position and
coord, one uniform named view, and one varying called vcoord. This means
Elm's type checker can make sure you are using the shader in a meaningful way,
avoiding a totally blank screen that can happen if your shader has an error in
it.


