React Base Project Starter Kit
Create React projects without configuration time.
Note: This pack is still under development, there are still undocumented functionalities.
Do not use for production
Quick Overview
Create a New folder or open the folder where you want this package installed. Then cd into your project.
cd Users\MyUser\MyFolder\MyProjectDir
#1. Create your package.json file if not created already.
npm init -y

#2. Add this package to dependencies
yarn add react-base-starter-project

#3. Run the React Base Project
npm run rbc::start
Index
Github automatically parses anchor tags out of your headers. So you can do the following:
- Configuration File
- Editing Configuration File
- Folder Structure
- Main Script
- Using Proxied Server
- Using Static Server
- Running Servers
Configuration file
When you run this package for the first time, you will be required to answer some questions in order to create the configuration file:
- rbc.config.js
- Project Name
- Desired Local Address
- Use of Proxy
- Auto open Chrome
Editing Configuration File
In this file you will be able to setup your project and the main variables required to make it work:
- Basic Paths
- SSL Certificates
- Webpack Configuration:
- Entry
- Output
- Extensions to Resolve
- Vendors to collect in the same chunk
Folder Structure
- React
- Electron
- Public
Start Script Option
Calling the script
Once you add this pack to your dependencies, you will be able to call the main script trough this command:
npm run rbc::startFirst Run
The first time you run this script, it will check for configuration file existence ( rbc.config.js ) on your project root, if it doesn't exist, the script will help you to create it, just answer a few question and that will be it.
The questions are:
- Project Name:
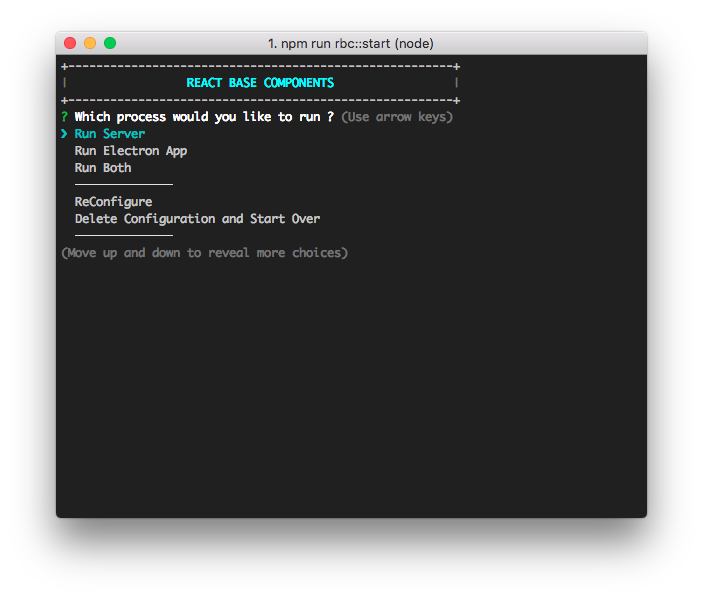
Script Options
- Run Server
- Run Electron
- Run Both
- ReConfigure
- Delete configuration and Start Over
- ReCompile RBC Package
- ReCompile RBC Package Hot
Using Proxied Server
To use a proxied server follow these steps:
-
Add the package to your package.json dependencies "yarn add https://github.com/mzamoras/rbc"
-
Run the Main Script for the first time npm run rbc::start
-
Fill in the questions:
a. Project Name ( any name ).
b. Local URL ( eg. http://localhost:5000 )
c. Proxy URL ( eg. http://example.com:80 ) -
Run the Main Script again, and select to copy templates, or make sure to have the folder structure in your project.
a. public Folder ( required folder ).
- remove any index.html, so the proxy can work.
b. react Folder ( required folder ).
c. electron Folder ( required folder ).
d. assets Folder With: ( required folder ).
- css ( optional folder )
- js ( optional folder )
- fonts ( optional folder )
- media ( optional folder )
- less ( optional folder )
| Name | Type | Description | Required |
|---|---|---|---|
| public | folder | Here goes all the compiled files | yes |
| react | folder | React main files | yes |
| electron | folder | Electron main files | yes |
| assets | folder | Files needed to create the app | yes |
Using Laravel
New Project
- Install Laravel Installer
- run
laravel new projectName
Install Laravel and create a
Includes
-
To Create:
- React App
- Electron App ( with react )
-
Server Side
- Webpack ( for compiling )
- Browsersync ( as server )
-
React Utilities
- PropTypes
- Babel Env
- Babel Stage 2
- react-hmr ( hot module reload )
- classnames
- shallowEqual
- Redux
- React JSS
- React Router
- Helmet
-
Additional Utilities
- Less Processing
- HTM5 Boilerplate
- GZip Compiled Files ( optional )
- Chunk Compiled Files ( optional )
- Minification of Compiled Files ( optional )
- Eslint code validation
-
For Testing
- Karma
- Mocha
- sinon
- Jest
Using Storyboard
| Options | Description |
|---|---|
| Servers | |
| Run Server | x |
| Run Electron App | x |
| Run Both | x |
| Testing | |
| Test with Karma | x |
| Launch Storybook | x |
| Configuration | |
| Re configure | x |
| Start Over | x |
Running Servers
When running a server some options are configurable. The default options are configured to run as DEVELOPMENT MODE.
| Option | Default |
|---|---|
| 1. Run in Production Mode ? | false |
| 2. Enable Hot Module Replacement ( HMR ) ? | true |
| 3. Enable gzip for compiled files ? | true |
| 4. Minify compiled files ? | false |
Running Electron Only
When running Electron App the default options are configured to run as DEVELOPMENT MODE.
Note: Running Electron only does not allow HMR, but you can use watch mode to listen for changes and recompile when they happen. To Enable HMR, run Server instead.
| Option | Default |
|---|---|
| 1. Run in Production Mode ? | false |
| 2. Watch Mode ? | true |
Testing With Karma
When running Electron App the default options are configured to run as DEVELOPMENT MODE.
Available Scripts
Once you install this package, some scripts become available in your package.json file, the easiest way to run this package is to run the Main Script.
npm run rbc::startBut when you have run the Main Script at least once, you will be able to call some of the scripts directly, this are the scripts available:
| Script | Description |
|---|---|
| rbc::start | This is the main script |
| rbc::storybook | Runs a server to view your stories |
| rbc::storybook | Runs a server to view your stories |
| rbc::electron | Runs directly the Electron App ( may run with errors ) |
| rbc::recompile | If you decide to modify this package in your node_modules you need to recompile everything in order to make it work. |
| rbc::recompileW | Same as rbc:compile but works in watch mode. |
Important: Modifying this package once is installed as repository and recompiling is not recommended, any change you made is in risk to be wiped out as soon as you install new packages or update this one. Use it carefully

