TARTARE - Code Driven Testing
The Tartare family: tartare-chai | tartare-mock | tartare-util | tartare-collections | tartare-logs | protractor-tartare
Tartare is a JavaScript testing framework which uses BDD/Gherkin and [DDT] (http://en.wikipedia.org/wiki/Data-driven_testing) to describe your tests. It is fully code driven since all your testing stuff is in your code.
Tartare is based on the popular Mocha framework providing you with a new Gherkin ui and a couple of Gherkin reporters, among other goodies.
TOC
- Install
- Describe your tests
- Run your tests
- Data Driven Testing - Variants
- Hooks
- Reporters
- Running only selected tests
- Skipping tests
- Manual tests
- Bug management
- Tags and filters
- CLI arguments
- Changing the timeout programmatically
- Other goodies
- Using Tartare programmatically
- Testing web apps with Tartare + Protractor
- Using Tartare with TypeScript
Install
Tartare is available as an NPM module.
$ npm install -g tartareDescribe your tests
When using Gherkin to describe tests, each test is called a scenario, and several related scenarios are grouped inside a feature. Then those scenarios are described in term of its pre-conditions, the event that triggers the test, and the expected outcomes or post-conditions. Pre-conditions are described with the given keyword, while events and post-conditions are described with the keywords when and then, respectively. You can also use the keywords and and but if your test needs more than one pre-condition, event, or post-condition. Each one of those descriptions are generically known as steps.
When using Tartare, you can describe you tests using those keywords:
feature('Addition', function() {
  scenario('Add two natural numbers', function() {
    given('I have entered 50 into the calculator', function() {

    });
    and('I have entered 70 into the calculator', function() {

    });
    when('I press add', function() {

    });
    then('the result should be 120 on the screen', function() {

    });
  });
});
The feature function accepts a variable number of string arguments between the feature description and the
function. Those all arguments may be used to give more information about the feature, such as the User Story related
to the feature, o some kind of additional information.
feature('Addition',
        'In order to avoid mistakes',
        'As a user that needs to do math calculations',
        'I want to be helped out to calculate additions',
        function() {
  scenario('Add two natural numbers', function() {

    [...]

  });
});
Filling in the steps
It's time to tell your steps what to do. Simply write your code inside each step function.
It is not a good idea to put a lot of code inside each step. For the sake of clarity it is always better to put your complex code in a separated module, exporting the needed functions, and using them from the main test file. Let's call this module your step library.
If you are using synchronous code, simply write it inside the callback function.
var steps = require('./steps-library');

feature('Addition', function() {
  scenario('Add two natural numbers', function() {
    given('I have entered 50 into the calculator', function() {
      steps.enterNumberSync(50);
    });

    [...]

  });
});
If your code is asynchronous, add a callback function (usually named done) to the step function, and invoke
that callback when the step is complete. This callback understand the common (err, res) pattern so it can
be directly used as your function's callback.
var steps = require('./steps-library');

feature('Addition', function() {
  scenario('Add two natural numbers', function() {
    given('I have entered 50 into the calculator', function(done) {
      steps.enterNumber(50, done);
    });

    [...]

  });
});
And what if you need to call more than an asynchronous function in a single step? It would look like this:
var steps = require('./steps-library');

feature('Addition', function() {
  scenario('Add two natural numbers', function() {
    given('I have entered 50 into the calculator', function(done) {
      steps.clearField(function(err, res) {
        if (err) {
          return done(err);
        }
        steps.enterNumber(50, done);
      });
    });

    [...]

  });
});
To avoid the callback hell, Tartare provides you with the function synchronize which applied to a module,
wraps all the exported functions so that they can be invoked as synchronous code.
var steps = require('./steps-library');
synchronize(steps);

feature('Addition', function() {
  scenario('Add two natural numbers', function() {
    given('I have entered 50 into the calculator', function() {
      steps.clearField();
      steps.enterNumber(50);
    });

    [...]

  });
});
Note that the wrapped functions can still be invoked asynchronously if called with a callback.
If you include synchronous functions in your step library, prevent synchronize from being applied to them
by adding an attribute named dontSync with a truthy value.
var enterNumberSync = function enterNumberSync(number) {
  // Your cool code here
}
enterNumberSync.dontSync = true;

module.exports = {
  enterNumberSync: enterNumberSync;
}
Run your tests
Once you have coded your tests in a file named calculator-tests.js run Tartare:
$ tartare calculator-tests.jsOr to run tests in a directory and its subdirectories:
$ tartare --recursive testsTartare will run your tests writing to the console a coloured output that shows the descriptions of the features, scenarios and steps, the execution duration at several levels, and a summary with some stats and metrics about your test suite.
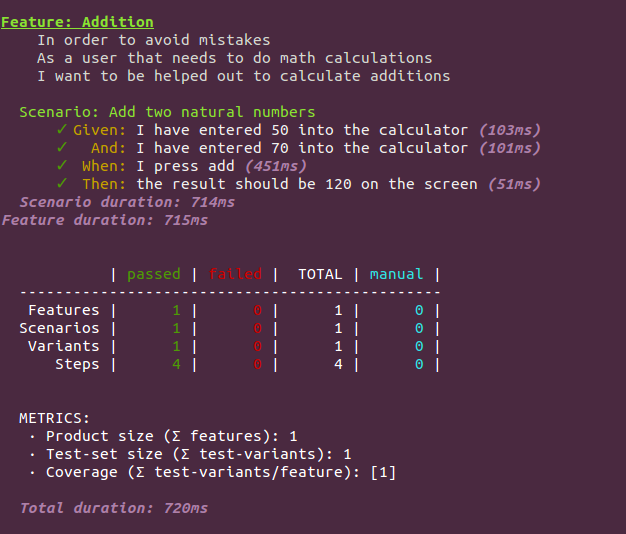
This output is generated by the so-called Gherkin reporter. See more about the available reporters below.
Data Driven Testing - Variants
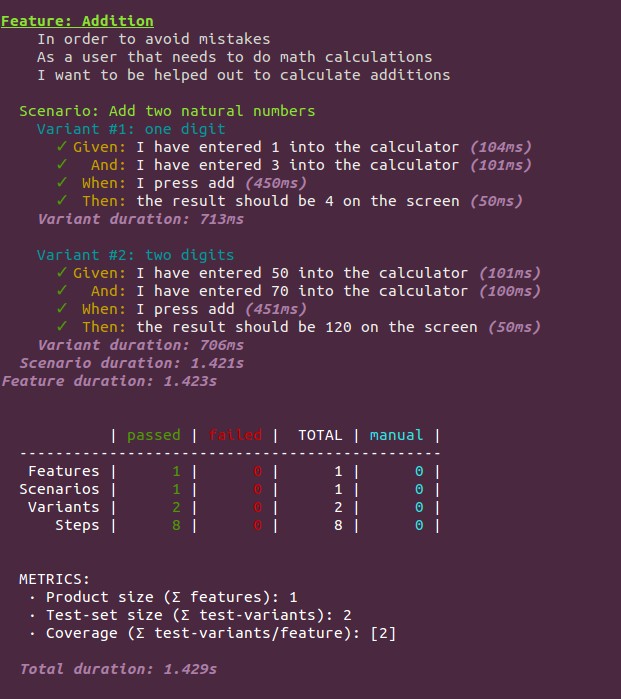
The concept of Data Driven Testing basically means that a single scenario is executed several times using different input data. In our calculator example, we could run the scenario to test the Add function with different numbers.
Tartare scenarios accept an extra argument with the set of data to be used in each scenario execution. This argument must be an array of objects, each one containing the properties to be used in each scenario execution. Each one of these objects is named a Variant. Then the scenario function will be invoked as many times as there are variants in the array, passing the variant object to the scenario function as an argument.
If you include a string property named desc in each variant, it will be used by the reporters to title
the variant.
var steps = require('./steps-library');
synchronize(steps);

feature('Addition', function() {
  var dataset = [
    {desc: 'one digit', number1: 1, number2: 3, result: 4},
    {desc: 'two digits', number1: 50, number2: 70, result: 120}
  ];
  scenario('Add two natural numbers', dataset, function(variant) {
    given('I have entered ' + variant.number1 + ' into the calculator', function() {
      steps.clearField();
      steps.enterNumber(variant.number1);
    });

    [...]

  });
});
Such a scenario produces the following output when the test suite is run:
Hooks
Hooks are useful to set up and tear down your tests. Sometimes you need things to happen but it makes no sense to take part of the steps. For example, you may need to start the SUT but it makes no sense to put it as part of a given step, and it only need to be done once at the beginning of the feature. The following is the list of the available hooks and where can they be used:
| Hook name | Usage |
|---|---|
| beforeAll/afterAll | Top level (outside features) |
| beforeFeature/afterFeature | Inside features and outside scenarios |
| beforeEachScenario/afterEachScenario | Inside features and outside scenarios |
| beforeScenario | Inside scenarios |
| beforeEachVariant/afterEachVariant | Inside scenarios |
Hooks behave as steps, understanding both synchronous and asynchronous code.
var steps = require('./steps-library');

feature('Addition', function() {
  beforeFeature(function(done) {
    steps.startCalculator(done);
  });

  scenario('Add two natural numbers', function() {
    given('I have entered 50 into the calculator', function(done) {
      steps.enterNumber(50, done);
    });

    [...]

  });

  afterFeature(function() {
    steps.closeCalculator();
  });
});
Reporters
Tartare comes with two built-in reporters:
- gherkin: a console reporter that outputs a coloured description of your features, scenarios and steps.
- gherkin-md: a Markdown reporter to upload the test description and results to GitHub.
Tartare also allows you to define third-party reporters. See below for more information.
gherkin
This is the default reporter. It prints the feature, scenario and step descriptions while they are being executed. It uses different symbols and colours for passed and failed steps, and prints the time taken by steps, variants, scenarios, features, and the whole suite to be executed.
At the end it prints some stats about the features, scenarios, variants and steps your suite has, and how many of them have passed or failed, or how many are marked as manual. It also gives you some metrics about your suite. Keep in mind that features having the same description are counted as the same feature. This means that you can split features without affecting the stats.
In the case that some steps have failed (due to runtime errors or unfulfilled assertions), this reporter prints the list of failures together with their details. When an assertions fails, the exact output depends on the assertions library you have used.
Finally, this reporter prints some warnings about variants that are marked as bugs but are not failing, or variants that are failing but are not marked as bugs, just to help you to manage your bugs.
Note that this reporter can use two colour themes: one for consoles with a dark background, and another one
for clear backgrounds. You can set the theme to be used setting the value dark or clear to the
TARTARE_THEME environment variable, or by passing the --theme argument to the CLI.
Tartare defaults to the dark theme.
$ TARTARE_THEME=clear tartare tests.js
$ tartare tests.js --theme clear
gherkin-md
When choosing the Markdown reporter, stats and test description is produced by using the GFM (GitHub Flavored Markdown). This reporter do not actually execute the test suite, but only reads all your features, scenarios, variants and steps to generate the report, so you get the report in a fraction of a second.
This reporter puts the stats at the very beginning, followed by a TOC that links to each feature and scenario in the report. Then a pretty test description is printed and finishes with a list of all the marked bugs, which are links to the related variant.
As in the case of the gherkin report, features with the same description are counted as the same feature.
By default, the report is written to the stdout, so you would want to redirect it to a file:
$ tartare tests.js --reporter gherkin-md > report.mdBut you can use the output reporter option to set the file where the report will be written:
$ tartare tests.js --reporter gherkin-md --reporter-options output=report.mdYou can also use the bugidLink reporter option to set the base URL of your bug tracking system
(see Bug Management below):
$ tartare tests.js --reporter gherkin-md --reporter-options output=report.md,bugidLink=http://bugtrackingsystem/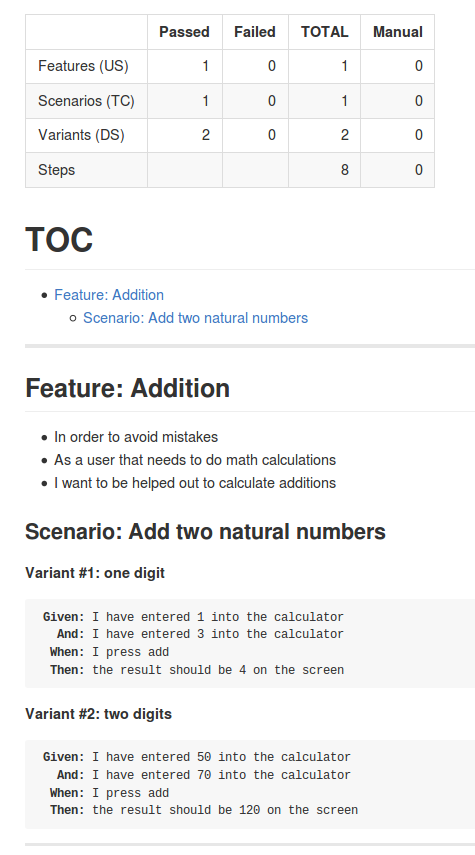
Third party reporters
Tartare also allows you to define third-party reporters by using npm modules. Simply install the reporter package
from npm (npm install my-cool-reporter) and use the option --reporter my-cool-reporter.
Running only selected tests
You can mark features or scenarios to be executed alone by using .only.
feature.only('Addition', function() {

    [...]

});

feature('Multiplication', function() {

    [...]

});
Only the first feature will be executed.
feature('Addition', function() {
  scenario('Add two natural numbers', function() {

    [...]

  });
  scenario.only('Add two real numbers', function() {

    [...]

  });
});
Only the second scenario will be executed.
You can also execute a single variant by adding an only property to the variant object with a truthy value.
feature('Addition', function() {
  var dataset = [
    {only: true, desc: 'one digit', number1: 1, number2: 3, result: 4},
    {desc: 'two digits', number1: 50, number2: 70, result: 120}
  ];
  scenario('Add two natural numbers', dataset, function(variant) {

    [...]

  });
});
If needed, you can use only in several features, scenarios or variants and only the marked ones will be executed.
Skipping tests
Features, scenarios and variants can also be marked with .skip/skip: true and they will be completely excluded
from execution. It works the same as commenting out the skipped tests: they don't appear on the reports nor are
counted on stats.
feature('Addition', function() {
  var dataset = [
    {desc: 'one digit', number1: 1, number2: 3, result: 4},
    {skip: true, desc: 'two digits', number1: 50, number2: 70, result: 120}
  ];
  scenario('Add two natural numbers', dataset, function(variant) {

    [...]

  });
  scenario.skip('Add two real numbers', function() {

    [...]

  });
});
Manual tests
Although sometimes we have to do manual testing, that doesn't mean that your manual tests don't appear on the report. Simply describe your manual tests without passing a function, and they will appear on the report tagged as manual tests.
feature('Addition', function() {
  scenario('Add two natural numbers', function() {
    given('I have entered 50 into the calculator');
    and('I have entered 70 into the calculator');
    when('I press add');
    then('the result should be 120 on the screen');
  });
});
In you want to mark features, scenarios or variants as manual tests even when their steps are implemented
you can use .manual/manual: true.
feature('Addition', function() {
  var dataset = [
    {desc: 'one digit', number1: 1, number2: 3, result: 4},
    {manual: true, desc: 'two digits', number1: 50, number2: 70, result: 120}
  ];
  scenario('Add two natural numbers', dataset, function(variant) {

    [...]

  });
  scenario.manual('Add two real numbers', function() {

    [...]

  });
});
Note that marking a variant as manual, its parent scenario and feature are automatically marked as manual, even when they may have implemented tests, and they are counted as manual on stats.
Bug management
In order to help you to manage bugs, Tartare allows you to mark features, scenarios and variants as minor or major bugs. When some of your tests detects a bug, it fails (because their assertions fail). Then you can mark the test as a major bug to assign it with a bug id from your bug tracking system, and it will be printed on the report. It also prevents the report from warning about failing tests that are not marked as bugs.
Sometimes a bug has a very low relevance and you don't want the buggy test to count as failed, while you still want to track the bug. In those cases, mark the test as a minor bug and, in addition to assigning it with a bug id, it won't be executed (to avoid the failure) and will count as passed on stats. Hooks belonging to a test marked as minor bug won't be executed either.
To mark features and scenarios as bugs, use the methods majorBug('bugId') or minorBug('bugId') where bugId
is a string.
feature('Addition', function() {
  scenario('Add two natural numbers', function() {

    [...]

  }).majorBug('id-359');
  scenario('Add two real numbers', function() {

    [...]

  }).minorBug('id-459');
});
You can also mark variants as minor or major bugs by including the majorBug or minorBug properties whose values
will be a string.
feature('Addition', function() {
  var dataset = [
    {majorBug: 'id-359', desc: 'one digit', number1: 1, number2: 3, result: 4},
    {minorBug: 'id-459', desc: 'two digits', number1: 50, number2: 70, result: 120}
  ];
  scenario('Add two natural numbers', dataset, function(variant) {

    [...]

  });
});
When using the markdown reporter you can pass the bugidLink reporter option with the base URL of
your bug tracking system, so the bug ids will be links formed by appending the bug id passed to the
majorBug/minorBug functions to the base url. If such a base url has the %s placeholder,
the bug id will be placed there.
$ tartare tests.js --reporter gherkin-md --reporter-options output=report.md,bugidLink=http://bugtrackingsystem/%sTags and filters
You can assign features, scenarios and variants with tags, understood as simple short strings, that help you
to organize, categorize, or whatever your tests. The goal of tagging tests is to use filters in order to
select tests to be executed. Using only is a very simple way of filtering, but tags gives you more choices.
Assign tags to features or scenarios by using the method tag(tags) where tags can be a string,
an array of strings, or several string arguments, allowing you to assign more that one tag. To assign tags
to a variant, include the tag property whose value can be a string or an array of strings.
feature('Addition', function() {
  var dataset = [
    {tag: 'important', desc: 'one digit', number1: 1, number2: 3, result: 4},
    {tag: ['reviewed', 'regression'], desc: 'two digits', number1: 50, number2: 70, result: 120}
  ];
  scenario('Add two natural numbers', dataset, function(variant) {

    [...]

  }).tag('smoke');
  scenario('Add two real numbers', function() {

    [...]

  }).tag('smoke', 'new');
});
Once you have tagged your tests, choose what to execute using the --filter argument. You can pass a single
tag to the filter parameter and only tests tagged with that tag will be executed.
$ tartare tests.js --filter smokeOr you can execute all the tests except those tagged as "smoke" by adding a hyphen before the tag.
$ tartare tests.js --filter -smokeYour can also combine several tags with AND and OR operators, using the characters & and |, respectively.
$ tartare tests.js --filter "new&-smoke"
$ tartare tests.js --filter "reviwed|important"
And even you can use parenthesis to indicate precedence.
Note that tags can only contain uppercase/lowercase letters, numbers, and underscore.
Also note that only, skip, manual and bug are reserved and cannot be used as tags. It is because Tartare
automatically tags tests when you use .only/only: true, .skip/skip: true, .manual/manual: true and
minorBug('bugId')/minorBug: 'bugId'/majorBug('bugId')/majorBug: 'bugId', so you can filter by buggy tests,
or manual tests.
$ tartare tests.js --filter manual
$ tartare tests.js --filter -bug
CLI arguments
  Usage: tartare [options] [files]

  Options:

    -h, --help                              output usage information
    -V, --version                           output the version number
    -r, --require                           require the given module
    -R, --reporter <name>                   specify the reporter to use [gherkin]
    -O, --reporter-options <k=v,k2=v2,...>  reporter-specific options
    -t, --timeout <ms>                      set test timeout in milliseconds [10000]
    -f, --filter <filter_str>               run only tests matching <filter_str>
    -c, --colors                            force enabling of colors
    -C, --no-colors                         force disabling of colors
    --theme (dark|clear)                    set the color theme to be used with the gherkin reporter [dark]
    --no-interactive                        disable interactive features
    -B, --no-bail                           prevent from bailing after first step failure
    --no-exit                               require a clean shutdown of the event loop: Tartare will not call process.exit
    --no-timeouts                           disables timeouts
    --recursive                             include sub directories
    --reporters                             display available reporters
-r, --require
This option is useful to load modules before executing the test suite. Since the required modules are not
assigned to any variable, it works with modules that modify prototypes or add properties to the
global object.
-R, --reporter
Allows you to specify the reporter that will be used, defaulting to gherkin.
-t, --timeout
Specifies the step or hook timeout (in milliseconds), defaulting to 10 seconds. If a step or hook does not finish before this timeout, it is considered as failed.
-f, --filter
Allows you to specify a filter to select what tests to run.
--theme
When using the default gherkin reporter, this options allows you to choose the color theme. It can take the value
dark (default) for consoles with a dark background, or clear for consoles with a clear background.
--no-interactive
Disable interactive features such as printing step descriptions during their execution, reprinting the line once the step has finished with the final result and duration. This kind of features uses the console in a way that may not work properly on some console emulators.
-B, --no-bail
By default, Tartare stops the test suite after the first failure. If you want Tartare to execute the whole suite, reporting all the failures at the end, use this option.
Changing the timeout programmatically
If you need to change the timeout passed through the -t, --timeout argument for a specific feature, scenario,
step, or hook, invoke this.timeout(20000) passing the new timeout in milliseconds.
feature('Addition', function() {
  scenario('Add two natural numbers', function() {
    given('I have entered 50 into the calculator', function() {
      this.timeout(20000);  // This step will take more than 10 seconds
      steps.enterNumberVerySlowly(50);
    });

    [...]

  });
});
Your can also get the current timeout invoking this.timeout().
Other goodies
Tartare augments the String and RegExp objects with useful methods not available in ECMAScript 5:
-
String.prototype.startsWith(substr [, position]): determines whether a string begins with the characters of another string, returningtrueorfalse, beginning at the provided position (defaults to 0). -
String.prototype.endsWith(substr [, position]): determines whether a string ends with the characters of another string, returningtrueorfalse. If a position is provided, the string will be considered to have that length. -
String.prototype.repeat(count): Returns a string which contains the the specified number of copies of the string on which it was called. -
RegExp.escape(str): Returns the string passed as argument where each character that has a special meaning in a regular expression has been escaped (preceded by\).
So when using Tartare you can do the following:
'string'.startsWith('str'); // => true
'string'.endsWith('ing');   // => true
'copyme'.repeat(5);         // => 'copymecopymecopymecopymecopyme'
RegExp.escape('(a+^)$*/'); // => '\\(a\\+\\^\\)\\$\\*\\/'
Tartare provides you with some handy global functions:
-
sleep(ms): it is a "synchronized" version ofsetTimeoutthat can be used inside steps and hooks as synchronous code.
  given('I have entered 50 into the calculator', function() {
    steps.enterNumber(50);
    sleep(200);
});-
getTartareOptions([optionName]): Every argument passed to the Tartare CLI that is not recognized by Tartare as an own option can be queried using this function, or if it is called without arguments an object containing all the options is returned. It also works for environment variables starting withTARTARE_. CLI arguments are converted to its lowerCamelCase form, removing the leading hyphens, while environment variables starting with TARTARE_ are converted to its lowerCamelCase form, removing the leading TARTARE_ and considering each underscore as a word separator. Thus the following options are equivalent and their values can be retrieved by invokinggetTartareOptions('myCoolVariable'):
$ TARTARE_MY_COOL_VARIABLE=foo tartare tests.js
$ tartare tests.js --my-cool-variable foo-
synchronize(module): As explained above, this function wraps the functions exported by a module so they can be invoked as synchronous functions from inside steps and hooks (they can still be invoked as asynchronous functions if invoked with a callback). It only works with function following the CPS pattern (with a callback as the last argument) and you can prevent a function from being "synchronized" by adding a property nameddontSyncwith a truthy value to the function. -
promisize(module): this function wraps the functions exported by a module into a promise and insert them into the Selenium Control Flow. See more about using Tartare with Protractor and Selenium here. It only works with function following the CPS pattern and you can prevent a function from being "promisized" by adding a property nameddontPromisizewith a truthy value to the function.
Using Tartare programmatically
In addition to running Tartare from the command line, you can also use it programmatically.
var Tartare = require('tartare'),
    fs = require('fs');

// First, instantiate a Tartare instance
var tartare = new Tartare();

// Then, use the method "addFiles" to tell Tartare what files to run
var files = fs.readdirSync('tests').filter(function(file) {
    // Keep only the .js files
    return file.endsWith('.js');
});
tartare.addFiles(files);

// Now, run the tests!
tartare.run(function(failures) {
  process.on('exit', function() {
    process.exit(failures);
  });
});
You can set Tartare options when instantiating the Tartare object.
var tartare = new Tartare({
  timeout: 5000,
  reporter: 'gherkin-md',
  filter: 'regression'
});
The whole list of supported options is:
-
reporter: reporter name, defaults togherkin. -
reporterOptions: reporter-specific options. It can be an object or a string with a list of key=value pairs separated by commas. -
timeout: timeout in milliseconds. -
bail: bail on the first step failure. -
filter: expression to filter tests with. -
useColors: set whether colors can be used on console reporters. -
theme: set the color theme to be used with the gherkin reporter (dark or clear). -
interactive: enable interactive features. -
enableTimeouts: enable timeouts. - Any other options will be available through the
getTartareOptionsfunction.
You can also use the following environment variables: TARTARE_REPORTER, TARTARE_REPORTER_OPTIONS, TARTARE_TIMEOUT,
TARTARE_BAIL, TARTARE_FILTER, TARTARE_USE_COLORS, TARTARE_THEME, TARTARE_INTERACTIVE, TARTARE_ENABLE_TIMEOUTS.
The addFiles method accepts both a string (a single file) or an array of strings.
Note that you can access to the underlying Mocha object through tartare.mocha.
Testing web apps with Tartare + Protractor
You can use Tartare as a testing framework with Protractor in order to describe your tests using the Gherkin syntax while taking advantage of Protractor to test AngularJS applications.
Firstly, install both Protractor and the Protractor Tartare Framework
using npm:
$ npm install --save-dev protractor protractor-tartare tartareNote that you still need Tartare as a dependency.
Then you have to set custom as the testing framework in the Protractor config file and set the path to the
Protractor Tartare Framework. You can also pass options to Tartare with tartareOpts.
  framework: 'custom',
  frameworkPath: require.resolve('protractor-tartare'),
  tartareOpts: {
    reporter: 'gherkin',
    timeout: 15000
  }
In order to make easier the usage of functions following the CPS pattern (with a callback) when using Protractor,
Tartare provides you with the promisize function. This function, when applied to a module, wraps all the
exported functions into promises and insert them into the
WebDriver Control Flow.
Consider you have a module with a exported CPS function:
module.exports = {
  myCoolFn: function myCoolFn(foo, bar, cb) {
    [...]
  }
};
After "promisizing" this module, the function can be used as any other Protractor function, such as element or
browser.
var steps = require('./steps-library');
promisize(steps);

feature('Addition', function() {
  scenario('Add two natural numbers', function() {
    given('I have entered 50 into the calculator', function() {
      browser.get('http://...');
      element(by.model('text')).sendKeys('abc');;
      steps.myCoolFn('foo', 'bar');
    });

    [...]

  });
});
You can prevent promisize from being applied to a function by adding an attribute named dontPromisize
with a truthy value.
var myCoolFn = function myCoolFn() {
  // Your code here
}
myCoolFn.dontPromisize = true;

module.exports = {
  myCoolFn: myCoolFn
}
Tartare also augments the WebDriver promises with a get method that allows to access object's properties
and array's elements for promises objects or arrays. It takes an argument that specify a dotted path of
property names or indexes and returns a promise that resolves to the specified property or element.
This may be used to assert some condition over an object property or an array element when such an object
or array are WebDriver promises (a function wrapped with synchronize returns this kind of promises).
Consider that you have a promise named myPromise that resolves to this object:
  {
    list: [33, 'foo'],
    bar: true
  }
Now you want to make an assertion over the second element of the list property, using the
chai-as-promised library:
expect(myPromise.get('list.1')).to.eventually.equal('foo');Using Tartare with TypeScript
To use Tartare with TypeScript you have to tell the compiler where to find the Tartare's declarations for the global
functions (feature, scenario, given, when, getTartareOptions, etc.).
Your can do it by including the following directive in a .ts file:
/// <reference types="tartare" />Or your can install Tartare's typings as a global dependency using typings:
$ npm install typings

$ node_modules/.bin/typings install github:telefonicaid/tartare#vX.Y.Z --global

