AzureDistributedService
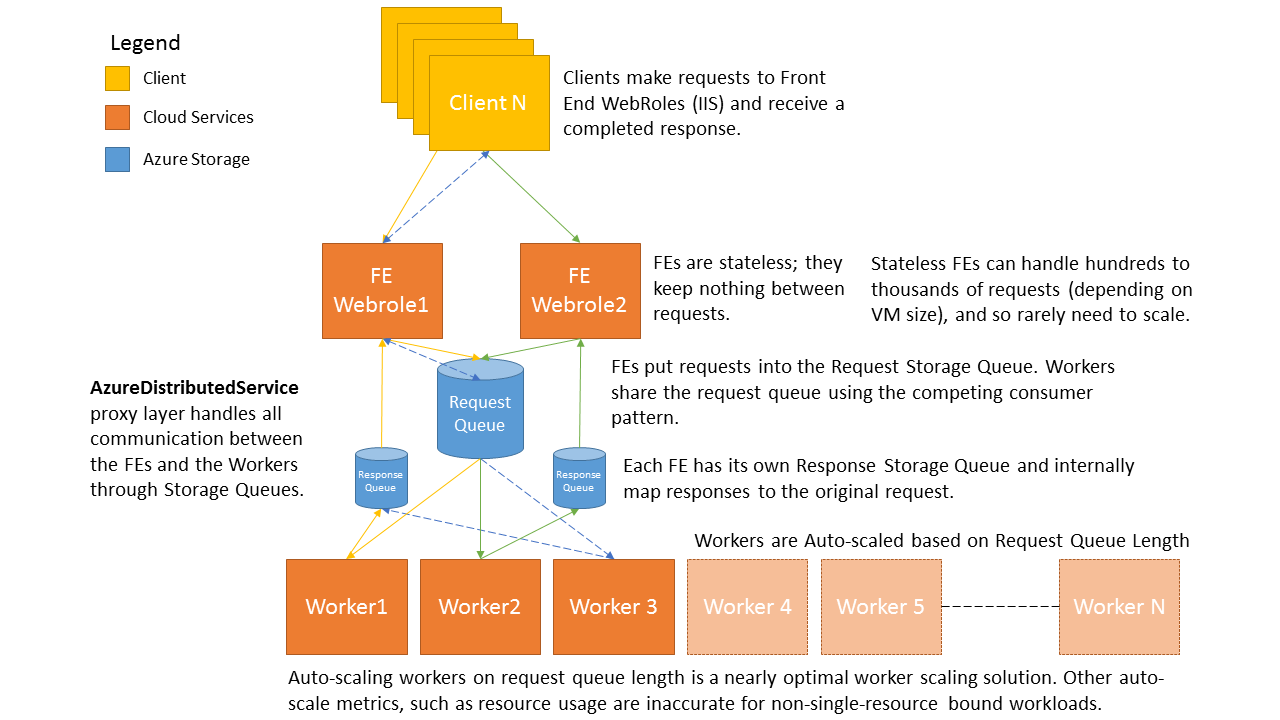
The AzureDistributedService library provides a framework for making remote procedure calls (RPC) from front-end clients (WebRoles/WebSites) to back-end VMs (WorkerRoles) using Azure Storage Queues. The system is easy to set-up and the calls look like simple RPC calls. The system internally uses .NET 4.5+ async-await pattern to allow even a pair of Extra Small front-end VMs to handle hundreds of simultaneous requests. And because the front-end communicates with the back-end through an Azure Storage Queue, the worker VMs can be auto-scaled trivially using Azure's built in auto-scaling.
Getting Started
For the best development experience, use the NuGet package https://www.nuget.org/packages/AzureDistributedService/ for referencing the library.
Start with examining the below control flow image for an explanation of the communication between the different roles.
Setting Up Your Own AzureDistributedCloudService
1) Define the TRequest and TResponse data structures based on the types of requests and responses your application uses.
2) Your FrontEnd ServiceController should accept your custom TRequest and return a TResponse
// Start your front-end
// serviceClient should be a singleton
var serviceClient = new ServiceClient<TRequest, TResponse>(
                    storageConnectionString,
                    new ServiceClientQueueNames
                    {
                        RequestQueueName = "service-request-queue",
                        ResponseQueueName = "front-end-1"
                    }, TimeSpan.FromSeconds(0.01));
// In your controller
return await serviceClient.SubmitRequestAsync(request, requestTimeout);
3) Your ServiceWorker should accept your custom TRequest and return TResponse. The Func passed to your ServiceWorker will call your application code to do the actual work.
// Start your worker
// serviceWorker should be a singleton
var serviceWorker = new ServiceWorker<TestRequest, TestResponse>(storageConnectionString,
                    requestQueueName: "service-request-queue",
                    ProcessRequest)
                    {
                        MaxProcessingTimeout = TimeSpan.FromSeconds(30),
                        MessagesPerRequest = 1,
                        DelayWhenNothingInQueue = TimeSpan.FromMilliseconds(100),
                        DequeueCountPoisonMessageLimit = 5
                    };

// Service worker will continue to process requests forever
// it should not return unless there is a thrown exception
await serviceWorker.ProcessRequestsAsync();
protected static Task<TResponse> ProcessRequest(TRequest request)
{
    // Your code
}
4) Your clients should make web requests using a HttpClient (similar to how TestWebApiSubmitter does if calls are made from outside the DataCenter). If your clients run from within the DataCenter and each client makes many simultaneous requests, you should consider following the example in the TestServiceQueueSubmitter and have each client use a service client directly.
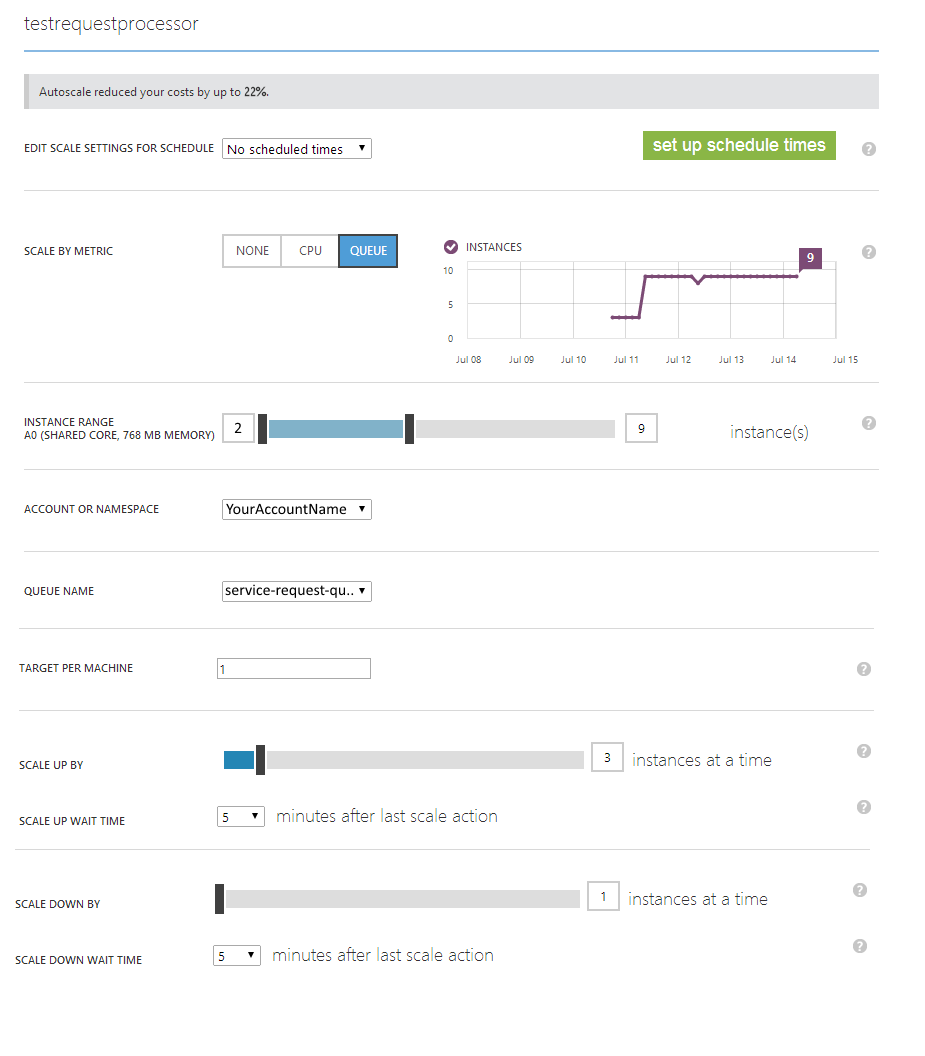
5) Setup auto-scaling in the Azure Management Portal (see sample below)
6) Deploy your Front-Ends and Worker Roles to Azure. Make calls from your clients. Enjoy your fast responses and massive scalability!
Set-up the Test Cloud Service
This project includes a working Test setup with Front-End, Back-End, and Test Clients. Only the AzureDistributedService.dll is needed for use in an application.
The three Cloud Service Roles should be deployed to your Microsoft Azure subscription. See http://azure.microsoft.com/documentation/articles/cloud-services-how-to-create-deploy/ for instructions. The Roles and console application settings should have the same ServiceRequestQueue name and StorageConnectionString. The Role settings can be modified using the property settings on each role and the console application settings in the app.config.
You can control the transactions per second (TPS) in the TestRequestSubmitter settings by adjusting the TPS and TotalTransactions settings. Expect to get around 3/5 of the target TPS due to delays in the request submitter sending requests and latency in request processing; the most important health metric is the latency per transaction since most applications won't normally have single clients sending hundreds of requests per second. You should also update the ServiceUri for WebAPI based requests to correspond to your service name, otherwise you'll get exceptions in the TestRequestSubmitter and console application. Once the settings are updated, you can deploy your Roles to Azure. They will immediately start sending requests and recording the resulting TPS and Avg Latency to the DistributedServiceTestResults table. Exceptions will be recorded to the DistributedServiceExceptions table.
Once the Roles are running, you can start the console tests in debug mode to see verbose output of client behaviour.
Use Auto-Scale to Reduce Latency
If your service is using the default TPS settings (50TPS webapi / 50TPS direct queue requests for each submitter), you might be seeing higher than expected avg latency. This is because more requests are being sent each second than the number of workers can handle. To alleviate this problem, turn on auto-scaling on the TestRequestProcessor worker roles. These settings can be updated on the scale tab in https://manage.windowsazure.com. After scaling up the number of worker VMs, you should see the avg request latency reduce to 40-75ms. The auto-scale task should start after five minutes and take less than 10 minutes to complete.
See the below screenshot for example auto-scale settings.
It is also recommended to scale the FrontEnds based on CPU usage. The recommended setting is to keep the FrontEnds in the 30-40% CPU range - scale up if the CPU is above 40% and scale down if below 30%. Keeping the CPU relatively low allows the FrontEnds to handle sudden spikes in usage, and gives the system some buffer time to scale up.
Expected Performance with Test Setup (with auto-scaling)
- VMs: 2-10 Front-Ends (Extra Small) and 2-20 Workers (Extra Small)
- Requests Per Second: 120 (60 FE/60 direct to queue), scale up the number of TestRequestSubmitter instances to increase the requests per second.
- Avg Latency WebAPI: 65-75ms
- Avg Latency Direct Queue Requests: 40-60ms
The Test Set-up Cloud Service Roles
TestServiceFrontEnd Role
This Role is a basic WebAPI WebRole. The Front-End has the single responsibility of receiving REST requests from the clients and sending them to the ServiceClient, then receiving the response from the ServiceClient and passing it back through the REST controller WebAPI. It uses the AzureDistributedService.ServiceClient class for communication. The only code modified from the initial WebRole code is in the ServiceController.cs and UnityConfig.cs. Within the UnityConfig.cs the ServiceClient instance is registered to receive TestRequests and return TestResponses. In the ServiceController.cs Post requests are submitted to the serviceClient then asynchronously awaited for responses.
TestRequestProcessor Role
This Role is a WorkerRole. It uses the AzureDistributedService.ServiceWorker class for communication. The worker receives requests from the ServiceRequestQueue through the ServiceWorker class, uses the application specific code to process the request, then places the result into the response queue for the front-end that sent the request.
In the WorkerRole.cs entry point the TestWorker is started. The TestWorker initializes a ServiceWorker and passes it the ProcessRequest method for processing TestRequests. The ProcessRequest method is a simple example of application specific code that takes TestRequests and returns TestResponses. This method is where your application specific code would go.
You can adjust the number of messages per request to cause the workers to process more messages at a time. These messages will still be processed sequentially, but will not require multiple queries against the service request queue. This can increase the usage of your workers and reduce the number of queue requests, but will also increase the request latency when the load is light. If you have a consistently heavily loaded system, increasing this number may help get more work done with fewer workers.
You can also adjust the MaxProcessingTimeout. After this amount time requests will time out on the worker and be put back into the queue for another worker to process. Be careful with adjustments to this number. If you choose a number that is too low you may have requests that can never be processed because they always take longer than the timeout. If you choose a number that is too high you may have a worker holding a request for long periods, when the worker itself has an issue and is unable to process the request. It is important to test how long is acceptable for processing a request in your system.
Last, you can adjust the DequeueCountLimit. This number indicates the number of times a request can be dequeued and attempted to be processed before it is considered a poison message and deleted. If it is deleted, the front-end will never get a response and will time out and return a TimeoutException to the client.
TestRequestSubmitter Role/ConsoleApplication
These are test classes that simulate a set of clients making rapid requests. There are two kinds of requests submitted: WebAPI and direct queue requests.
WebAPI requests are the recommended request type for clients that will be outside of Azure or in a different DataCenter than the AzureDistributedCloudService. This is recommended because it allows the FrontEnd Roles to handle many simultaneous requests and poll on the response queue to receive batches of responses. This keeps all polling action within the DataCenter for efficiency and to minimize bandwidth cost.
The direct Queue Requests are recommended if you have clients that will be in the same DataCenter as the AzureDistributedCloudService and will be making many requests to the service. Calling the service request queue directly causes the client to act as both a client and a FrontEnd. It will submit a request or requests and then poll the queue for responses. This can save around 15ms in comparison to using the WebAPI, but is inefficient (and usually slower) if done from outside the DataCenter.
Scalability of the AzureDistributedService (a polling system)
Nowadays polling is often considered anathema and is practically a curse word. However, an exception to this rule where polling is highly efficient is in a producer-consumer work-flow. The competing consumers pattern (http://msdn.microsoft.com/en-us/library/dn568101.aspx) allows work to be easily distributed among a set of workers.
When built on top of Azure Storage Queues, polling becomes efficient and cheap. As of writing this readme, a single queue can serve 2000 requests per second and queue request costs $0.005 per 100,000 requests (http://azure.microsoft.com/en-us/pricing/details/storage/). A worker running at 10 requests per second will cost around $0.04 cents per day if constantly polling. With three workers polling 10 times per second it will rarely be more than 30ms before the first request is picked up for processing. And if the workers are consistently supplied with requests, they won't wait between requests and will start processing the next request immediately. This means with high worker utilization there will be little polling; the workers are always being fully utilized and completing the queued requests. With auto-scaling, the number of workers will be automatically adjusted so that they are always highly utilized. Auto-scale based on queue length is effective because the number of requests in the queue is an actual representation of the amount of work to be done. Compared to auto-scaling on CPU, Latency, Memory, or other metrics, queue based scaling is significantly more precise.
The AzureDistributedService adds to the competing consumers pattern by allowing responses to be sent back to the Front-End Roles in a simulated RPC style. RPC style programming is attractive because RPC calls look like local method calls, but most RPC solutions don't scale well because the Front-Ends need to "know" the workers. Managing the worker mapping can be a complex and often expensive task. This expense causes a low maximum ratio of Front-Ends to workers. With AzureDistributedService, the front-ends don't know the workers at all, which allows the workers to scale independently. This means that a small number of Front-Ends can provide work for a large number of back-end workers. This is effective because the Front-Ends can handle many more requests than the workers.
The Front-End will only poll responses if it has made a request and is expecting a response. If it is expecting multiple responses, the responses are picked up in batches and sent back to the clients immediately. Which means there is a minimal amount of polling, and requests can be completed quickly. Because the requests are being handled asynchronously, they do not hold onto threads, and a single large VM Front-End can handle thousands simultaneous requests, even an extra-small VM can handle hundreds of simultaneous requests.
This decoupled relationship between the Clients <-> FrontEnd <-> Workers makes for a low-latency and highly scalable cloud service.
