![]()
Zebra Image 

A single-file, lightweight PHP library designed for efficient image manipulation featuring methods for modifying images and applying filters
Use Zebra Image to resize, flip, rotate, crop and sharpen images. The library supports loading and saving images in the BMP, GIF, JPEG, PNG and WEBP formats and preserves transparency of GIF, PNG8, PNG24 and WEBP images, and it doesn't require any external libraries other than the GD2 extension (with which PHP usually comes pre-compiled with).
All the filters supported by PHP can be applied to images. These filters include negate, grayscale, brightness, contrast, colorize, edgedetect, emboss, gaussian blur, selective blur, mean removal, smooth and pixelate. Multiple filters can be applied at once for creating custom filters.
The code is heavily commented and generates no warnings/errors/notices when PHP's error reporting level is set to E_ALL.
Using this library you can resize images to exact given width and height and still maintain aspect ratio by using one of the following methods:
-
the image will be scaled so that it will fit in a box with the given width and height and then it will be centered both horizontally and vertically in the box. The blank area will be filled with a specified color.
-
the image will be scaled so that it could fit in a box with the given width and height but will not be enclosed in a box with given width and height
-
after the image has been scaled so that its width and height are equal or greater than the required width and height respectively, a region of required width and height will be cropped from the top left corner of the resulted image.
-
after the image has been scaled so that its width and height are equal or greater than the required width and height respectively, a region of required width and height will be cropped from the center of the resulted image.
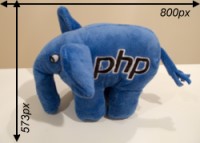
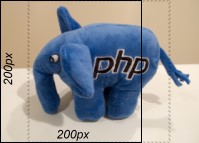
Here are the results of resizing a 800×573 pixels image to a 200×200 pixels image and preserving the aspect ratio by using each of the aforementioned methods:
|
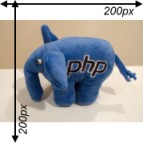
Method 1 After the image is resized to 200x143 pixels representing the size of the image that would fit in a 200x200 pixels box while preserving its aspect ratio, it is centered both horizontally and vertically in a 200x200 pixels box. In our example the background is white but it can be set to any color. The resulting image has 200x200 pixels. |
|
|
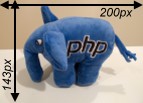
Method 2 The image is resized to 200x143 pixels representing the size of the image that would fit in a 200200 pixels box while preserving its aspect ratio. |
|
|
|
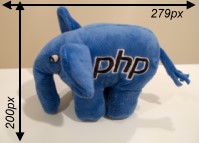
Method 3 & 4 Step 1: The image is first resized to 279x200 pixels representing the size closest to the required size where the image's width and height are both equal or greater than the required width and height respectively, while preserving its aspect ratio. |
|
|
| Step 2: A 200x200 pixels area will be cropped from the top-left corner of the image (for method 3) or from the center of the image (for method 4). |
|
Features
- can be used to resize, flip, rotate, crop and sharpen images
- supports handling of BMP, GIF, JPG, PNG and WEBP images
- all the filters supported by PHP can be applied to images: negate, grayscale, brightness, contrast, colorize, edgedetect, emboss, gaussian blur, selective blur, mean removal, smooth and pixelate; multiple filters can be applied at once for creating custom filters;
- images can be resized to exact sizes and maintaining aspect ratio by automatically cropping them
- preserves transparency of GIF, PNG8, PNG24 and WEBP images
- supports creation of interlaced JPEG images
- code is heavily commented and generates no warnings/errors/notices when PHP's error reporting level is set to E_ALL
- can automatically fix incorrect image orientation
- has awesome documentation
📔 Documentation
Check out the awesome documentation!
🎂 Support the development of this project
Your support is greatly appreciated and it keeps me motivated continue working on open source projects. If you enjoy this project please star it by clicking on the star button at the top of the page. If you're feeling generous, you can also buy me a coffee through PayPal or become a sponsor. Thank you for your support! 🎉
Requirements
PHP 5+, bundled GD 2.0.28+ (PHP 7.0.0+ for WEBP support, PHP 7.2.0+ for BMP support)
PHP needs to be compiled with --enable-exif (Windows users enable php_mbstring.dll and php_exif.dll extensions in php.ini) for auto-fixing image rotation so images are always shown correctly regardless of how the camera was held when the pictures were taken.
Installation
You can install Zebra Image via Composer
# get the latest stable release
composer require stefangabos/zebra_image

# get the latest commit
composer require stefangabos/zebra_image:dev-master
Or you can install it manually by downloading the latest version, unpacking it, and then including it in your project
require_once 'Zebra_Image.php';How to use
<?php

// load the image manipulation class
// (you don't need this if you are using Composer)
require 'path/to/Zebra_Image.php';

// create a new instance of the class
$image = new Zebra_Image();

// if you handle image uploads from users and you have enabled exif-support with --enable-exif
// (or, on a Windows machine you have enabled php_mbstring.dll and php_exif.dll in php.ini)
// set this property to TRUE in order to fix rotation so you always see images in correct position
$image->auto_handle_exif_orientation = false;

// indicate a source image (a GIF, PNG, JPEG or WEBP file)
$image->source_path = 'path/to/image.png';

// indicate a target image
// note that there's no extra property to set in order to specify the target
// image's type -simply by writing '.jpg' as extension will instruct the script
// to create a 'jpg' file
$image->target_path = 'path/to/image.jpg';

// since in this example we're going to have a jpeg file, let's set the output
// image's quality
$image->jpeg_quality = 100;

// some additional properties that can be set
// read about them in the documentation
$image->preserve_aspect_ratio = true;
$image->enlarge_smaller_images = true;
$image->preserve_time = true;
$image->handle_exif_orientation_tag = true;

// resize the image to exactly 100x100 pixels by using the "crop from center" method
// (read more in the overview section or in the documentation)
//  and if there is an error, check what the error is about
if (!$image->resize(100, 100, ZEBRA_IMAGE_CROP_CENTER)) {

    // if there was an error, let's see what the error is about
    switch ($image->error) {

        case 1:
            echo 'Source file could not be found';
            break;
        case 2:
            echo 'Source file is not readable';
            break;
        case 3:
            echo 'Could not write target file';
            break;
        case 4:
            echo 'Unsupported source file type';
            break;
        case 5:
            echo 'Unsupported target file type';
            break;
        case 6:
            echo 'GD library version does not support target file format';
            break;
        case 7:
            echo 'GD library is not installed';
            break;
        case 8:
            echo '"chmod" command is disabled via configuration';
            break;
        case 9:
            echo '"exif_read_data" function is not available';
            break;

    }

// if no errors
} else echo 'Success!';

