

LabGym can:
- TRACK multiple animals / objects without restrictions on recording environments
- IDENTIFY user-defined social or non-social behaviors without restrictions on behavior types / animal species
- QUANTIFY user-defined behaviors by providing quantitative measures for each behavior
- MINE the analysis results to show statistically significant findings
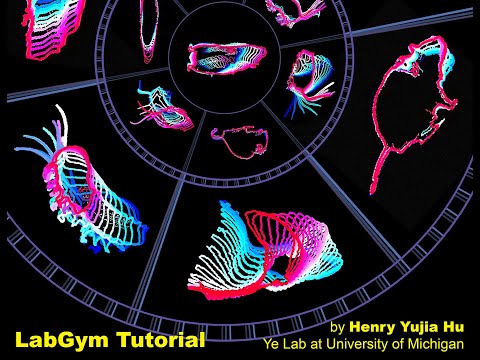
A tutorial video for a high-level understanding of what LabGym can do, how it works, and how to use it:
Cite LabGym: https://www.cell.com/cell-reports-methods/fulltext/S2667-2375(23)00026-7.
For installation instructions and documentation, please see https://labgym.readthedocs.io.
Note
We are currently in the process of migrating documentation to the above website. If you can't find information you're looking for there, refer to the extended user guide for a more detailed reference on how to use LabGym.
LabGym is equipped with three distinct modes of behavior identification to suit different scenarios:
-
'Interactive advanced'
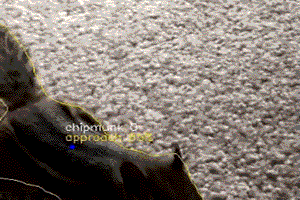
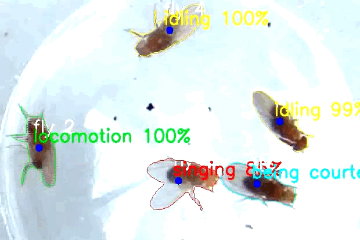
This mode is for analyzing the behavior of each individual in a group of animals or objects. Below are two examples. Left: LabGym can differentiate between a finger 'holding a peanut' vs. 'offering a peanut', discern whether a chipmunk is 'taking the offer' or 'loading peanut', and identify the status of the peanut itself as 'being held', 'being taken', or 'being loaded'. Right: it can distinguish in a group of flies which fly is 'singing’ a courtship song, which one is ‘being courted’, which one is ‘resting’, and which one is ‘locomotion’.


-
'Interactive basic'
Optimized for speed, this mode considers the entire interactive group (2 or more individuals) as an entity, streamlining the processing time compared to the 'Interactive advanced' mode. It is ideal for scenarios where individual behaviors within the group are uniform or when the specific actions of each member are not the primary focus of the study.


-
'Non-interactive'
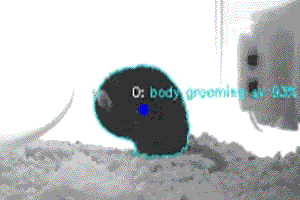
This mode is for identifying solitary behaviors of individuals that are not engaging in interactive activities. It is suitable for studies where the emphasis is on non-social or independent behaviors.


LabGym computes a range of motion and kinematics parameters for each behavior defined by users. The parameters include count, duration, and latency of behavioral incidents, as well as speed, acceleration, distance traveled, and the intensity and vigor of motions during the behaviors. LabGym outputs these parameters in spreadsheets.
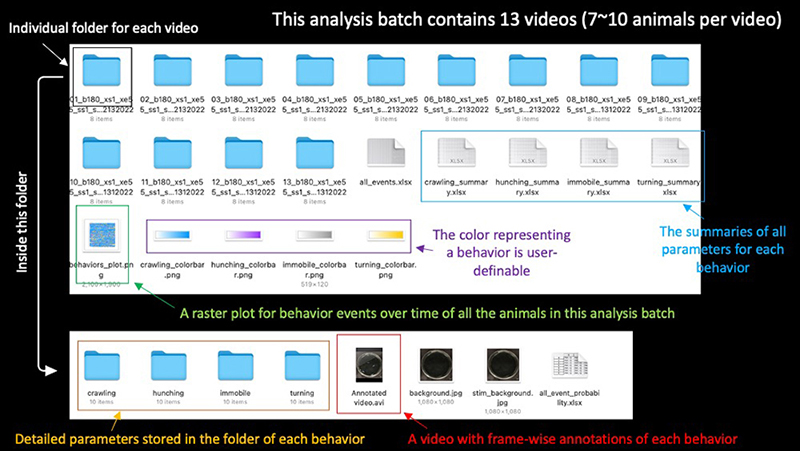
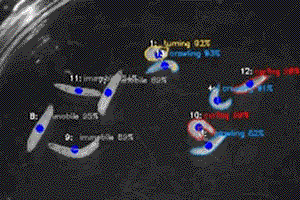
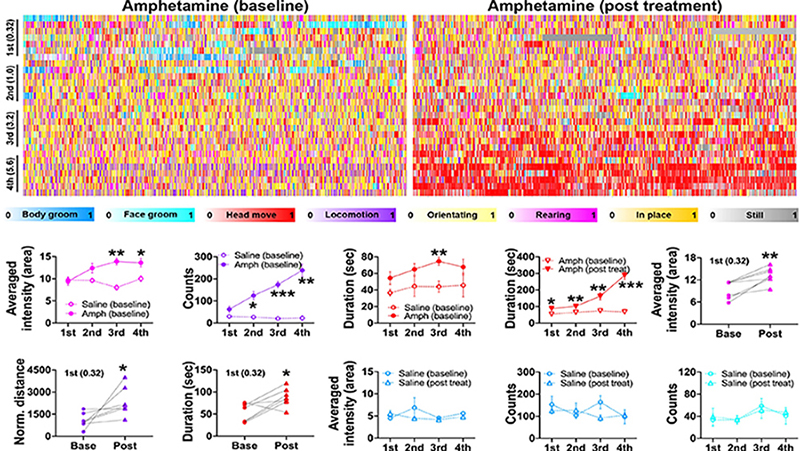
LabGym also provides visualization of analysis results, including annotated videos that visually mark each behavior event, temporal raster plots that show every behavior event overtime. The temporal raster plots below were output by LabGym and show the changes in behavior events of rodent before and after amphetamine treatments (See detailed explanation in Hu et al. (2023) Cell Reports Methods 3(3): 100415).
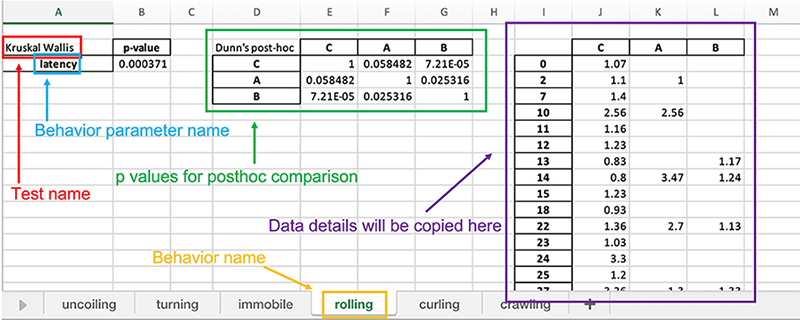
LabGym outputs diverse spreadsheets that store the behavior parameters that it calculates. It is labor intensive to dig into these spreadsheets manually for statistical analysis across different experimental groups and behavioral types and parameters. To address this, LabGym contains a data-mining module that automatically performs the statistical tests on every behavioral parameter across the experimental groups of your choice. The data-mining result below displays the details of the comparisons that show statistically significant differences between groups.
LabGym eliminates the need for coding due to its intuitive user interface, ensuring ease of use for all users regardless of their programming skills. While the software operates efficiently without GPUs, it can achieve enhanced speed on systems equipped with NVIDIA GPUs and the CUDA toolkit (version==11.7) installed.
Extended user guide: (https://github.com/yujiahu415/LabGym/blob/master/LabGym%20user%20guide_v2.2.pdf).
Put your mouse cursor above each button in the user interface to see a detailed description for it.
LabGym comprises three modules, each tailored to streamline the analysis process. Together, these modules create a cohesive workflow, enabling users to prepare, train, and analyze their behavioral data with accuracy and ease.
-
'Preprocessing Module': This module is for optimizing video footage for analysis. It can enhance video contrast to make the relevant details more discernible. It can trim videos to focus solely on the necessary time windows. It can also crop frames to remove irrelevant regions.
-
'Training Module': Here, you can customize LabGym according to your specific research needs. You can train a Detector in this module to detect animals or objects of your interest in videos. You can also train a Categorizer to recognize specific behaviors that are defined by you.
-
'Analysis Module': After customizing LabGym to your need, you can use this module for automated behavioral analysis in videos. It not only outputs comprehensive analysis results but also delves into these results to mine significant findings.
Follow these three steps (three buttons in the ‘Training Module’):
-
'Generate Behavior Examples': Use this button to input your video files and let LabGym generate behavior examples from these videos. Each behavior example is comprised of an Animation paired with a Pattern Image, spanning a specific behavior episode that is defined by you.
-
'Sort Behavior Examples': Once your behavior examples are generated, use this button to select appropriate examples and sort them according to their behavior types.
-
'Train Categorizers': Finally, use this button to feed the sorted behavior examples into the system to train a Categorizer. The trained Categorizer is stored in LabGym and can categorize these behaviors automatically in future analyses.
LabGym has three modes of behavior identification, so it offers three modes for behavior examples:
-
'Interactive advanced'
In this mode, each pair of Animation and Pattern Image highlights an entire interactive group, with a 'spotlight' focusing on the main character. The categorization is based on the main character’s behavior. In the example below, behaviors of the chipmunk ('taking the offer'), the peanuts ('being taken' and 'being held'), and the hand ('offering peanut') can be distinguished.

-
'Interactive basic'
This mode captures all relevant animals or objects in each pair of Animation and Pattern Image. Sort these as one collective unit. In the following example of fly courtship behavior, behaviors like 'orientating', 'singing while licking', and 'attempted copulation' could be categorized, focusing on specific actions like the courtship steps of a male fly while disregarding the female's response, if the research focuses only on male courtship behaviors.

-
'Non-interactive'
Each pair of Animation and Pattern Image in this mode represents a 'monodrama', focusing solely on individual animals or objects without interaction.


LabGym employs two distinct methods for detecting animals or objects in different scenarios.
-
Subtract background
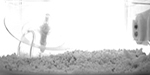
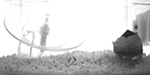
This method is fast and accurate but requires stable illumination and static background in videos to analysis. It does not require training neural networks, but you need to define a time window during which the animals are in motion for effective background extraction. A shorter time window leads to quicker processing. Typically, a duration of 10 to 30 seconds is adequate.
How to select an appropriate time window for background extraction?
To determine the optimal time window for background extraction, consider the animal's movement throughout the video. In the example below, in a 60-second video, selecting a 20-second window where the mouse moves frequently and covers different areas is ideal. The following three images are backgrounds extracted using the time windows of the first, second, and last 20 seconds, respectively. In the first and last 20 seconds, the mouse mostly stays either in left or right side and moves little and the extracted backgrounds contain animal trace, which is not ideal. In the second 20 seconds, the mouse frequently moves around and the extracted background is perfect:


-
Use trained Detectors
This method incorporates Detectron2 (https://github.com/facebookresearch/detectron2), offering more versatility but at a slower processing speed compared to the ‘Subtract Background’ method. It excels in differentiating individual animals or objects, even during collisions, which is particularly beneficial for the 'Interactive advanced' mode. To enhance processing speed, use a GPU or reduce the frame size during analysis. To train a Detector in ‘Training Module’:
- Click the ‘Generate Image Examples’ button to extract image frames from videos.
- Use free online annotation tools like Roboflow (https://roboflow.com) to annotate the outlines of animals or objects in these images. For annotation type, choose 'Instance Segmentation', and export the annotations in 'COCO instance segmentation' format, which generates a ‘*.json’ file. In 'Interactive advanced' mode, focus on images where individuals collide and annotate these boundaries precisely. Exposing the Detector to a variety of collision scenarios during training can significantly minimize identity switching in subsequent analyses.
- Use the ‘Train Detectors’ button to input these annotated images and commence training your Detectors.


Please refer to the installation instructions in the documentation.
To report an issue with LabGym, refer to the walkthrough in the documentation.


