pizero-gpslog


Raspberry Pi Zero gpsd logger with status LEDs.
A longer description of the motivation behind this and the specific hardware that I used is available on my blog: DIY Raspberry Pi Zero GPS Track Logger.
Introduction and Goals
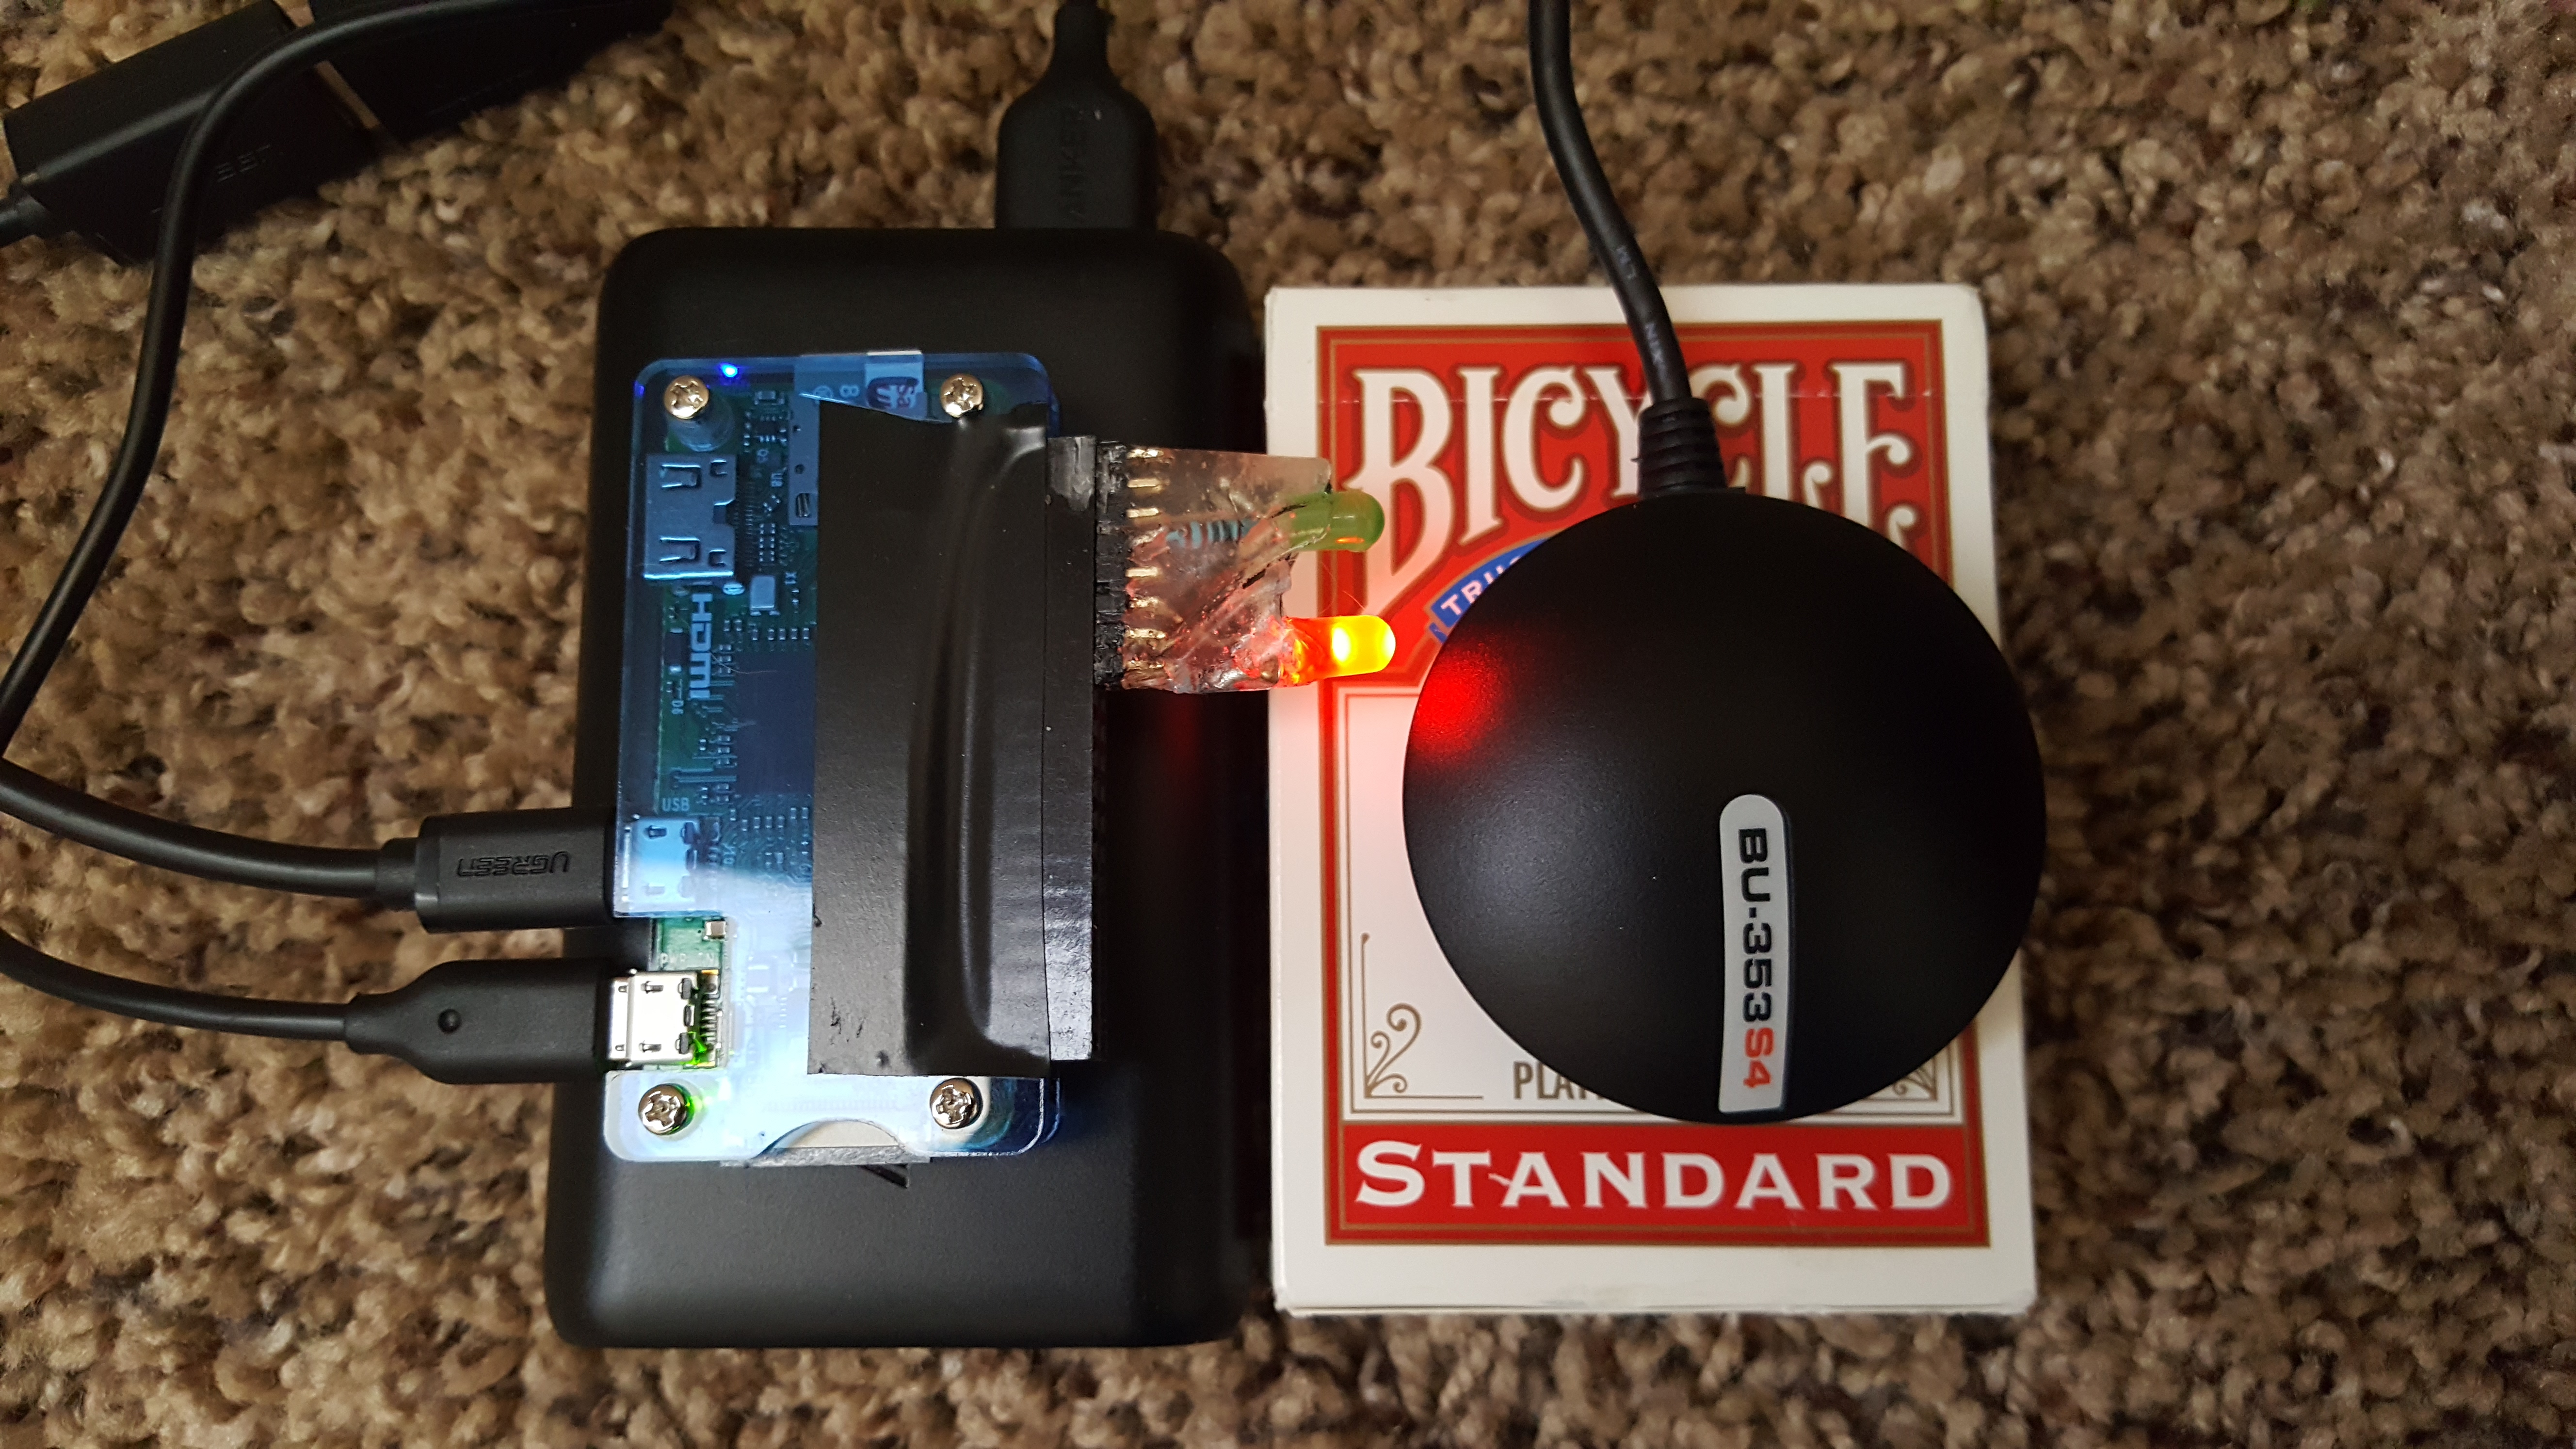
This is a trivial (and not really "supported") project of mine to couple a Raspberry Pi Zero with a USB GPS receiver and a battery pack to GPS track my hikes. The hardware decision was mainly based on what I had lying around: a Raspberry Pi Zero, a 10,000mAh external battery pack for my cell phone, and a USB GPS (well, I thought I had one, and got far enough into the project when I decided it was missing for good that I bought another).
The goal is to package all of this together into a "small" (but not necessarily lightweight, based on the components) package that I can put in the outside pocket of my hiking pack, and record an accurate and detailed GPS track of my hikes. It writes the most recent position data from gpsd to disk at a user-defined interval, flushes IO after each write (so that it's safe to just pull the power on the Pi), and uses two LEDs to indicate status while in the field. Data is written in gpsd's native format, but a conversion tool is provided.
This program relies on gpsd to interact with the GPS itself, as it's very mature and stable software, exposes a simple JSON-based socket interface, and also has decent Python bindings. There's no reason for a logger to have to worry about the nuances of GPS communication itself.
Requirements
- Raspberry Pi (tested with Pi Zero 1.3) and a MicroSD card (I'm using an 8GB SanDisk Ultra Class 10 UHS-1, which has enough space after the OS for 240 days of 5-second-interval data).
- Raspberry Pi OS with Python3 (see installation instructions below)
- gpsd compatible GPS (I use a GlobalSat BU-353-S4 USB; the gpsd folks say some pretty awful things about it, but we'll see...)
- Recommended, one of: * Two GPIO-connected LEDs on the RPi, ideally different colors (see below). * A bitmap display, such as the Waveshare 2.13 inch E-Ink Display Hat (B), which I got on Amazon for $25 USD. While e-Ink displays are comparatively sluggish (this one takes an astonishing 15 seconds to re-draw the screen), they offer some major advantages for this purpose: they have very low power consumption, and the displayed information stays visible until the next refresh even without power. This means that if you have a GPS display that refreshes every minute, it will still show the last coordinates as of when it lost power. The one I purchased is also fully assembled and just connects directly to the Pi's 40-pin header. * An adafruit 4567 2.23" Monochrome OLED Bonnet OLED. This is much brighter than the e-Ink and can refresh at up to 30Hz, but draws more power. Good if you're using this in your vehicle and have "unlimited" power. * Some other variety of display, if you're willing to write a driver class for it. See below for further information.
- Some sort of power source for the Pi. I use a standard adapter when testing and a 10000mAh USB battery pack in the field (specifically the Anker PowerCore Speed 10000 QA). That battery pack is extreme overkill, and powers the unit continuously for 42 hours, when logging at a 5-second interval.
Software Installation
This assumes you're running on Linux...
- Download the latest Raspberry Pi OS Lite image. I'm using the "May 2020" version, released 2020-05-27, kernel 4.19.
- Verify the checksum on the file and then unzip it.
- Put the MicroSD card in your machine and write the image to it. As root,
dd bs=4M if=2020-05-27-raspios-buster-lite-armhf.img of=/dev/sdX conv=fsync status=progress(where/dev/sdXis the device that the SD card showed up at). - Wait for the copy to finish and IO to the device to stop (run
sync). - Optional: If you're going to be using this on a network (i.e. for setup, troubleshooting, development, etc.) then this would be a good time to mount the Raspian partition on your computer and make some changes. See setup_pi.sh for an example.
- Copy your authorized_keys file over to
/home/pi.- Touch the file at
/boot/sshon the Pi boot partition to enable SSH access.- Set a hostname.
- If desired, configure WiFi (as well as downloading the packages for any required drivers onto the OS partition).
- When finished, unmount,
syncand remove the SD card.
- Put the SD card in your Pi and plug it in. If you're going to be connecting directly with a keyboard and monitor, do so. If you configured WiFi (or want to use a USB Ethernet adapter) and have everything setup correctly, it should eventually connect to your network. If you have issues with a USB Ethernet adapter, try letting the Pi boot up (give it 2-3 minutes) and then plug in the adapter.
- Log in. The default user is named "pi" with a default password of "raspberry". Run sudo raspi-config to set things like the locale and timezone. Personally, I usually leave the
piuser password at its default for devices that will never be on an untrusted network. If using a SPI display, enable the SPI kernel module viaraspi-config. If you're using an I2C display, enable the I2C module. Reboot as needed. sudo apt-get update && sudo apt-get install haveged git python3-gpiozero python3-setuptools python3-pip gpsd python-gps- If using a display such as the one recommended:
sudo apt-get install python3-numpy && sudo pip3 install RPi.GPIO - Run
sudo pip3 install pizero-gpslog && sudo pizero-gpslog-install. The installer,pizero-gpslog-install, templates out a systemd unit file, reloads systemd, and enables the unit. Environment variables to set for the service are taken from command line arguments; seepizero-gpslog-install --helpfor details. They can be changed after install by editing/etc/systemd/system/pizero-gpslog.service - Find out the USB vendor and product IDs for your GPS. My BU-353S4 uses a Prolific PL2303 serial chipset (vendor 067b product 2303) which is disabled by default in the Debian gpsd udev rules because it matches too many devices. Look at
/lib/udev/rules.d/60-gpsd.rules. If your GPS is commented out like mine, uncomment it and save the file. - If you're ready,
sudo systemctl start pizero-gpslogto start it. Otherwise, it will start on the next boot.
Hardware Installation & Setup
GPS
This should be pretty simple. Plug your GPS into the USB input on the RPi, via a "usb on the go" (USB OTG) cable.
LED Indicators for GPS Fix & Disk Write
The simplest status indication adds two LEDs to the Pi Zero. I prefer to solder a female right-angle header to the Pi, then put the LEDs on a male header so they can be removed. gpiozero, the library used for controlling the LEDs, has pinout diagrams and information on the wiring that the API expects. The code this project uses expects the LEDs to be wired active-high (cathode to ground, anode to GPIO pin through a limiting resistor). I made up a small 8x20 header for my LEDs and (very sloppily) potted them in epoxy.
The LEDs are configured using the LED_PIN_RED and LED_PIN_GREEN environment variables, as described in the Configuration section.
The LED outputs are as follows:
- Green Solid (at start) - connecting to gpsd. Green LED goes out when connected to gpsd and the output file is opened for writing.
- Red Solid - no active GPS (gpsd does not yet have an active gps, or no GPS is connected).
- Red 3 Fast Blinks (0.1 sec) - GPS is connected but does not yet have a fix.
- Red 2 Slow Blinks (0.5 sec) - GPS has a 2D-only fix; position data is being read.
- Red 1 Slow Blink (0.5s) - GPS has a 3D fix; position data is being read.
- Green Blink (0.25s) - Data point written to disk (and flushed, if flush not disabled).
Waveshare 2.13-inch e-Ink Display Hat B
This 128x32 monochrome OLED display has a fixed pinout, and plugs directly in to the Pi's 40-pin GPIO header. You must enable SPI via ``raspi-config`` before it will work. The display is extremely sluggish, and takes approximately 15 seconds to redraw the image. It does not support partial re-draw, though some of their other models do.
This display has a driver built-in to pizero-gpslog. To use the display, set DISPLAY_CLASS to pizero_gpslog.displays.epd2in13bc:EPD2in13bc.
Displays can be tested with some sample data using the pizero-gpslog-screentest entrypoint.
Adafruit 4567 2.23" Monochrome OLED Bonnet
This display uses I2C and connects to the Pi's 40-pin GPIO header. You must enable I2C via ``raspi-config`` before it will work. The display refreshes quite quickly (up to 30Hz) but draws considerably more power than the e-Ink displays.
This display driver requires the installation of the adafruit-circuitpython-ssd1305 Python package.
This display has a driver built-in to pizero-gpslog. To use the display, set DISPLAY_CLASS to pizero_gpslog.displays.adafruit4567:Adafruit4567.
Displays can be tested with some sample data using the pizero-gpslog-screentest entrypoint.
Your Own Display
pizero-gpslog can support "any" display that's capable of rendering text. To implement a display driver class, create a subclass of pizero_gpslog.displays.base.BaseDisplay and implement at least the required methods and properties, as well as whatever internals your display needs. See the Adafruit4567 class as an example. While it is strongly encouraged for you to contribute any display drivers back to the project via pull requests, the import system used can import any class from any importable module.
Displays can be tested with some sample data using the pizero-gpslog-screentest entrypoint.
Extra Data Providers
It's possible to have a dict of arbitrary data from a "data provider" - a class to read any arbitrary sensor - included in each GPS location line in the output file. Extra Data Providers must be classes which are subclasses of pizero_gpslog.extradata.base.BaseExtraDataProvider, implement all of its methods, and set self._data to a dict. the dict should have two keys: message, a string message suitable for a line on a display (e.g. 20 characters or less), and data, an arbitrary JSON-encodeable dict.
Data providers are enabled by setting the EXTRA_DATA_CLASS environment variable to the module name and class name in colon-separated format.
Two data providers are included:
- Dummy ExtraData can be generated by running with
EXTRA_DATA_CLASS=pizero_gpslog.extradata.dummy:DummyData - GQ Electronics GMC-series geiger counter sensors can be enabled by running with
EXTRA_DATA_CLASS=pizero_gpslog.extradata.gq_gmc500plus:GqGMC500plus. This currently requires using my fork, i.e.pip install git+https://gitlab.com/jantman/gmc.git@jantman-fixes-config
Configuration
pizero-gpslog's entire configuration is provided via environment variables. There are NO command-line switches. By default, these are set in /etc/systemd/system/pizero-gpslog.service by the pizero-gpslog-install installer script and need to be updated in that file.
-
LOG_LEVEL- Defaults to "WARNING"; other accepted values are "INFO" and "DEBUG". All logging is to STDOUT. -
LED_PIN_RED- Integer. Specifies the GPIO pin number used for the primary ("red") LED. Leave unset if running on non-RPi hardware (in which case LED state will be logged to STDOUT) or if using a display. Note the number used here is the Broadcom GPIO pin number, not the physical board pin number. -
LED_PIN_GREEN- Integer. Specifies the GPIO pin number used for the secondary ("green") LED. Leave unset if running on non-RPi hardware (in which case LED state will be logged to STDOUT) or if using a display. Note the number used here is the Broadcom GPIO pin number, not the physical board pin number. -
GPS_INTERVAL_SEC- Integer. Interval to poll gps at, and write gps position. Defaults to every 5 seconds. -
FLUSH_FILE- String. If set to "false", do not explicitly flush output file after every write. -
OUT_DIR- Directory to write log files under. If not set, will use current working directory (when running via systemd, as default, this will be the current directory that the installer was run in). -
DISPLAY_CLASS- String. The colon-separated module path and class name of an importable class to drive a display. See details above on using displays. -
DISPLAY_REFRESH_SEC- Integer. The ideal/target number of seconds between display refreshes. Note that how fast a display can actually refresh is hardware-specific, and how fast you want it to refresh is based on its power consumption and your battery life. The default value for this parameter is to refresh as quickly as the display will allow! If you use a fast display, you should set this to a sane integer.
Running
Configure as described above. Plug the Pi into a power source. Everything else should be automatic after the installation described above. The pizero-gpslog systemd service should start automatically at boot.
Log Files
Log files will be written under the directory specified by the OUT_DIR environment variable, or the current working directory if that environment variable is not set. Log files will be written under that directory, named according to the time and date when the program started (%Y-%m-%d_%H-%M-%S format).
Each line of the output file is a single raw gpsd response to the ?POLL command. While this program also decodes the responses, it doesn't make sense for us to invent our own data structure for something that already has one. Each line in the output file should be valid JSON matching the gpsd JSON ?POLL response schema, deserialized and reserialized to ensure that it does not contain any linebreaks.
Getting the Data
At the moment, when I'm home from a hike and the Pi is powered down, I just pull the SD card and copy the data to my computer, then delete the data file(s) from the SD card and put it back. It would certainly be easy to automate this with a Pi Zero W or an Ethernet or WiFi connection, but it's not worth it for me for this project. If you're interested, I have some scripts and instructions that might help as part of my pi2graphite project.
Using the Data
The log files output by pizero-gpslog are in the gpsd JSON ?POLL response format, one response per line (some responses may be empty). In order to make the output useful, this package also includes the pizero-gpslog-convert command line tool which can convert a specified JSON file to one of a variety of more-useful formats. While gpsbabel is the standard for GPS data format conversion, it doesn't support the gpsd POLL response format. This utility is provided as a means of converting to some common GPS data formats. If you need other formats, please convert to one of these and then to gpsbabel.
-
pizero-gpslog-convert YYYY-MM-DD_HH:MM:SS.json- convertYYYY-MM-DD_HH:MM:SS.jsonto GPX and write atYYYY-MM-DD_HH:MM:SS.gpx -
pizero-gpslog-convert --stats YYYY-MM-DD_HH:MM:SS.json- same as above, but also print some stats to STDERR
It's up to you how to use the data, but there are a number of handy online tools that work with GPX files, including:
- gpsvisualizer.com that has multiple output formats including elevation and speed profiles (and other profiles including slope, climb rate, pace, etc.), plotting the track on Google Maps (including with colorization by speed, elevation, slope, climb rate, pace, etc.), converting to Google Earth KML, etc. Plotting can also use sources other than Google Maps, such as OpenStreetMap, ThunderForest, OpenTopoMap, USGS, USFS, etc. (and there's some explanation about how this is done).
- utrack.crempa.net Takes a GPX file and generates a HTML page "report" giving a map overlay (with optional elevation colorization) as well as elevation and speed profiles (against both time and distance), some statistics, a distance vs time profile, and the option to download that report as a PDF.
- sunearthtools.com has a simple tool (admittedly with a poor UI) that plots GPX data on Google maps along with a separate speed and elevation profile (by distance).
- mygpsfiles Is a web-based app with a native-looking tiled UI that can plot tracks on Google Maps (Satellite or Map + Topo) as well as displaying per-point statistics (distance, time, elevation, speed, pace) and a configurable profile of elevation, speed, distance, pace, etc. As far as I can tell, all units are metric.
Testing
There currently aren't any code tests. But there are some scripts and tox-based helpers to aid with manual testing.
-
pizero_gpslog/tests/data/runfake.sh- Runs gpsfake (provided by gpsd) with sample data. Takes optional arguments for--nofix(data with no GPS fix) or--stillfix(fix but not moving). - Running with
DISPLAY_CLASS=pizero_gpslog.displays.dummy:DummyDisplaywill output display lines to STDOUT. - Dummy ExtraData can be generated by running with
EXTRA_DATA_CLASS=pizero_gpslog.extradata.dummy:DummyData.
Development
Follow normal installation instructions, but instead of sudo pip3 install pizero-gpslog && sudo pizero-gpslog-install, log in as pi, and in /home/pi run git clone https://github.com/jantman/pizero-gpslog.git && cd pizero_gpslog/ && sudo python3 setup.py develop && sudo pizero-gpslog-install.
Release Process
1. Test changes locally, ensure they work as desired.
1. Ensure the version number has been incremented and there's an entry in CHANGES.rst
1. Merge PR to master branch.
1. Manually tag master with the new version number and create a GitHub Release for it.
1. The above will trigger TravisCI to build and push to PyPI.
Acknowledgements
First, many thanks to the developers of gpsd, who have put forth the massive effort to make a script like this relatively trivial.
Second, thanks to Martijn Braam, developer of the MIT-licensed gpsd-py3 package. A modified version of that package makes up the gpsd.py module.

