tomodachi ⌁ a lightweight µservice lib ⌁ for Python 3
tomodachi [友達] means friends — 🦊🐶🐻🐯🐮🐸🐍 — a suitable name for microservices working together. ✨✨
events messaging api pubsub sns+sqs amqp http queues handlers scheduling tasks microservice tomodachi
![]()


tomodachi is a library designed to make it easy for devs to build
microservices using asyncio on Python.
Includes ready implementations to support handlers built for HTTP requests, websockets, AWS SNS+SQS and RabbitMQ / AMQP for 🚀 event based messaging, 🔗 intra-service communication and 🐶 watchdog handlers.
- HTTP request handlers (API endpoints) are sent requests via the
aiohttpserver library. 🪢 - Events and message handlers are hooked into a message bus, such as a queue, from for example AWS (Amazon Web Services) SNS+SQS (
aiobotocore), RabbitMQ / AMQP (aioamqp), etc. 📡
Using the provided handler managers, the need for devs to interface with low-level libs directly should be lower, making it more of a breeze to focus on building the business logic. 🪄

tomodachi has a featureset to meet most basic needs, for example...
-
🦸⋯ Graceful termination of consumers, listeners and tasks to ensure smooth deployments. -
⏰⋯ Scheduled function execution (cron notation / time interval) for building watchdog handlers. -
🍔⋯ Execution middleware interface for incoming HTTP requests and received messages. -
💌⋯ Simple envelope building and parsing for both receiving and publishing messages. -
📚⋯ Logging support viastructlogwith template loggers for both "dev console" and JSON output. -
⛑️⋯ Loggers and handler managers built to support exception tracing, from for example Sentry. -
📡⋯ SQS queues with filter policies for SNS topic subscriptions filtering messages on message attributes. -
📦⋯ Supports SQS dead-letter queues via redrive policy -- infra orchestration from service optional. -
🌱⋯ Designed to be extendable -- most kinds of transport layers or event sources can be added.
Quicklinks to the documentation 📖
This documentation README includes information on how to get started with services, what built-in functionality exists in this library, lists of available configuration parameters and a few examples of service code.
Visit https://tomodachi.dev/ for additional documentation. 📔
Handler types / endpoint built-ins. 🛍️
- HTTP and WebSocket endpoints
- AWS SNS+SQS event messaging
- RabbitMQ / AMQP messaging
- Scheduled functions and cron
Service options to tweak handler managers. 🛠️
Use the features you need. 🌮
- Middleware functionality
- Function signature keywords
- Logging and log formatters
- OpenTelemetry instrumentation
Recommendations and examples. 🧘
Please note -- this library is a work in progress. 🐣
Consider tomodachi as beta software. This library follows an unregular
release schedule. There may be breaking changes between 0.x versions.
Usage
tomodachi is used to execute service code via command line interface
or within container images. It will be installed automatically when the
package is installed in the environment.
The CLI endpoint tomodachi is then used to run services defined as
tomodachi service classes.
Start a service with its class definition defined in ./service/app.py
by running tomodachi run service/app.py. Finally stop the service with
the keyboard interrupt <ctrl+c>.
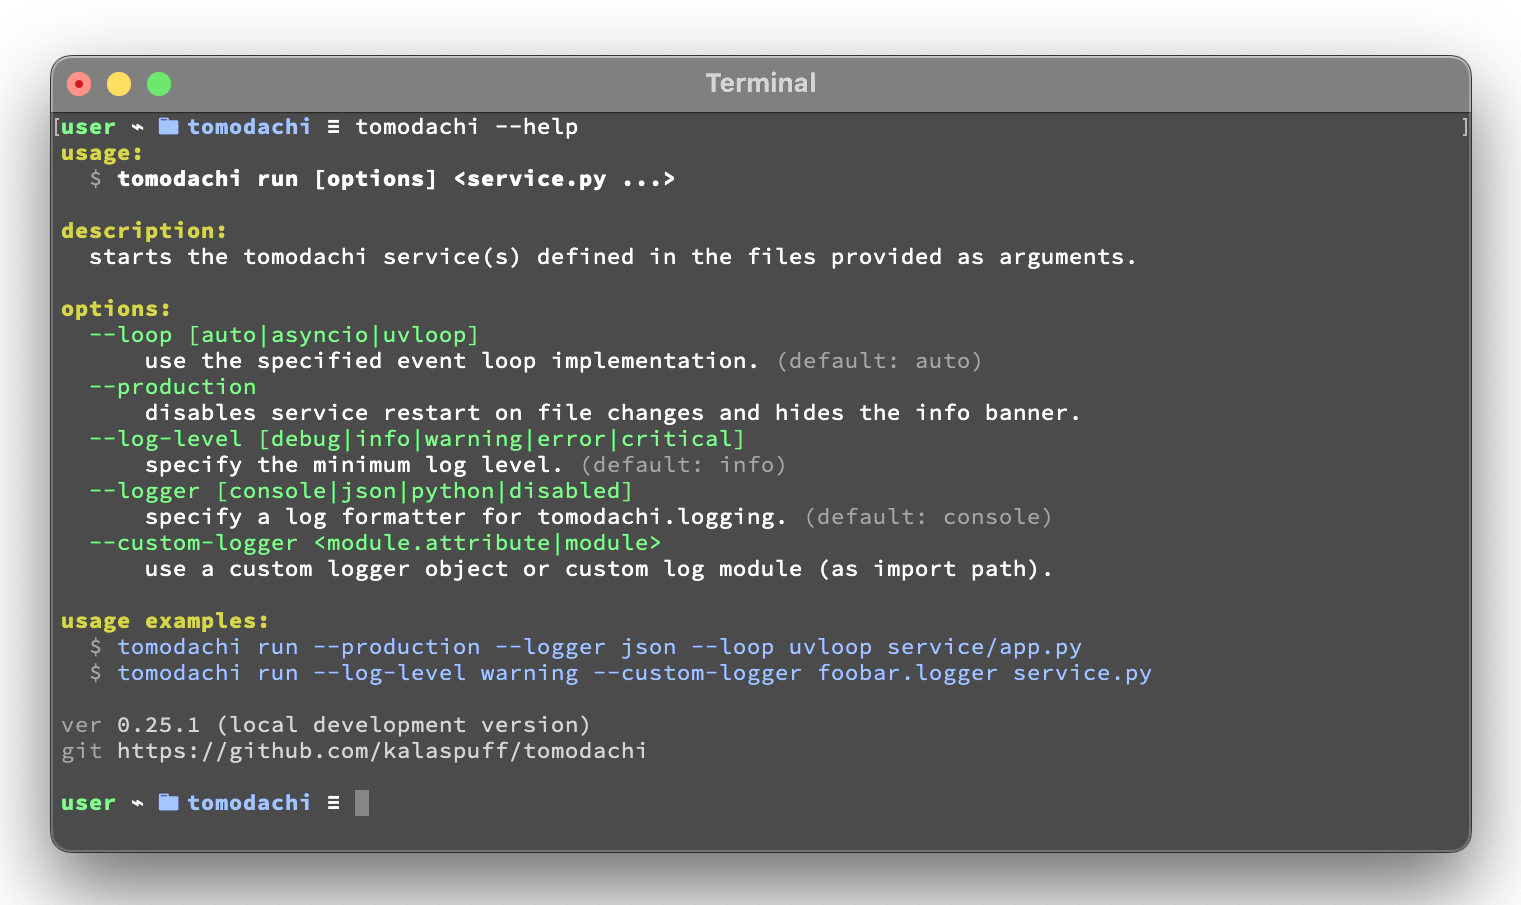
The run command has some options available that can be specified with arguments to the CLI.
Most options can also be set as an environment variable value.
For example setting environment TOMODACHI_LOGGER=json will yield the
same change to the logger as if running the service using the argument
--logger json.
| 🧩 | --loop [auto|asyncio|uvloop] |
|---|---|
| 🖥️ | TOMODACHI_LOOP=... |
The value for --loop can either be set to asyncio, uvloop or
auto. The uvloop value can only be used if uvloop is installed in
the execution environment. Note that the default auto value will
currently end up using the event loop implementation that is preferred
by the Python interpreter, which in most cases will be asyncio.
| 🧩 | --production |
|---|---|
| 🖥️ | TOMODACHI_PRODUCTION=1 |
Use --production to disable the file watcher that restarts the service
on file changes and to hide the startup info banner.
⇢ recommendation ✨👀
⇢ Highly recommended to enable this option for built docker images and
for builds of services that are to be released to any environment. The
only time you should run without the --production option is during
development and in local development environment.
| 🧩 | --log-level [debug|info|warning|error|critical] |
|---|---|
| 🖥️ | TOMODACHI_LOG_LEVEL=... |
Set the minimum log level for which the loggers will emit logs to their
handlers with the --log-level option. By default the minimum log level
is set to info (which includes info, warning, error and
critical, resulting in only the debug log records to be filtered
out).
| 🧩 | --logger [console|json|python|disabled] |
|---|---|
| 🖥️ | TOMODACHI_LOGGER=... |
Apply the --logger option to change the log formatter that is used by
the library. The default value console is mostly suited for local
development environments as it provides a structured and colorized view
of log records. The console colors can be disabled by setting the env
value NO_COLOR=1.
⇢ recommendation ✨👀
⇢ For released services / images it's recommended to use the json
option so that you can set up structured log collection via for
example Logstash, Fluentd, Fluent Bit, Vector, etc.
If you prefer to disable log output from the library you can use
disabled (and presumably add a log handler with another
implementation).
The python option isn't recommended, but available if required to use
the loggers from Python's built-in logging module. Note that the
built-in logging module will be used any way. as the library's
loggers are both added as handlers to logging.root and has propagation
of records through to logging as well.
| 🧩 | --custom-logger <module.attribute|module> |
|---|---|
| 🖥️ | TOMODACHI_CUSTOM_LOGGER=... |
If the template loggers from the option above doesnt' cut it or if you
already have your own logger (preferably a structlog logger) and
processor chain set up, you can specify a --custom-logger which will
also make tomodachi use your logger set up. This is suitable also if
your app is using a custom logging setup that would differ in output
from what the tomodachi loggers outputs.
If your logger is initialized in for example the module
yourapp.logging and the initialized (structlog) logger is aptly
named logger, then use --custom-logger yourapp.logging.logger (or
set as an env value TOMODACHI_CUSTOM_LOGGER=yourapp.logging.logger).
The path to the logger attribute in the module you're specifying must
implement debug, info, warning, error, exception, critical
and preferably also new(context: Dict[str, Any]) -> Logger (as that is
what primarily will be called to create (or get) a logger).
Although non-native structlog loggers can be used as custom loggers,
it's highly recommended to specify a path that has been assigned a
value from structlog.wrap_logger or structlog.get_logger.
| 🧩 | --opentelemetry-instrument |
|---|---|
| 🖥️ | TOMODACHI_OPENTELEMETRY_INSTRUMENT=1 |
Use --opentelemetry-instrument to enable OpenTelemetry auto
instrumentation of the service and libraries for which the environment
has installed instrumentors.
If tomodachi is installed in the environment, using the argument
--opentelemetry-instrument (or setting the
TOMODACHI_OPENTELEMETRY_INSTRUMENT=1 env variable value) is mostly
equivalent to starting the service using the opentelemetry-instrument
CLI -- OTEL distros, configurators and instrumentors will be loaded
automatically and OTEL_* environment values will be processed in the
same way.
Getting started 🏃
First off -- installation using poetry is fully supported and battle-tested (pip works just as fine)
Install tomodachi in your preferred way, wether it be poetry, pip,
pipenv, etc. Installing the distribution will give your environment
access to the tomodachi package for imports as well as a shortcut to
the CLI alias, which later is used to run the microservices you build.
local ~$ pip install tomodachi
> ...
> Installing collected packages: ..., ..., ..., tomodachi
> Successfully installed ... ... ... tomodachi-x.x.xx

local ~$ tomodachi --version
> tomodachi x.xx.xx
tomodachi can be installed together with a set of "extras" that will
install a set of dependencies that are useful for different purposes.
The extras are:
-
uvloop: for the possibility to start services with the--loop uvloopoption. -
protobuf: for protobuf support in envelope transformation and message serialization. -
aiodns: to useaiodnsas the DNS resolver foraiohttp. -
brotli: to usebrotlicompression inaiohttp. -
opentelemetry: for OpenTelemetry instrumentation support. -
opentelemetry-exporter-prometheus: to use the experimental OTEL meter provider for Prometheus.
Services and their dependencies, together with runtime utilities like
tomodachi, should preferably always be installed and run in isolated
environments like Docker containers or virtual environments.
Building blocks for a service class and microservice entrypoint
-
import tomodachiand create a class that inheritstomodachi.Service, it can be called anything... or justServiceto keep it simple. - Add a
nameattribute to the class and give it a string value. Having anameattribute isn't required, but good practice. - Define an awaitable function in the service class -- in this example we'll use it as an entrypoint to trigger code in the service by decorating it with one of the available invoker decorators. Note that a service class must have at least one decorated function available to even be recognized as a service by
tomodachi run. - Decide on how to trigger the function -- for example using HTTP, pub/sub or on a timed interval, then decorate your function with one of these trigger / subscription decorators, which also invokes what capabilities the service initially has.
Further down you'll find a desciption of how each of the built-in invoker decorators work and which keywords and parameters you can use to change their behaviour.
Note: Publishing and subscribing to events and messages may require user credentials or hosting configuration to be able to access queues and topics.
For simplicity, let's do HTTP:
- On each POST request to
/sheep, the service will wait for up to one whole second (pretend that it's performing I/O -- waiting for response on a slow sheep counting database modification, for example) and then issue a 200 OK with some data. - It's also possible to query the amount of times the POST tasks has run by doing a
GETrequest to the same url,/sheep. - By using
@tomodachi.httpan HTTP server backed byaiohttpwill be started on service start.tomodachiwill act as a middleware to route requests to the correct handlers, upgrade websocket connections and then also gracefully await connections with still executing tasks, when the service is asked to stop -- up until a configurable amount of time has passed.
import asyncio
import random

import tomodachi


class Service(tomodachi.Service):
    name = "sleepy-sheep-counter"

    _sheep_count = 0

    @tomodachi.http("POST", r"/sheep")
    async def add_to_sheep_count(self, request):
        await asyncio.sleep(random.random())
        self._sheep_count += 1
        return 200, str(self._sheep_count)

    @tomodachi.http("GET", r"/sheep")
    async def return_sheep_count(self, request):
        return 200, str(self._sheep_count)
Run services with:
local ~/code/service$ tomodachi run service.pyBeside the currently existing built-in ways of interfacing with a service, it's possible to build additional function decorators to suit the use-cases one may have.
To give a few possible examples / ideas of functionality that could be coded to call functions with data in similar ways:
- Using Redis as a task queue with configurable keys to push or pop onto.
- Subscribing to Kinesis or Kafka event streams and act on the data received.
- An abstraction around otherwise complex functionality or to unify API design.
- As an example to above sentence; GraphQL resolver functionality with built-in tracability and authentication management, with a unified API to application devs.
Additional examples will follow with different ways to trigger functions in the service
Of course the different ways can be used within the same class, for example the very common use-case of having a service listening on HTTP while also performing some kind of async pub/sub tasks.
Basic HTTP based service 🌟
Code for a simple service which would service data over HTTP, pretty similar, but with a few more concepts added.
import tomodachi


class Service(tomodachi.Service):
    name = "http-example"

    # Request paths are specified as regex for full flexibility
    @tomodachi.http("GET", r"/resource/(?P<id>[^/]+?)/?")
    async def resource(self, request, id):
        # Returning a string value normally means 200 OK
        return f"id = {id}"

    @tomodachi.http("GET", r"/health")
    async def health_check(self, request):
        # Return can also be a tuple, dict or even an aiohttp.web.Response
        # object for more complex responses - for example if you need to
        # send byte data, set your own status code or define own headers
        return {
            "body": "Healthy",
            "status": 200,
        }

    # Specify custom 404 catch-all response
    @tomodachi.http_error(status_code=404)
    async def error_404(self, request):
        return "error 404"
RabbitMQ or AWS SNS+SQS event based messaging service 🐰
Example of a service that calls a function when messages are published on an AMQP topic exchange.
import tomodachi


class Service(tomodachi.Service):
    name = "amqp-example"

    # The "message_envelope" attribute can be set on the service class to build / parse data.
    # message_envelope = ...

    # A route / topic on which the service will subscribe to via RabbitMQ / AMQP
    @tomodachi.amqp("example.topic")
    async def example_func(self, message):
        # Received message, fordarding the same message as response on another route / topic
        await tomodachi.amqp_publish(self, message, routing_key="example.response")
AMQP – Publish to exchange / routing key – tomodachi.amqp_publish
await tomodachi.amqp_publish(service, message, routing_key=routine_key, exchange_name=...)-
serviceis the instance of the service class (from within a handler, useself) -
messageis the message to publish before any potential envelope transformation -
routing_keyis the routing key to use when publishing the message -
exchange_nameis the exchange name for publishing the message (default: "amq.topic")
For more advanced workflows, it's also possible to specify overrides for the routing key prefix or message enveloping class.
AWS SNS+SQS event based messaging service 📡
Example of a service using AWS SNS+SQS managed pub/sub messaging. AWS
SNS and AWS SQS together brings managed message queues for
microservices, distributed systems, and serverless applications hosted
on AWS. tomodachi services can customize their enveloping
functionality to both unwrap incoming messages and/or to produce
enveloped messages for published events / messages. Pub/sub patterns are
great for scalability in distributed architectures, when for example
hosted in Docker on Kubernetes.
import tomodachi


class Service(tomodachi.Service):
    name = "aws-example"

    # The "message_envelope" attribute can be set on the service class to build / parse data.
    # message_envelope = ...

    # Using the @tomodachi.aws_sns_sqs decorator to make the service create an AWS SNS topic,
    # an AWS SQS queue and to make a subscription from the topic to the queue as well as start
    # receive messages from the queue using SQS.ReceiveMessages.
    @tomodachi.aws_sns_sqs("example-topic", queue_name="example-queue")
    async def example_func(self, message):
        # Received message, forwarding the same message as response on another topic
        await tomodachi.aws_sns_sqs_publish(self, message, topic="another-example-topic")
AWS – Publish message to SNS – tomodachi.aws_sns_sqs_publish
await tomodachi.aws_sns_sqs_publish(service, message, topic=topic)-
serviceis the instance of the service class (from within a handler, useself) -
messageis the message to publish before any potential envelope transformation -
topicis the non-prefixed name of the SNS topic used to publish the message
Additional function arguments can be supplied to also include message_attributes, and / or group_id + deduplication_id.
For more advanced workflows, it's also possible to specify overrides for the SNS topic name prefix or message enveloping class.
AWS – Send message to SQS – tomodachi.sqs_send_message
await tomodachi.sqs_send_message(service, message, queue_name=queue_name)-
serviceis the instance of the service class (from within a handler, useself) -
messageis the message to publish before any potential envelope transformation -
queue_nameis the SQS queue url, queue ARN or non-prefixed queue name to be used
Additional function arguments can be supplied to also include message_attributes, and / or group_id + deduplication_id.
For more advanced workflows, it's also possible to set delay seconds, define a custom message body formatter, or to specify overrides for the SNS topic name prefix or message enveloping class.
Scheduling, inter-communication between services, etc. ⚡️
There are other examples available with code of how to use services with self-invoking methods called on a specified interval or at specific times / days, as well as additional examples for inter-communication pub/sub between different services on both AMQP or AWS SNS+SQS as shown above. See more at the examples folder.
Run the service 😎
# cli alias is set up automatically on installation
local ~/code/service$ tomodachi run service.py

# alternatively using the tomodachi.run module
local ~/code/service$ python -m tomodachi.run service.py
Defaults to output startup banner on stdout and log output on stderr.
HTTP service acts like a normal web server.
local ~$ curl -v "http://127.0.0.1:9700/resource/1234"
# > HTTP/1.1 200 OK
# > Content-Type: text/plain; charset=utf-8
# > Server: tomodachi
# > Content-Length: 9
# > Date: Sun, 16 Oct 2022 13:38:02 GMT
# >
# > id = 1234
Getting an instance of a service
If the a Service instance is needed outside the Service class itself, it
can be acquired with tomodachi.get_service. If multiple Service
instances exist within the same event loop, the name of the Service can
be used to get the correct one.
import tomodachi

# Get the instance of the active Service.
service = tomodachi.get_service()

# Get the instance of the Service by service name.
service = tomodachi.get_service(service_name)
Stopping the service
Stopping a service can be achieved by either sending a SIGINT
<ctrl+c> or SIGTERM signal to to the tomodachi Python process, or
by invoking the tomodachi.exit() function, which will initiate the
termination processing flow. The tomodachi.exit() call can
additionally take an optional exit code as an argument, which otherwise
will default to use exit code 0.
-
SIGINTsignal (equivalent to using <ctrl+c>) -
SIGTERMsignal -
tomodachi.exit()ortomodachi.exit(exit_code)
The process' exit code can also be altered by changing the value of
tomodachi.SERVICE_EXIT_CODE, however using tomodachi.exit with an
integer argument will override any previous value set to
tomodachi.SERVICE_EXIT_CODE.
All above mentioned ways of initiating the termination flow of the service will perform a graceful shutdown of the service which will try to await open HTTP handlers and await currently running tasks using tomodachi's scheduling functionality as well as await tasks processing messages from queues such as AWS SQS or RabbitMQ.
Some tasks may timeout during termination according to used
configuration (see options such as
http.termination_grace_period_seconds) if they are long running tasks.
Additionally container handlers may impose additional timeouts for how
long termination are allowed to take. If no ongoing tasks are to be
awaited and the service lifecycle can be cleanly terminated the shutdown
usually happens within milliseconds.
Function hooks for service lifecycle changes
To be able to initialize connections to external resources or to perform graceful shutdown of connections made by a service, there's a few functions a service can specify to hook into lifecycle changes of a service.
| Magic function name | When is the function called? | What is suitable to put here |
|---|---|---|
_start_service |
Called before invokers / servers have started. | Initialize connections to databases, etc. |
_started_service |
Called after invokers / server have started. | Start reporting or start tasks to run once. |
_stopping_service |
Called on termination signal. | Cancel eventual internal long-running tasks. |
_stop_service |
Called after tasks have gracefully finished. | Close connections to databases, etc. |
Changes to a service settings / configuration (by for example modifying
the options values) should be done in the __init__ function instead
of in any of the lifecycle function hooks.
Good practice -- in general, make use of the _start_service (for
setting up connections) in addition to the _stop_service (to close
connections) lifecycle hooks. The other hooks may be used for more
uncommon use-cases.
Lifecycle functions are defined as class functions and will be called by the tomodachi process on lifecycle changes:
import tomodachi


class Service(tomodachi.Service):
    name = "example"

    async def _start_service(self):
        # The _start_service function is called during initialization,
        # before consumers or an eventual HTTP server has started.
        # It's suitable to setup or connect to external resources here.
        return

    async def _started_service(self):
        # The _started_service function is called after invoker
        # functions have been set up and the service is up and running.
        # The service is ready to process messages and requests.
        return

    async def _stopping_service(self):
        # The _stopping_service function is called the moment the
        # service is instructed to terminate - usually this happens
        # when a termination signal is received by the service.
        # This hook can be used to cancel ongoing tasks or similar.
        # Note that some tasks may be processing during this time.
        return

    async def _stop_service(self):
        # Finally the _stop_service function is called after HTTP server,
        # scheduled functions and consumers have gracefully stopped.
        # Previously ongoing tasks have been awaited for completion.
        # This is the place to close connections to external services and
        # clean up eventual tasks you may have started previously.
        return
Exceptions raised in _start_service or _started_service will
gracefully terminate the service.
Graceful termination of a service (SIGINT / SIGTERM)
When the service process receives a SIGINT or SIGTERM signal (or tomodachi.exit() is called) the service begins the process for graceful termination, which in practice means:
- The service'
_stopping_servicemethod, if implemented, is called immediately upon the received signal. - The service stops accepting new HTTP connections and closes keep-alive HTTP connections at the earliest.
- Already established HTTP connections for which a handler call is awaited called are allowed to finish their work before the service stops (up to
options.http.termination_grace_period_secondsseconds, after which the open TCP connections for those HTTP connections will be forcefully closed if still not completed). - Any AWS SQS / AMQP handlers (decorated with
@aws_sns_sqsor@amqp) will stop receiving new messages. However handlers already processing a received message will be awaited to return their result. Unlike the HTTP handler connections there is no grace period for these queue consuming handlers. - Currently running scheduled handlers will also be awaited to fully complete their execution before the service will terminates. No new scheduled handlers will be started.
- When all HTTP connections are closed, all scheduled handlers has completed and all pub-sub handlers have been awaited, the service'
_stop_servicemethod is finally called (if implemented), where for example database connections can be closed. When the_stop_servicemethod returns (or immediately after completion of handler invocations if any_stop_serviceisn't implemented), the service will finally terminate.
It's recommended to use a http.termination_grace_period_seconds options value of around 30 seconds to allow for the graceful termination of HTTP connections. This value can be adjusted based on the expected time it takes for the service to complete the processing of incoming request.
Make sure that the orchestration engine (such as Kubernetes) waits at least 30 seconds from sending the SIGTERM to remove the pod. For extra compatibility when operating services in k8s and to get around most kind of edge-cases of intermittent timeouts and problems with ingress connections, (and unless your setup includes long running queue consuming handler calls which requires an even longer grace period), set the pod spec terminationGracePeriodSeconds to 90 seconds and use a preStop lifecycle hook of 20 seconds.
Keep the http.termination_grace_period_seconds options value lower than the pod spec's terminationGracePeriodSeconds value, as the latter is a hard limit for how long the pod will be allowed to run after receiving a SIGTERM signal.
In a setup where long running queue consuming handler calls commonly occurs, any grace period the orchestration engine uses will have to take that into account. It's generally advised to split work up into sizeable chunks that can quickly complete or if handlers are idempotent, apply the possibility to cancel long running handlers as part of the _stopping_service implementation.
Example of a microservice containerized in Docker 🐳
A great way to distribute and operate microservices are usually to run
them in containers or even more interestingly, in clusters of compute
nodes. Here follows an example of getting a tomodachi based service up
and running in Docker.
We're building the service' container image using just two small
files, the Dockerfile and the actual code for the microservice,
service.py. In reality a service would probably not be quite this
small, but as a template to get started.
Dockerfile
FROM python:3.10-bullseye
RUN pip install tomodachi
RUN mkdir /app
WORKDIR /app
COPY service.py .
ENV PYTHONUNBUFFERED=1
CMD ["tomodachi", "run", "service.py"]
service.py
import json

import tomodachi


class Service(tomodachi.Service):
    name = "example"
    options = tomodachi.Options(
        http=tomodachi.Options.HTTP(
            port=80,
            content_type="application/json; charset=utf-8",
        ),
    )
    _healthy = True

    @tomodachi.http("GET", r"/")
    async def index_endpoint(self, request):
        # tomodachi.get_execution_context() can be used for
        # debugging purposes or to add additional service context
        # in logs or alerts.
        execution_context = tomodachi.get_execution_context()

        return json.dumps({
            "data": "hello world!",
            "execution_context": execution_context,
        })

    @tomodachi.http("GET", r"/health/?", ignore_logging=True)
    async def health_check(self, request):
        if self._healthy:
            return 200, json.dumps({"status": "healthy"})
        else:
            return 503, json.dumps({"status": "not healthy"})

    @tomodachi.http_error(status_code=400)
    async def error_400(self, request):
        return json.dumps({"error": "bad-request"})

    @tomodachi.http_error(status_code=404)
    async def error_404(self, request):
        return json.dumps({"error": "not-found"})

    @tomodachi.http_error(status_code=405)
    async def error_405(self, request):
        return json.dumps({"error": "method-not-allowed"})
Building and running the container, forwarding host's port 31337 to port 80
local ~/code/service$ docker build . -t tomodachi-microservice
# > Sending build context to Docker daemon  9.216kB
# > Step 1/7 : FROM python:3.10-bullseye
# > 3.10-bullseye: Pulling from library/python
# > ...
# >  ---> 3f7f3ab065d4
# > Step 7/7 : CMD ["tomodachi", "run", "service.py"]
# >  ---> Running in b8dfa9deb243
# > Removing intermediate container b8dfa9deb243
# >  ---> 8f09a3614da3
# > Successfully built 8f09a3614da3
# > Successfully tagged tomodachi-microservice:latest
local ~/code/service$ docker run -ti -p 31337:80 tomodachi-microservice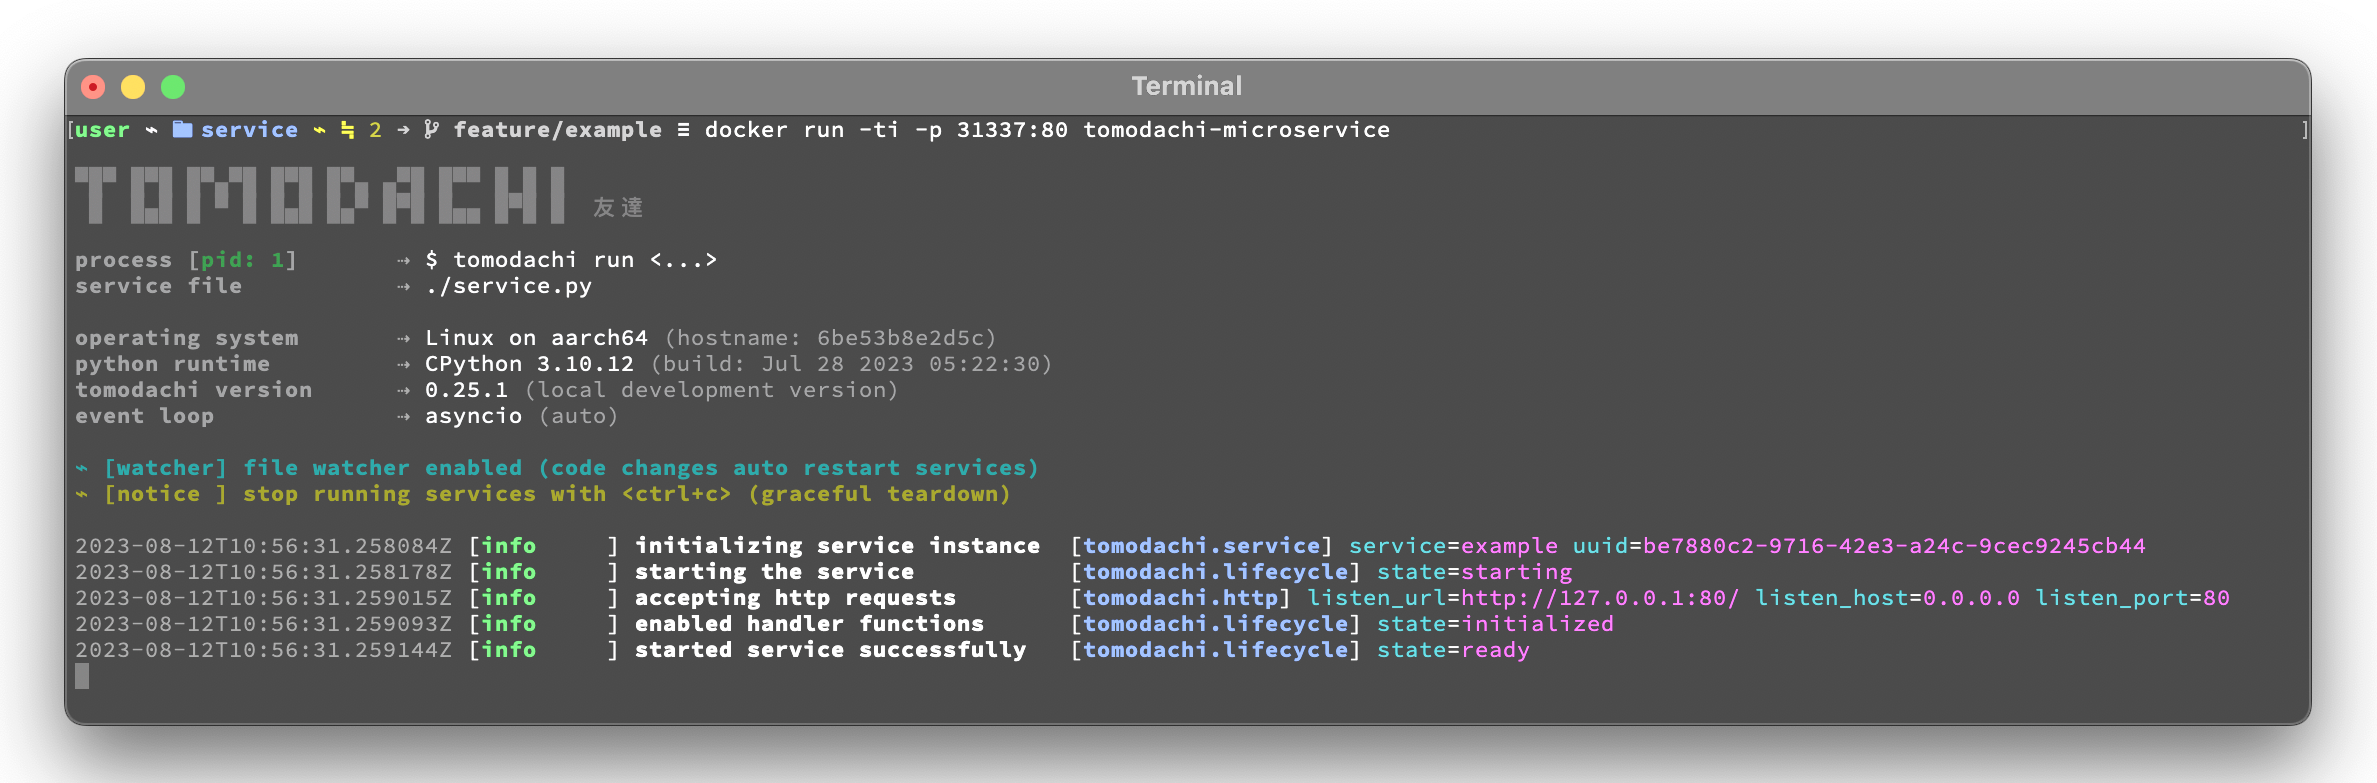
Making requests to the running container
local ~$ curl http://127.0.0.1:31337/ | jq
# {
#   "data": "hello world!",
#   "execution_context": {
#     "tomodachi_version": "x.x.xx",
#     "python_version": "3.x.x",
#     "system_platform": "Linux",
#     "process_id": 1,
#     "init_timestamp": "2022-10-16T13:38:01.201509Z",
#     "event_loop": "asyncio",
#     "http_enabled": true,
#     "http_current_tasks": 1,
#     "http_total_tasks": 1,
#     "aiohttp_version": "x.x.xx"
#   }
# }
local ~$ curl http://127.0.0.1:31337/health -i
# > HTTP/1.1 200 OK
# > Content-Type: application/json; charset=utf-8
# > Server: tomodachi
# > Content-Length: 21
# > Date: Sun, 16 Oct 2022 13:40:44 GMT
# >
# > {"status": "healthy"}local ~$ curl http://127.0.0.1:31337/no-route -i
# > HTTP/1.1 404 Not Found
# > Content-Type: application/json; charset=utf-8
# > Server: tomodachi
# > Content-Length: 22
# > Date: Sun, 16 Oct 2022 13:41:18 GMT
# >
# > {"error": "not-found"}It's actually as easy as that to get something spinning. The hard part is usually to figure out (or decide) what to build next.
Other popular ways of running microservices are of course to use them as
serverless functions, with an ability of scaling to zero (Lambda, Cloud
Functions, Knative, etc. may come to mind). Currently tomodachi works
best in a container setup and until proper serverless supporting
execution context is available in the library, it should be adviced to
hold off and use other tech for those kinds of deployments.
Available built-ins used as endpoints 🚀
As shown, there's different ways to trigger your microservice function in which the most common ones are either directly via HTTP or via event based messaging (for example AMQP or AWS SNS+SQS). Here's a list of the currently available built-ins you may use to decorate your service functions.
HTTP endpoints
@tomodachi.http
@tomodachi.http(method, url, ignore_logging=[200])
def handler(self, request, *args, **kwargs):
    ...
Sets up an HTTP endpoint for the specified method (GET,
PUT, POST, DELETE) on the regexp url. Optionally specify
ignore_logging as a dict or tuple containing the status codes you
do not wish to log the access of.
Can also be set to True to
ignore everything except status code 500.
@tomodachi.http_static
@tomodachi.http_static(path, url)
def handler(self, request, *args, **kwargs):
    # noop
    pass
Sets up an HTTP endpoint for static content available as GET
HEAD from the path on disk on the base regexp url.
@tomodachi.websocket
@tomodachi.websocket(url)
def handler(self, request, *args, **kwargs):
    async def _receive(data: Union[str, bytes]) -> None:
        ...

    async def _close() -> None:
        ...

    return _receive, _close
Sets up a websocket endpoint on the regexp url. The invoked
function is called upon websocket connection and should return a two
value tuple containing callables for a function receiving frames
(first callable) and a function called on websocket close (second
callable).
The passed arguments to the function beside the class
object is first the websocket response connection which can be
used to send frames to the client, and optionally also the request
object.
@tomodachi.http_error
@tomodachi.http_error(status_code)
def handler(self, request, *args, **kwargs):
    ...
A function which will be called if the HTTP request would result
in a 4XX status_code. You may use this for example to set up a
custom handler on "404 Not Found" or "403 Forbidden" responses.
AWS SNS+SQS messaging
@tomodachi.aws_sns_sqs
@tomodachi.aws_sns_sqs(
    topic=None,
    competing=True,
    queue_name=None,
    filter_policy=FILTER_POLICY_DEFAULT,
    visibility_timeout=VISIBILITY_TIMEOUT_DEFAULT,
    dead_letter_queue_name=DEAD_LETTER_QUEUE_DEFAULT,
    max_receive_count=MAX_RECEIVE_COUNT_DEFAULT,
    fifo=False,
    max_number_of_consumed_messages=MAX_NUMBER_OF_CONSUMED_MESSAGES
    **kwargs,
)
def handler(self, data, *args, **kwargs):
    ...
Topic and Queue
This would set up an AWS SQS queue, subscribing to messages on
the AWS SNS topic topic (if a topic is specified),
whereafter it will start consuming messages from the queue. The value
can be omitted in order to make the service consume messages from an existing
queue, without setting up an SNS topic subscription.
The competing value is used when the same queue name should be
used for several services of the same type and thus "compete" for
who should consume the message. Since tomodachi version 0.19.x
this value has a changed default value and will now default to
True as this is the most likely use-case for pub/sub in
distributed architectures.
Unless queue_name is specified an auto generated queue name will
be used. Additional prefixes to both topic and queue_name can be
assigned by setting the options.aws_sns_sqs.topic_prefix and
options.aws_sns_sqs.queue_name_prefix dict values.
FIFO queues + max number of consumed messages
AWS supports two types of queues and topics, namely standard and
FIFO. The major difference between these is that the latter
guarantees correct ordering and at-most-once delivery. By default,
tomodachi creates standard queues and topics. To create them as
FIFO instead, set fifo to True.
The max_number_of_consumed_messages setting determines how many
messages should be pulled from the queue at once. This is useful if
you have a resource-intensive task that you don't want other
messages to compete for. The default value is 10 for standard
queues and 1 for FIFO queues. The minimum value is 1, and the
maximum value is 10.
Filter policy
The filter_policy value of specified as a keyword argument will be
applied on the SNS subscription (for the specified topic and queue)
as the "FilterPolicy attribute. This will apply a filter on SNS
messages using the chosen "message attributes" and/or their values
specified in the filter. Make note that the filter policy dict
structure differs somewhat from the actual message attributes, as
values to the keys in the filter policy must be a dict (object) or
list (array).
Example: A filter policy value of
{"event": ["order_paid"], "currency": ["EUR", "USD"]} would set up
the SNS subscription to receive messages on the topic only where the
message attribute "event" is "order_paid" and the "currency"
value is either "EUR" or "USD".
If filter_policy is not specified as an argument (default), the
queue will receive messages on the topic as per already specified if
using an existing subscription, or receive all messages on the topic
if a new subscription is set up (default). Changing the
filter_policy on an existing subscription may take several minutes
to propagate.
Read more about the filter policy format on AWS:
Related to the above mentioned filter policy, the
tomodachi.aws_sns_sqs_publish (which is used for publishing
messages to SNS) and tomodachi.sqs_send_message (which sends
messages directly to SQS) functions, can specify "message
attributes" using the message_attributes keyword argument. Values
should be specified as a simple dict with keys and values.
Example: {"event": "order_paid", "paid_amount": 100, "currency": "EUR"}.
Visibility timeout
The visibility_timeout value will set the queue attribute
VisibilityTimeout if specified. To use already defined values for
a queue (default), do not supply any value to the
visibility_timeout keyword -- tomodachi will then not modify the
visibility timeout.
DLQ: Dead-letter queue
Similarly the values for dead_letter_queue_name in tandem with the
max_receive_count value will modify the queue attribute
RedrivePolicy in regards to the potential use of a dead-letter
queue to which messages will be delivered if they have been picked
up by consumers max_receive_count number of times but haven't
been deleted from the queue.
The value for dead_letter_queue_name
should either be a ARN for an SQS queue, which in that case requires
the queue to have been created in advance, or a alphanumeric queue
name, which in that case will be set up similar to the queue name
you specify in regards to prefixes, etc.
Both dead_letter_queue_name and max_receive_count needs to be
specified together, as they both affect the redrive policy. To
disable the use of DLQ, use a None value for the
dead_letter_queue_name keyword and the RedrivePolicy will be
removed from the queue attribute.
To use the already defined values
for a queue, do not supply any values to the keyword arguments in
the decorator. tomodachi will then not modify the queue attribute
and leave it as is.
Message envelope
Depending on the service message_envelope (previously named
message_protocol) attribute if used, parts of the enveloped data
would be distributed to different keyword arguments of the decorated
function. It's usually safe to just use data as an argument. You
can also specify a specific message_envelope value as a keyword
argument to the decorator for specifying a specific enveloping
method to use instead of the global one set for the service.
If you're utilizing from tomodachi.envelope import ProtobufBase
and using ProtobufBase as the specified service message_envelope
you may also pass a keyword argument proto_class into the
decorator, describing the protobuf (Protocol Buffers) generated
Python class to use for decoding incoming messages. Custom
enveloping classes can be built to fit your existing architecture or
for even more control of tracing and shared metadata between
services.
Encryption at rest via AWS KMS
Encryption at rest for AWS SNS and/or AWS SQS can optionally be
configured by specifying the KMS key alias or KMS key id as
tomodachi service options
options.aws_sns_sqs.sns_kms_master_key_id (to configure encryption
at rest on the SNS topics for which the tomodachi service handles
the SNS -> SQS subscriptions) and
options.aws_sns_sqs.sqs_kms_master_key_id (to configure encryption
at rest for the SQS queues which the service is consuming).
Note that an option value set to an empty string ("") or False will
unset the KMS master key id and thus disable encryption at rest. If
instead an option is completely unset or set to None value no
changes will be done to the KMS related attributes on an existing
topic or queue.
It's generally not advised to change the KMS master key id/alias values for resources currently in use.
If it's expected that the services themselves, via their IAM credentials or assumed role, are responsible for creating queues and topics, these options could be desirable to use.
Do not use these options if you instead are using IaC tooling to handle the topics, queues and subscriptions or that they for example are created / updated as a part of deployments.
See further details about AWS KMS for AWS SNS+SQS at:
- https://docs.aws.amazon.com/AWSSimpleQueueService/latest/SQSDeveloperGuide/sqs-server-side-encryption.html
- https://docs.aws.amazon.com/sns/latest/dg/sns-server-side-encryption.html#sse-key-terms.
AMQP messaging (RabbitMQ)
@tomodachi.amqp
@tomodachi.amqp(
    routing_key,
    exchange_name="amq.topic",
    competing=True,
    queue_name=None,
    **kwargs,
)
def handler(self, data, *args, **kwargs):
    ...
Routing key, Exchange and Queue
Sets up the method to be called whenever a AMQP / RabbitMQ message
is received for the specified routing_key. By default the
'amq.topic' topic exchange would be used, it may also be
overridden by setting the options.amqp.exchange_name dict value on
the service class.
The competing value is used when the same queue name should be
used for several services of the same type and thus "compete" for
who should consume the message. Since tomodachi version 0.19.x
this value has a changed default value and will now default to
True as this is the most likely use-case for pub/sub in
distributed architectures.
Unless queue_name is specified an auto generated queue name will
be used. Additional prefixes to both routing_key and queue_name
can be assigned by setting the options.amqp.routing_key_prefix and
options.amqp.queue_name_prefix dict values.
Message envelope
Depending on the service message_envelope (previously named
message_protocol) attribute if used, parts of the enveloped data
would be distributed to different keyword arguments of the decorated
function. It's usually safe to just use data as an argument. You
can also specify a specific message_envelope value as a keyword
argument to the decorator for specifying a specific enveloping
method to use instead of the global one set for the service.
If you're utilizing from tomodachi.envelope import ProtobufBase
and using ProtobufBase as the specified service message_envelope
you may also pass a keyword argument proto_class into the
decorator, describing the protobuf (Protocol Buffers) generated
Python class to use for decoding incoming messages. Custom
enveloping classes can be built to fit your existing architecture or
for even more control of tracing and shared metadata between
services.
Scheduled functions / cron / triggered on time interval
@tomodachi.schedule
@tomodachi.schedule(
    interval=None,
    timestamp=None,
    timezone=None,
    immediately=False,
)
def handler(self, *args, **kwargs):
    ...
A scheduled function invoked on either a specified interval
(you may use the popular cron notation as a str for fine-grained
interval or specify an integer value of seconds) or a specific
timestamp. The timezone will default to your local time unless
explicitly stated.
When using an integer interval you may also specify wether the
function should be called immediately on service start or wait the
full interval seconds before its first invokation.
@tomodachi.heartbeat
@tomodachi.heartbeat
def handler(self, *args, **kwargs):
    ...
A function which will be invoked every second.
@tomodachi.minutely / @tomodachi.hourly
@tomodachi.minutely
@tomodachi.hourly
@tomodachi.daily
@tomodachi.monthly
def handler(self, *args, **kwargs):
    ...
A scheduled function which will be invoked once every minute / hour / day / month.
Scheduled tasks in distributed contexts
What is your use-case for scheduling function triggers or functions that trigger on an interval. These types of scheduling may not be optimal in clusters with many pods in the same replication set, as all the services running the same code will very likely execute at the same timestamp / interval (which in same cases may correlated with exactly when they were last deployed). As such these functions are quite naive and should only be used with some care, so that it triggering the functions several times doesn't incur unnecessary costs or come as a bad surprise if the functions aren't completely idempotent.
To perform a task on a specific timestamp or on an interval where only one of the available services of the same type in a cluster should trigger is a common thing to solve and there are several solutions to pick from., some kind of distributed consensus needs to be reached. Tooling exists, but what you need may differ depending on your use-case. There's algorithms for distributed consensus and leader election, Paxos or Raft, that luckily have already been implemented to solutions like the strongly consistent and distributed key-value stores etcd and TiKV.
Even primitive solutions
such as Redis SETNX commands would work, but could be costly or hard
to manage access levels around. If you're on k8s there's even a simple
"leader election" API available that just creates a 15 seconds lease.
Solutions are many and if you are in need, go hunting and find one that
suits your use-case, there's probably tooling and libraries available
to call it from your service functions.
Implementing proper consensus mechanisms and in turn leader election can be complicated. In distributed environments the architecture around these solutions needs to account for leases, decision making when consensus was not reached, how to handle crashed executors, quick recovery on master node(s) disruptions, etc.
To extend the functionality by building your own trigger decorators for
your endpoints, studying the built-in invoker classes should the first
step of action. All invoker classes should extend the class for a common
developer experience: tomodachi.invoker.Invoker.
Function signatures - keywords with transport centric values 🪄
Function handlers, middlewares and envelopes can specify additional keyword arguments in their signatures and receive transport centric values.
The following keywords can be used across all kind of handler functions, envelopes and envelopes parsing messages. These can be used to structure apps, logging, tracing, authentication, building more advanced messaging logic, etc.
AWS SNS+SQS related values - function signature keyword arguments
Use the following keywords arguments in function signatures (for handlers, middlewares and envelopes used for AWS SNS+SQS messages).
message_attributes |
Values specified as message attributes that accompanies the message body and that are among other things used for SNS queue subscription filter policies and for distributed tracing. |
queue_url |
Can be used to modify visibility of messages, provide exponential backoffs, move to DLQs, etc. |
receipt_handle |
Can be used to modify visibility of messages, provide exponential backoffs, move to DLQs, etc. |
approximate_receive_count |
A value that specifies approximately how many times this message has been received from consumers on SQS.ReceiveMessage calls. Handlers that received a message, but that doesn't delete it from the queue (for example in order to make it visible for other consumers or in case of errors), will add to this count for each time they received it. |
topic |
Simply the name of the SNS topic. For messages sent directly to the queue (for example via SQS.SendMessage API calls), instead of via SNS topic subscriptions (SNS.Publish), the value of topic will be an empty string. |
sns_message_id |
The message identifier for the SNS message (which is usually embedded in the body of a SQS message). Ths SNS message identifier is the same that is returned in the response when publishing a message with SNS.Publish. The sns_message_id is read from within the "Body" of SQS messages, if the message body contains a message that comes from an SNS topic subscription. If the SQS message doesn't originate from SNS (if the message isn't type "Notification", and holds a "TopicArn" value), then sns_message_id will result in an empty string. |
sqs_message_id |
The SQS message identifier, which naturally will differ from the SNS message identifier as one SNS message can be propagated to several SQS queues. The sqs_message_id is read from the "MessageId" value in the top of the SQS message. |
message_type |
Returns the "Type" value from the message body. For messages consumed from a queue that was sent there from an SNS topic, the message_type will be "Notification". |
raw_message_body |
Returns the full contents (as a string) from "Body", which can be used to implement custom listeners, tailored for more advanced workflows, where more flexibility is needed. |
message_timestamp |
A timestamp of when the original SNS message was published. |
message_deduplication_id |
The deduplication id for messages in FIFO queues (or None on messages in non-FIFO queues). |
message_group_id |
The group id for messages in FIFO queues (orNone on messages in non-FIFO queues). |
HTTP related values - function signature keyword arguments
Use the following keywords arguments in function signatures (for handlers and middlewares used for HTTP requests).
request |
The aiohttp request object which holds functionality for all things HTTP requests. |
status_code |
Specified when predefined error handlers are run. Using the keyword in handlers and middlewares for requests not invoking error handlers should preferably be specified with a default value to ensure it will work on both error handlers and request router handlers. |
websocket |
Will be added to websocket requests if used. |
Middlewares for HTTP and messaging (AWS SNS+SQS, AMQP, etc.) 🧱
Middlewares can be used to add functionality to the service, for example to add logging, authentication, tracing, build more advanced logic for messaging, unpack request queries, modify HTTP responses, handle uncaught errors, add additional context to handlers, etc.
Custom middleware functions or objects that can be called are added to
the service by specifying them as a list in the http_middleware and
message_middleware attribute of the service class.
from .middleware import logger_middleware

class Service(tomodachi.Service):
    name = "middleware-example"
    http_middleware = [logger_middleware]
    ...
Middlewares are invoked as a stack in the order they are specified in
http_middleware or message_middleware with the first callable in the
list to be called first (and then also return last).
Provided arguments to middleware functions
- The first unbound argument of a middleware function will receive the
coroutine function to call next (which would be either the handlers
function or a function for the next middleware in the chain).
(recommended name:
func) - (optional) The second unbound argument of a middleware function will
receive the service class object. (recommended name:
service) - (optional) The third unbound argument of a middleware function will
receive the
requestobject for HTTP middlewares, or themessage(as parsed by the envelope) for message middlewares. (recommended name:requestormessage)
Use the recommended names to prevent collisions with passed keywords for transport centric values that are also sent to the middleware if the keyword arguments are defined in the function signature.
Calling the handler or the next middleware in the chain
When calling the next function in the chain, the middleware function
should be called as an awaitable function (await func()) and for HTTP
middlewares the result should most commonly be returned.
Adding custom arguments passed on to the handler
The function can be called with any number of custom keyword arguments, which will then be passed to each following middleware and the handler itself. This pattern works a bit how contextvars can be set up, but could be useful for passing values and objects instead of keeping them in a global context.
async def logger_middleware(func: Callable[..., Awaitable], *, traceid: str = "") -> Any:
    if not traceid:
        traceid = uuid.uuid4().hex
    logger = Logger(traceid=traceid)

    # Passes the logger and traceid to following middlewares and to the handler
    return await func(logger=logger, traceid=traceid)
A middleware can only add new keywords or modify the values or existing keyword arguments (by passing it through again with the new value). The exception to this is that passed keywords for transport centric values will be ignored - their value cannot be modified - they will retain their original value.
While a middleware can modify the values of custom keyword arguments, there is no way for a middleware to completely remove any keyword that has been added by previous middlewares.
Example of a middleware specified as a function that adds tracing to AWS SQS handlers:
This example portrays a middleware function which adds trace spans around the function, with the trace context populated from a "traceparent header" value collected from a SNS message' message attribute. The topic name and SNS message identifier is also added as attributes to the trace span.
async def trace_middleware(
    func: Callable[..., Awaitable],
    *,
    queue_url: str,
    topic: str,
    message_attributes: dict,
    sns_message_id: str,
    sqs_message_id: str,
) -> None:
    ctx = TraceContextTextMapPropagator().extract(carrier=message_attributes)

    with tracer.start_as_current_span(f"SNSSQS handler '{func.__name__}'", context=ctx) as span:
        span.set_attribute("messaging.system", "aws_sqs")
        span.set_attribute("messaging.operation", "process")
        span.set_attribute("messaging.destination.name", queue_url.rsplit("/")[-1])
        span.set_attribute("messaging.destination_publish.name", topic or queue_url.rsplit("/")[-1])
        span.set_attribute("messaging.message.id", sns_message_id or sqs_message_id)

        try:
            # Calls the handler function (or next middleware in the chain)
            await func()
        except BaseException as exc:
            logging.getLogger("exception").exception(exc)
            span.record_exception(exc, escaped=True)
            span.set_status(StatusCode.ERROR, f"{exc.__class__.__name__}: {exc}")
            raise exc
from .middleware import trace_middleware
from .envelope import Event, MessageEnvelope
class Service(tomodachi.Service):
name = "middleware-example"
message_envelope: MessageEnvelope(key="event")
message_middleware = [trace_middleware]
@tomodachi.aws_sns_sqs("example-topic", queue_name="example-queue")
async def handler(self, event: Event) -> None:
...Example of a middleware specified as a class:
A middleware can also be specified as the object of a class, in which
case the __call__ method of the object will be invoked as the
middleware function. Note that bound functions such as self has to be
included in the signature as it's called as a normal class function.
This class provides a simplistic basic auth implementation validating credentials in the HTTP Authorization header for HTTP requests to the service.
class BasicAuthMiddleware:
    def __init__(self, username: str, password: str) -> None:
        self.valid_credentials = base64.b64encode(f"{username}:{password}".encode()).decode()

    async def __call__(
        self,
        func: Callable[..., Awaitable[web.Response]],
        *,
        request: web.Request,
    ) -> web.Response:
        try:
            auth = request.headers.get("Authorization", "")
            encoded_credentials = auth.split()[-1] if auth.startswith("Basic ") else ""

            if encoded_credentials == self.valid_credentials:
                username = base64.b64decode(encoded_credentials).decode().split(":")[0]
                # Calls the handler function (or next middleware in the chain).
                # The handler (and following middlewares) can use username in their signature.
                return await func(username=username)
            elif auth:
                return web.json_response({"status": "bad credentials"}, status=401)

            return web.json_response({"status": "auth required"}, status=401)
        except BaseException as exc:
            try:
                logging.getLogger("exception").exception(exc)
                raise exc
            finally:
                return web.json_response({"status": "internal server error"}, status=500)
from .middleware import trace_middleware
class Service(tomodachi.Service):
name = "middleware-example"
http_middleware = [BasicAuthMiddleware(username="example", password="example")]
@tomodachi.http("GET", r"/")
async def handler(self, request: web.Request, username: str) -> web.Response:
...
Logging and log formatting using the tomodachi.logging module 📚
A context aware logger is available from the tomodachi.logging module
that can be fetched with tomodachi.logging.get_logger() or just
tomodachi.get_logger() for short.
The logger is a initiated using the popular structlog package
(structlog
documentation),
and can be used in the same way as the standard library logger, with a
few additional features, such as holding a context and logging of
additional values.
The logger returned from tomodachi.get_logger() will hold the context
of the current handler task or request for rich contextual log records.
To get a logger with another name than the logger set for the current
context, use tomodachi.get_logger(name="my-logger").
from typing import Any

import tomodachi

class Service(tomodachi.Service):
    name = "service"

    @tomodachi.aws_sns_sqs("test-topic", queue_name="test-queue")
    async def sqs_handler(self, data: Any, topic: str, sns_message_id: str) -> None:
        tomodachi.get_logger().info("received msg", topic=topic, sns_message_id=sns_message_id)
The log record will be enriched with the context of the current handler
task or request and the output should look something like this if the
json formatter is used (note that the example output below has been
prettified -- the JSON that is actually used outputs the entire log
entry on one single line):
{
    "timestamp": "2023-08-13T17:44:09.176295Z",
    "logger": "tomodachi.awssnssqs.handler",
    "level": "info",
    "message": "received msg",
    "handler": "sqs_handler",
    "type": "tomodachi.awssnssqs",
    "topic": "test-topic",
    "sns_message_id": "a1eba63e-8772-4b36-b7e0-b2f524f34bff"
}
Interactions with Python's built-in logging module
Note that the log entries are propagated to the standard library logger (as long as it wasn't filtered), in order to allow third party handler hooks to pick up records or act on them. This will make sure that integrations such a Sentry's exception tracing will work out of the box.
Similarly the tomodachi logger will also by default receive records
from the standard library logger as adds a logging.root handler, so
that the tomodachi logger can be used as a drop-in replacement for the
standard library logger. Because of this third party modules using
Python's default logging module will use the same formatter as
tomodachi. Note that if logging.basicConfig() is called before the
tomodachi logger is initialized, tomodachi may not be able to add
its logging.root handler.
Note that when using the standard library logger directly the contextual logger won't be selected by default.
import logging

from aiohttp.web import Request, Response
import tomodachi

class Service(tomodachi.Service):
    name = "service"

    @tomodachi.http("GET", r"/example")
    async def http_handler(self, request: Request) -> Response:
        # contextual logger
        tomodachi.get_logger().info("http request")

        # these two rows result in similar log records
        logging.getLogger("service.logger").info("with logging module")
        tomodachi.get_logger("service.logger").info("with tomodachi.logging module")

        # extra fields from built in logger ends up as "extra" in log records
        logging.getLogger("service.logger").info("adding extra", extra={
            "http_request_path": request.path
        })

        return Response(body="hello world")
A GET request to /example of this service would result in five log
records being emitted (as shown formatted with the json formatter).
The four from the example above and the last one from the
tomodachi.transport.http module.
{"timestamp": "2023-08-13T19:25:15.923627Z", "logger": "tomodachi.http.handler", "level": "info", "message": "http request", "handler": "http_handler", "type": "tomodachi.http"}
{"timestamp": "2023-08-13T19:25:15.923894Z", "logger": "service.logger", "level": "info", "message": "with logging module"}
{"timestamp": "2023-08-13T19:25:15.924043Z", "logger": "service.logger", "level": "info", "message": "with tomodachi.logging module"}
{"timestamp": "2023-08-13T19:25:15.924172Z", "logger": "service.logger", "level": "info", "message": "adding extra", "extra": {"http_request_path": "/example"}}
{"timestamp": "2023-08-13T19:25:15.924507Z", "logger": "tomodachi.http.response", "level": "info", "message": "", "status_code": 200, "remote_ip": "127.0.0.1", "request_method": "GET", "request_path": "/example", "http_version": "HTTP/1.1", "response_content_length": 11, "user_agent": "curl/7.88.1", "handler_elapsed_time": "0.00135s", "request_time": "0.00143s"}
Configuring the logger
Start the service using the --logger json arguments (or setting
TOMODACHI_LOGGER=json environment value) to change the log formatter
to use the json log formatter. The default log formatter console is
mostly suited for local development environments as it provides a
structured and colorized view of log records.
It's also possible to use your own logger implementation by specifying
--custom-logger ... (or setting TOMODACHI_CUSTOM_LOGGER=...
environment value).
Read more about how to start the service with another formatter or implementation in the usage section
Using OpenTelemetry instrumentation
Install tomodachi using the opentelemetry extras to enable
instrumentation for OpenTelemetry. In addition, install with the
opentelemetry-exporter-prometheus extras to use Prometheus exporter
metrics.
local ~$ pip install tomodachi[opentelemetry]
local ~$ pip install tomodachi[opentelemetry,opentelemetry-exporter-prometheus]
When added as a Poetry dependency the opentelemetry extras can be
enabled by adding tomodachi = {extras = ["opentelemetry"]} to the
pyproject.toml file, and when added to a requiements.txt file the
opentelemetry extras can be enabled by adding
tomodachi[opentelemetry] to the file.
Auto instrumentation: tomodachi --opentelemetry-instrument
Passing the --opentelemetry-instrument argument to tomodachi run
will automatically instrument the service with the appropriate exporters
and configuration according to the set OTEL_* environment variables.
If tomodachi is installed in the environment, using
tomodachi --opentelemetry-instrument service.py is mostly equivalent
to running opentelemetry-instrument tomodachi run service.py and will
load distros, configurators and instrumentors automatically in the same
way as the opentelemetry-instrument CLI would do.
local ~$ OTEL_LOGS_EXPORTER=console \
    OTEL_TRACES_EXPORTER=console \
    OTEL_METRICS_EXPORTER=console \
    OTEL_SERVICE_NAME=example-service \
    tomodachi --opentelemetry-instrument run service/app.py
The environment variable TOMODACHI_OPENTELEMETRY_INSTRUMENT if set
will also enable auto instrumentation in the same way.
local ~$ OTEL_LOGS_EXPORTER=console \
    OTEL_TRACES_EXPORTER=console \
    OTEL_METRICS_EXPORTER=console \
    OTEL_SERVICE_NAME=example-service \
    TOMODACHI_OPENTELEMETRY_INSTRUMENT=1 \
    tomodachi run service/app.py
Auto instrumentation using the opentelemetry-instrument CLI
Auto instrumentation using the opentelemetry-instrument CLI can be
achieved by starting services using
opentelemetry-instrument [otel-options] tomodachi run [options] <service.py ...>.
# either define the OTEL_* environment variables to specify instrumentation specification
local ~$ OTEL_LOGS_EXPORTER=console \
    OTEL_TRACES_EXPORTER=console \
    OTEL_METRICS_EXPORTER=console \
    OTEL_SERVICE_NAME=example-service \
    opentelemetry-instrument tomodachi run service/app.py

# or use the arguments passed to the opentelemetry-instrument command
local ~$ opentelemetry-instrument \
    --logs_exporter console \
    --traces_exporter console \
    --metrics_exporter console \
    --service_name example-service \
    tomodachi run service/app.py
Manual instrumentation
Auto instrumentation using either
tomodachi --opentelemetry-instrument, setting the
TOMODACHI_OPENTELEMETRY_INSTRUMENT=1 env value or using the
opentelemetry-instrument CLI are the recommended ways of instrumenting
services, as they will automatically instrument the service (and libs
with instrumentors installed) with the appropriate exporters and
configuration.
However, instrumentation can also be enabled by importing the
TomodachiInstrumentor instrumentation class and calling its'
instrument function.
import tomodachi
from tomodachi.opentelemetry import TomodachiInstrumentor

TomodachiInstrumentor().instrument()

class Service(tomodachi.Service):
    name = "example-service"

    @tomodachi.http(GET, r"/example")
    async def example(self, request):
        return 200, "hello world"
Starting such a service with the appropriate OTEL_* environment
variables would properly instrument traces, logs and metrics for the
service without the need to use the opentelemetry-instrument CLI.
local ~$ OTEL_LOGS_EXPORTER=console \
    OTEL_TRACES_EXPORTER=console \
    OTEL_METRICS_EXPORTER=console \
    OTEL_SERVICE_NAME=example-service \
    tomodachi run service/app.py
Service name dynamically set if missing OTEL_SERVICE_NAME value
If the OTEL_SERVICE_NAME environment variable value (or
--service_name argument to opentelemetry-instrument) is not set, the
resource' service.name will instead be set to the name attribute of
the service class. In case the service class uses the default generic
names (service or app), the resource' service.name will instead
be set to the default as specified in
https://github.com/open-telemetry/semantic-conventions/tree/main/docs/resource#service.
In the rare case where there's multiple tomodachi services started
within the same Python process, it should be noted that OTEL traces,
metrics and logging will primarily use the OTEL_SERVICE_NAME, and if
it's missing then use the name from the first instrumented service
class. The same goes for the service.instance.id resource attribute,
which will be set to the first instrumented service class' uuid value
(which in most cases is automatically assigned on service start).
Multi-service execution won't accurately distinguish the service name
of tracers, meters and loggers. The recommended solution if this is an
issue, is to split the services into separate processes instead.
Exclude lists to exclude certain URLs from traces and metrics
To exclude certain URLs from traces and metrics, set the environment
variable OTEL_PYTHON_TOMODACHI_EXCLUDED_URLS (or
OTEL_PYTHON_EXCLUDED_URLS to cover all instrumentations) to a string
of comma delimited regexes that match the URLs.
Regexes from the OTEL_PYTHON_AIOHTTP_EXCLUDED_URLS environment
variable will also be excluded.
For example,
export OTEL_PYTHON_TOMODACHI_EXCLUDED_URLS="client/.*/info,healthcheck"will exclude requests such as https://site/client/123/info and
https://site/xyz/healthcheck.
You can also pass comma delimited regexes directly to the instrument
method:
TomodachiInstrumentor().instrument(excluded_urls="client/.*/info,healthcheck")Prometheus meter provider (experimental)
The tomodachi.opentelemetry module also provides a Prometheus meter
provider that can be used to export metrics to Prometheus. Run
opentelemetry-instrument with the
--meter_provider tomodachi_prometheus argument (or set
OTEL_PYTHON_METER_PROVIDER=tomodachi_prometheus environment value) to
enable the Prometheus meter provider.
Environment variables to configure Prometheus meter provider
-
OTEL_PYTHON_TOMODACHI_PROMETHEUS_ADDRESSspecifies the host address the Prometheus export server should listen on. (default:"localhost") -
OTEL_PYTHON_TOMODACHI_PROMETHEUS_PORTspecifies the port the Prometheus export server should listen on. (default:9464) -
OTEL_PYTHON_TOMODACHI_PROMETHEUS_INCLUDE_SCOPE_INFOspecifies whether to include scope information asotel_scope_infovalue. (default:true) -
OTEL_PYTHON_TOMODACHI_PROMETHEUS_INCLUDE_TARGET_INFOspecifies whether to include resource attributes astarget_infovalue. (default:true) -
OTEL_PYTHON_TOMODACHI_PROMETHEUS_EXEMPLARS_ENABLEDspecifies whether exemplars (experimental) should be collected and used in Prometheus export. (default:false) -
OTEL_PYTHON_TOMODACHI_PROMETHEUS_NAMESPACE_PREFIXspecifies the namespace prefix for Prometheus metrics. A final underscore is automatically added if prefix is used. (default:"")
Dependency requirement for Prometheus meter provider
The tomodachi_prometheus meter provider requires that the
opentelemetry-exporter-prometheusand prometheus_client packages
package are installed.
Use tomodachi extras opentelemetry-exporter-prometheus to
automatically include a compatible version of the exporter.
OpenMetrics output from Prometheus with exemplars enabled
With exemplars enabled, make sure to call the Prometheus client with the
accept header application/openmetrics-text to ensure exemplars are
included in the response.
curl http://localhost:9464/metrics -H "Accept: application/openmetrics-text"💡 Note that if the accept header application/openmetrics-text is
missing from the request, exemplars will be excluded from the response.
Example: starting a service with instrumentation
This example will start and instrument a service with OTLP exported
traces sent to the endpoint otelcol:4317 and metrics that can be
scraped by Prometheus from port 9464. All metrics except for
target_info and otel_scope_info will be prefixed with
"tomodachi_". Additionally exemplars will be added to the Prometheus
collected metrics that includes sample exemplars with trace_id and
span_id labels.
local ~$ TOMODACHI_OPENTELEMETRY_INSTRUMENT=1 \
    OTEL_TRACES_EXPORTER=otlp \
    OTEL_EXPORTER_OTLP_ENDPOINT=otelcol:4317 \
    OTEL_PYTHON_METER_PROVIDER=tomodachi_prometheus \
    OTEL_PYTHON_TOMODACHI_PROMETHEUS_EXEMPLARS_ENABLED=true \
    OTEL_PYTHON_TOMODACHI_PROMETHEUS_ADDRESS=0.0.0.0 \
    OTEL_PYTHON_TOMODACHI_PROMETHEUS_PORT=9464 \
    OTEL_PYTHON_TOMODACHI_PROMETHEUS_NAMESPACE_PREFIX=tomodachi \
    tomodachi run service/app.py
Additional configuration options 🤩
In the service class an attribute named options (as a
tomodachi.Options object) can be set for additional configuration.
import json

import tomodachi

class Service(tomodachi.Service):
    name = "http-example"
    options = tomodachi.Options(
        http=tomodachi.Options.HTTP(
            port=80,
            content_type="application/json; charset=utf-8",
            real_ip_from=[
                "127.0.0.1/32",
                "10.0.0.0/8",
                "172.16.0.0/12",
                "192.168.0.0/16",
            ],
            keepalive_timeout=5,
            max_keepalive_requests=20,
        ),
        watcher=tomodachi.Options.Watcher(
            ignored_dirs=["node_modules"],
        ),
    )

    @tomodachi.http("GET", r"/health")
    async def health_check(self, request):
        return 200, json.dumps({"status": "healthy"})

    # Specify custom 404 catch-all response
    @tomodachi.http_error(status_code=404)
    async def error_404(self, request):
        return json.dumps({"error": "not-found"})
Options are read or written via the service' options attribute
A service option can be accessed via the configuration key in numerous ways.
-
options.http.sub_key(example:options.http.port) -
options[f"http.{sub_key}"](example:options["http.port"]) -
options["http"][sub_key](example:options["http"]["port"])
The service options attribute is an object of tomodachi.Options type.
HTTP server parameters
| Configuration key | Description | Default |
|---|---|---|
http.port |
TCP port (integer value) to listen for incoming connections. | 9700 |
http.host |
Network interface to bind TCP server to. "0.0.0.0" will bind to all IPv4 interfaces. None or "" will assume all network interfaces. |
"0.0.0.0" |
http.reuse_port |
If set to True (which is also the default value on Linux) the HTTP server will bind to the port using the socket option SO_REUSEPORT. This will allow several processes to bind to the same port, which could be useful when running services via a process manager such as supervisord or when it's desired to run several processes of a service to utilize additional CPU cores, etc. Note that the reuse_port option cannot be used on non-Linux platforms. |
True on Linux, otherwise False
|
http.keepalive_timeout |
Enables connections to use keep-alive if set to an integer value over 0. Number of seconds to keep idle incoming connections open. |
0 |
http.max_keepalive_requests |
An optional number (int) of requests which is allowed for a keep-alive connection. After the specified number of requests has been done, the connection will be closed. An option value of 0 or None (default) will allow any number of requests over an open keep-alive connection. |
None |
http.max_keepalive_time |
An optional maximum time in seconds (int) for which keep-alive connections are kept open. If a keep-alive connection has been kept open for more than http.max_keepalive_time seconds, the following request will be closed upon returning a response. The feature is not used by default and won't be used if the value is 0 or None. A keep-alive connection may otherwise be open unless inactive for more than the keep-alive timeout. |
None |
http.client_max_size |
The client’s maximum size in a request, as an integer, in bytes. | (1024 ** 2) * 100 |
http.termination_grace_period_seconds |
The number of seconds to wait for functions called via HTTP to gracefully finish execution before terminating the service, for example if service received a SIGINT or SIGTERM signal while requests were still awaiting response results. |
30 |
http.real_ip_header |
Header to read the value of the client's real IP address from if service operates behind a reverse proxy. Only used if http.real_ip_from is set and the proxy's IP correlates with the value from http.real_ip_from. |
"X-Forwarded-For" |
http.real_ip_from |
IP address(es) or IP subnet(s) / CIDR. Allows the http.real_ip_header header value to be used as client's IP address if connecting reverse proxy's IP equals a value in the list or is within a specified subnet. For example ["127.0.0.1/32", "10.0.0.0/8", "172.16.0.0/12", "192.168.0.0/16"] would permit header to be used if closest reverse proxy is "127.0.0.1" or within the three common private network IP address ranges. |
[] |
http.content_type |
Default content-type header to use if not specified in the response. | "text/plain; charset=utf-8" |
http.access_log |
If set to the default value (boolean) True the HTTP access log will be output to stdout (logger tomodachi.http). If set to a str value, the access log will additionally also be stored to file using value as filename. |
True |
http.server_header |
"Server" header value in responses. |
"tomodachi" |
AWS SNS+SQS credentials and prefixes
| Configuration key | Description | Default |
|---|---|---|
aws_sns_sqs.region_name |
The AWS region to use for SNS+SQS pub/sub API requests. | None |
aws_sns_sqs.aws_access_key_id |
The AWS access key to use for SNS+SQS pub/sub API requests. | None |
aws_sns_sqs.aws_secret_access_key |
The AWS secret to use for SNS+SQS pub/sub API requests. | None |
aws_sns_sqs.topic_prefix |
A prefix to any SNS topics used. Could be good to differentiate between different dev environments. | "" |
aws_sns_sqs.queue_name_prefix |
A prefix to any SQS queue names used. Could be good to differentiate between different dev environments. | "" |
aws_sns_sqs.sns_kms_master_key_id |
If set, will set the KMS key (alias or id) to use for encryption at rest on the SNS topics created by the service or subscribed to by the service. Note that an option value set to an empty string ("") or False will unset the KMS master key id and thus disable encryption at rest. If instead an option is completely unset or set to None value no changes will be done to the KMS related attributes on an existing topic. |
None (no changes to KMS settings) |
aws_sns_sqs.sqs_kms_master_key_id |
If set, will set the KMS key (alias or id) to use for encryption at rest on the SQS queues created by the service or for which the service consumes messages on. Note that an option value set to an empty string ("") or False will unset the KMS master key id and thus disable encryption at rest. If instead an option is completely unset or set to None value no changes will be done to the KMS related attributes on an existing queue. |
None (no changes to KMS settings) |
aws_sns_sqs.sqs_kms_data_key_reuse_period |
If set, will set the KMS data key reuse period value on the SQS queues created by the service or for which the service consumes messages on. If the option is completely unset or set to None value no change will be done to the KMSDataKeyReusePeriod attribute of an existing queue, which can be desired if it's specified during deployment, manually or as part of infra provisioning. Unless changed, SQS queues using KMS use the default value 300 (seconds). |
None |
Custom AWS endpoints (for example during development)
| Configuration key | Description | Default |
|---|---|---|
aws_endpoint_urls.sns |
Configurable endpoint URL for AWS SNS – primarily used for integration testing during development using fake services / fake endpoints. | None |
aws_endpoint_urls.sqs |
Configurable endpoint URL for AWS SQS – primarily used for integration testing during development using fake services / fake endpoints. | None |
AMQP / RabbitMQ pub/sub settings
| Configuration key | Description | Default |
|---|---|---|
amqp.host |
Host address / hostname for RabbitMQ server. | "127.0.0.1" |
amqp.port |
Host post for RabbitMQ server. | 5672 |
amqp.login |
Login credentials. | "guest" |
amqp.password |
Login credentials. | "guest" |
amqp.exchange_name |
The AMQP exchange name to use in the service. | "amq_topic" |
amqp.routing_key_prefix |
A prefix to add to any AMQP routing keys provided in the service. | "" |
amqp.queue_name_prefix |
A prefix to add to any AMQP queue names provided in the service. | "" |
amqp.virtualhost |
AMQP virtualhost settings. | "/" |
amqp.ssl |
TLS can be enabled for supported host connections. | False |
amqp.heartbeat |
The heartbeat timeout value defines after what period of time the peer TCP connection should be considered unreachable (down) by RabbitMQ and client libraries. | 60 |
amqp.queue_ttl |
TTL set on newly created queues. | 86400 |
Code auto reload on file changes (for use in development)
| Configuration key | Description | Default |
|---|---|---|
watcher.ignored_dirs |
Directories / folders that the automatic code change watcher should ignore. Could be used during development to save on CPU resources if any project folders contains a large number of file objects that doesn't need to be watched for code changes. Already ignored directories are "__pycache__", ".git", ".svn", "__ignored__", "__temporary__" and "__tmp__". |
[] |
watcher.watched_file_endings |
Additions to the list of file endings that the watcher should monitor for file changes. Already followed file endings are ".py", ".pyi", ".json", ".yml", ".html" and ".phtml". |
[] |
Default options
If no options are specified or if an empty tomodachi.Options object is instantiated, the default set of options will be applied.
>>> import tomodachi
>>> tomodachi.Options()
∴ http <class: "Options.HTTP" -- prefix: "http">:
  | port = 9700
  | host = "0.0.0.0"
  | reuse_port = False
  | content_type = "text/plain; charset=utf-8"
  | charset = "utf-8"
  | client_max_size = 104857600
  | termination_grace_period_seconds = 30
  | access_log = True
  | real_ip_from = []
  | real_ip_header = "X-Forwarded-For"
  | keepalive_timeout = 0
  | keepalive_expiry = 0
  | max_keepalive_time = None
  | max_keepalive_requests = None
  | server_header = "tomodachi"

∴ aws_sns_sqs <class: "Options.AWSSNSSQS" -- prefix: "aws_sns_sqs">:
  | region_name = None
  | aws_access_key_id = None
  | aws_secret_access_key = None
  | topic_prefix = ""
  | queue_name_prefix = ""
  | sns_kms_master_key_id = None
  | sqs_kms_master_key_id = None
  | sqs_kms_data_key_reuse_period = None
  | queue_policy = None
  | wildcard_queue_policy = None

∴ aws_endpoint_urls <class: "Options.AWSEndpointURLs" -- prefix: "aws_endpoint_urls">:
  | sns = None
  | sqs = None

∴ amqp <class: "Options.AMQP" -- prefix: "amqp">:
  | host = "127.0.0.1"
  | port = 5672
  | login = "guest"
  | password = "guest"
  | exchange_name = "amq.topic"
  | routing_key_prefix = ""
  | queue_name_prefix = ""
  | virtualhost = "/"
  | ssl = False
  | heartbeat = 60
  | queue_ttl = 86400
  · qos <class: "Options.AMQP.QOS" -- prefix: "amqp.qos">:
    | queue_prefetch_count = 100
    | global_prefetch_count = 400

∴ watcher <class: "Options.Watcher" -- prefix: "watcher">:
  | ignored_dirs = []
  | watched_file_endings = []
Decorated functions using @tomodachi.decorator 🎄
Invoker functions can of course be decorated using custom functionality.
For ease of use you can then in turn decorate your decorator with the
the built-in @tomodachi.decorator to ease development. If the
decorator would return anything else than True or None (or not
specifying any return statement) the invoked function will not be
called and instead the returned value will be used, for example as an
HTTP response.
import tomodachi


@tomodachi.decorator
async def require_csrf(instance, request):
    token = request.headers.get("X-CSRF-Token")
    if not token or token != request.cookies.get("csrftoken"):
        return {
            "body": "Invalid CSRF token",
            "status": 403
        }


class Service(tomodachi.Service):
    name = "example"

    @tomodachi.http("POST", r"/create")
    @require_csrf
    async def create_data(self, request):
        # Do magic here!
        return "OK"
Good practices for running services in production 🤞
When running a tomodachi service in a production environment, it's
important to ensure that the service is set up correctly to handle the
demands and constraints of a live system. Here's some recommendations
of options and operating practices to make running the services a
breeze.
-
Go for a Docker 🐳 environment if possible -- preferably orchestrated with for example Kubernetes to handle automated scaling events to meet demand of incoming requests and/or event queues.
-
Make sure that a
SIGTERMsignal is passed to thepythonprocess when a pod is scheduled for termination to give it time to gracefully stop listeners, consumers and finish active handler tasks.- This should work automatically for services in Docker if the
CMDstatement in yourDockerfileis starting thetomodachiservice directly. - In case shell scripts are used in
CMDyou might need to trap signals and forward them to the service process.
- This should work automatically for services in Docker if the
-
To give services the time to gracefully complete active handler executions and shut down, make sure that the orchestration engine waits at least 30 seconds from sending the
SIGTERMto remove the pod.-
For extra compatibility in k8s and to get around most kind of edge-cases of intermittent timeouts and problems with ingress connections, set the pod spec
terminationGracePeriodSecondsto90seconds and use apreStoplifecycle hook of 20 seconds.spec: terminationGracePeriodSeconds: 90 containers: lifecycle: preStop: exec: command: ["/bin/sh", "-c", "sleep 20"]
-
-
If your service inbound network access to HTTP handlers from users or API clients, then it's usually preferred to put some kind of ingress (nginx, haproxy or other type of load balancer) to proxy connections to the service pods.
-
Let the ingress handle public TLS, http2 / http3, client facing keep-alives and WebSocket protocol upgrades and let the service handler just take care of the business logic.
-
Use HTTP options such as the ones in this service to have the service rotate keep-alive connections so that ingress connections doesn't stick to the old pods after a scaling event.
If keep-alive connections from ingresses to services stick for too long, the new replicas added when scaling out won't get their balanced share of the requests and the old pods will continue to receive most of the requests.
import tomodachi

class Service(tomodachi.Service):
    name = "service"

    options = tomodachi.Options(
        http=tomodachi.Options.HTTP(
            port=80,
            content_type="application/json; charset=utf-8",
            real_ip_from=["127.0.0.1/32", "10.0.0.0/8", "172.16.0.0/12", "192.168.0.0/16"],
            keepalive_timeout=10,
            max_keepalive_time=30,
        )
    )
-
-
Use a JSON log formatter such as the one enabled via
--logger json(or env variableTOMODACHI_LOGGER=json) so that the log entries can be picked up by a log collector. -
Always start the service with the
--productionCLI argument (or set the env variableTOMODACHI_PRODUCTION=1) to disable the file watcher that restarts the service on file changes, and to hide the start banner so it doesn't end up in log buffers. -
Not related to
tomodachidirectly, but always remember to collect the log output and monitor your instances or clusters.
Arguments to tomodachi run when running in production env
tomodachi run service/app.py --loop uvloop --production --log-level warning --logger jsonHere's a breakdown of the arguments and why they would be good for these kinds of environments.
-
--loop uvloop: This argument sets the event loop implementation touvloop, which is known to be faster than the defaultasyncioloop. This can help improve the performance of your service. However, you should ensure thatuvloopis installed in your environment before using this option. -
--production: This argument disables the file watcher that restarts the service on file changes and hides the startup info banner. This is important in a production environment where you don't want your service to restart every time a file changes. It also helps to reduce unnecessary output in your logs. -
--log-level warning: This argument sets the minimum log level towarning. In a production environment, you typically don't want to log every single detail of your service's operation. By setting the log level towarning, you ensure that only important messages are logged.If your infrastructure supports rapid collection of log entries and you see a clear benefit of including logs of log level
info, it would make sense to use--log-level infoinstead of filtering on at leastwarning. -
--logger json: This argument sets the log formatter to output logs in JSON format. This is useful in a production environment where you might have a log management system that can parse and index JSON logs for easier searching and analysis.
You can also set these options using environment variables. This can be useful if you're deploying your service in a containerized environment like Docker or Kubernetes, where you can set environment variables in your service's configuration. Here's how you would set the same options using environment variables:
export TOMODACHI_LOOP=uvloop
export TOMODACHI_PRODUCTION=1
export TOMODACHI_LOG_LEVEL=warning
export TOMODACHI_LOGGER=json

tomodachi run service/app.py
By using environment variables, you can easily change the configuration of your service without having to modify your code or your command line arguments. This can be especially useful in a CI/CD pipeline where you might want to adjust your service's configuration based on the environment it's being deployed to.
Requirements 👍
-
Python (
3.8+,3.9+,3.10+,3.11+,3.12+) -
aiohttp (
aiohttpis the currently supported HTTP server implementation fortomodachi) - aiobotocore and botocore (used for AWS SNS+SQS pub/sub messaging)
- aioamqp (used for RabbitMQ / AMQP pub/sub messaging)
- structlog (used for logging)
- uvloop (optional: alternative event loop implementation)
Pull requests and bug reports
This library is open source software. Please add a pull request with the feature that you deem are missing from the lib or for bug fixes that you encounter.
Make sure that the tests and linters are passing. A limited number of tests can be run locally without external services. Use GitHub Actions to run the full test suite and to verify linting and regressions. Read more in the contribution guide.
GitHub repository
The latest developer version of tomodachi is always available at
GitHub.
- Clone repo:
git clone git@github.com:kalaspuff/tomodachi.git - GitHub: https://github.com/kalaspuff/tomodachi
Acknowledgements + contributors
🙇 Thank you everyone that has come with ideas, reported issues, built and operated services, helped debug and made contributions to the library code directly or via libraries that build on the base functionality.
🙏 Many thanks to the amazing contributors that have helped to make
tomodachi better.
Changelog of releases
Changes are recorded in the repo as well as together with the GitHub releases.
- In repository: https://github.com/kalaspuff/tomodachi/blob/master/CHANGELOG.md
- Release tags: https://github.com/kalaspuff/tomodachi/releases
LICENSE
tomodachi is offered under the MIT license.
Additional questions and information
What is the best way to run a tomodachi service?
Docker containers are great and can be scaled out in Kubernetes, Nomad or other orchestration engines. Some may instead run several services on the same environment, on the same machine if their workloads are smaller or more consistent. Remember to gather your output and monitor your instances or clusters.
See the section on good practices for running services in production environments for more insights.
Are there any more example services?
There are a few examples in the
examples
folder, including using tomodachi in an example Docker
environment
with or without docker-compose. There are examples to publish events
/ messages to an AWS SNS topic and subscribe to an AWS SQS queue.
There's also a similar code available of how to work with pub/sub
for RabbitMQ via the AMQP transport protocol.
What's the recommended setup to run integration tests towards my service?
When unit tests are not enough, you can run integration tests towards your services using the third party
library tomodachi-testcontainers. This library provides a way to run your service in a Docker container.
- https://github.com/filipsnastins/tomodachi-testcontainers
- https://pypi.org/project/tomodachi-testcontainers/
Why should I use tomodachi?
tomodachi is an easy way to start when experimenting with your
architecture or trying out a concept for a new service – specially if you're
working on services that publish and consume messages (pub-sub messaging), such as events or commands
from AWS SQS or AMQP message brokers.
tomodachi processes message flows through topics and queues, with enveloping and receiving execution handling.
tomodachi may not have all the features you desire out of the box and it may never do, but I believe
it's great for bootstrapping microservices in async Python.
While tomodachi provides HTTP handlers, the library may not be the best choice today if you are solely building
services that exposes REST or GraphQL API. In such case, you may be better off to use,
for example fastapi or litestar, perhaps in combination with strawberry as your preferred interface.
Note that the HTTP layer on top of tomodachi is using aiohttp, which provides a more raw interface than libraries such as fastapi or starlette.
I have some great additions
Sweet! Please open a pull request with your additions. Make sure that the tests and linters are passing. A limited number of tests can be run locally without external services. Use GitHub Actions to run the full test suite and to verify linting and regressions. Get started at the short contribution guide.
Beta software in production?
There are some projects and organizations that already are running
services based on tomodachi in production. The library is provided
as is with an unregular release schedule, and as with most software,
there will be unfortunate bugs or crashes. Consider this currently
as beta software (with an ambition to be stable enough for
production). Would be great to hear about other use-cases in the
wild!
Another good idea is to drop in Sentry or other exception debugging solutions. These are great to catch errors if something wouldn't work as expected in the internal routing or if your service code raises unhandled exceptions.
Who built this and why?
My name is Carl Oscar Aaro
[@kalaspuff] and I'm a coder
from Sweden. When I started writing the first few lines of this
library back in 2016, my intention was to experiment with
Python's asyncio, the event loop, event sourcing and pub-sub message
queues.
A lot has happened since -- now running services in both production and development clusters, while also using microservices for quick proof of concepts and experimentation. 🎉

![dependabot[bot]](https://avatars.githubusercontent.com/u/49699333?size=120)


