Python Video Stabilization 


Python video stabilization using OpenCV. Full searchable documentation here.
This module contains a single class (VidStab) used for video stabilization. This class is based on the work presented by Nghia Ho in SIMPLE VIDEO STABILIZATION USING OPENCV. The foundation code was found in a comment on Nghia Ho's post by the commenter with username koala.
| Input | Output |
|---|---|
 |
 |
Video used with permission from HappyLiving
Contents:
Installation
+ Please report issues if you install/try to install and run into problems!
Install vidstab without installing OpenCV
If you've already built OpenCV with python bindings on your machine it is recommended to install vidstab without installing the pypi versions of OpenCV. The opencv-python python module can cause issues if you've already built OpenCV from source in your environment.
The below commands will install vidstab without OpenCV included.
From PyPi
pip install vidstabFrom GitHub
pip install git+https://github.com/AdamSpannbauer/python_video_stab.git
Install vidstab & OpenCV
If you don't have OpenCV installed already there are a couple options.
- You can build OpenCV using one of the great online tutorials from PyImageSearch, LearnOpenCV, or OpenCV themselves. When building from source you have more options (e.g. platform optimization), but more responsibility. Once installed you can use the pip install command shown above.
- You can install a pre-built distribution of OpenCV from pypi as a dependency for
vidstab(see command below)
The below commands will install vidstab with opencv-contrib-python as dependencies.
From PyPi
pip install vidstab[cv2]From Github
pip install -e git+https://github.com/AdamSpannbauer/python_video_stab.git#egg=vidstab[cv2]Basic usage
The VidStab class can be used as a command line script or in your own custom python code.
Using from command line
# Using defaults
python3 -m vidstab --input input_video.mov --output stable_video.avi
# Using a specific keypoint detector
python3 -m vidstab -i input_video.mov -o stable_video.avi -k GFTT
Using VidStab class
from vidstab import VidStab

# Using defaults
stabilizer = VidStab()
stabilizer.stabilize(input_path='input_video.mov', output_path='stable_video.avi')

# Using a specific keypoint detector
stabilizer = VidStab(kp_method='ORB')
stabilizer.stabilize(input_path='input_video.mp4', output_path='stable_video.avi')

# Using a specific keypoint detector and customizing keypoint parameters
stabilizer = VidStab(kp_method='FAST', threshold=42, nonmaxSuppression=False)
stabilizer.stabilize(input_path='input_video.mov', output_path='stable_video.avi')
Advanced usage
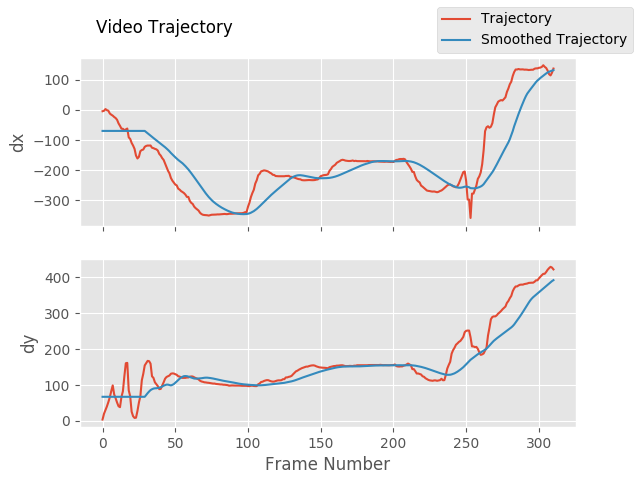
Plotting frame to frame transformations
from vidstab import VidStab
import matplotlib.pyplot as plt

stabilizer = VidStab()
stabilizer.stabilize(input_path='input_video.mov', output_path='stable_video.avi')

stabilizer.plot_trajectory()
plt.show()

stabilizer.plot_transforms()
plt.show()| Trajectories | Transforms |
|---|---|
 |
Using borders
from vidstab import VidStab

stabilizer = VidStab()

# black borders
stabilizer.stabilize(input_path='input_video.mov',
                     output_path='stable_video.avi',
                     border_type='black')
stabilizer.stabilize(input_path='input_video.mov',
                     output_path='wide_stable_video.avi',
                     border_type='black',
                     border_size=100)

# filled in borders
stabilizer.stabilize(input_path='input_video.mov',
                     output_path='ref_stable_video.avi',
                     border_type='reflect')
stabilizer.stabilize(input_path='input_video.mov',
                     output_path='rep_stable_video.avi',
                     border_type='replicate')
|
|
border_type='reflect' |
border_type='replicate' |
|---|---|
 |
 |
Video used with permission from HappyLiving
Using Frame Layering
from vidstab import VidStab, layer_overlay, layer_blend

# init vid stabilizer
stabilizer = VidStab()

# use vidstab.layer_overlay for generating a trail effect
stabilizer.stabilize(input_path=INPUT_VIDEO_PATH,
                     output_path='trail_stable_video.avi',
                     border_type='black',
                     border_size=100,
                     layer_func=layer_overlay)


# create custom overlay function
# here we use vidstab.layer_blend with custom alpha
#   layer_blend will generate a fading trail effect with some motion blur
def layer_custom(foreground, background):
    return layer_blend(foreground, background, foreground_alpha=.8)

# use custom overlay function
stabilizer.stabilize(input_path=INPUT_VIDEO_PATH,
                     output_path='blend_stable_video.avi',
                     border_type='black',
                     border_size=100,
                     layer_func=layer_custom)
layer_func=vidstab.layer_overlay |
layer_func=vidstab.layer_blend |
|---|---|
 |
 |
Video used with permission from HappyLiving
Automatic border sizing
from vidstab import VidStab, layer_overlay

stabilizer = VidStab()

stabilizer.stabilize(input_path=INPUT_VIDEO_PATH,
                     output_path='auto_border_stable_video.avi',
                     border_size='auto',
                     # frame layering to show performance of auto sizing
                     layer_func=layer_overlay)

Stabilizing a frame at a time
The method VidStab.stabilize_frame() can accept numpy arrays to allow stabilization processing a frame at a time.
This can allow pre/post processing for each frame to be stabilized; see examples below.
Simplest form
from vidstab.VidStab import VidStab

stabilizer = VidStab()
vidcap = cv2.VideoCapture('input_video.mov')

while True:
     grabbed_frame, frame = vidcap.read()

     if frame is not None:
        # Perform any pre-processing of frame before stabilization here
        pass

     # Pass frame to stabilizer even if frame is None
     # stabilized_frame will be an all black frame until iteration 30
     stabilized_frame = stabilizer.stabilize_frame(input_frame=frame,
                                                   smoothing_window=30)
     if stabilized_frame is None:
         # There are no more frames available to stabilize
         break

     # Perform any post-processing of stabilized frame here
     pass
Example with object tracking
import os
import cv2
from vidstab import VidStab, layer_overlay, download_ostrich_video

# Download test video to stabilize
if not os.path.isfile("ostrich.mp4"):
    download_ostrich_video("ostrich.mp4")

# Initialize object tracker, stabilizer, and video reader
object_tracker = cv2.TrackerCSRT_create()
stabilizer = VidStab()
vidcap = cv2.VideoCapture("ostrich.mp4")

# Initialize bounding box for drawing rectangle around tracked object
object_bounding_box = None

while True:
    grabbed_frame, frame = vidcap.read()

    # Pass frame to stabilizer even if frame is None
    stabilized_frame = stabilizer.stabilize_frame(input_frame=frame, border_size=50)

    # If stabilized_frame is None then there are no frames left to process
    if stabilized_frame is None:
        break

    # Draw rectangle around tracked object if tracking has started
    if object_bounding_box is not None:
        success, object_bounding_box = object_tracker.update(stabilized_frame)

        if success:
            (x, y, w, h) = [int(v) for v in object_bounding_box]
            cv2.rectangle(stabilized_frame, (x, y), (x + w, y + h),
                          (0, 255, 0), 2)

    # Display stabilized output
    cv2.imshow('Frame', stabilized_frame)

    key = cv2.waitKey(5)

    # Select ROI for tracking and begin object tracking
    # Non-zero frame indicates stabilization process is warmed up
    if stabilized_frame.sum() > 0 and object_bounding_box is None:
        object_bounding_box = cv2.selectROI("Frame",
                                            stabilized_frame,
                                            fromCenter=False,
                                            showCrosshair=True)
        object_tracker.init(stabilized_frame, object_bounding_box)
    elif key == 27:
        break

vidcap.release()
cv2.destroyAllWindows()
Working with live video
The VidStab class can also process live video streams. The underlying video reader is cv2.VideoCapture(documentation).
The relevant snippet from the documentation for stabilizing live video is:
Its argument can be either the device index or the name of a video file. Device index is just the number to specify which camera. Normally one camera will be connected (as in my case). So I simply pass 0 (or -1). You can select the second camera by passing 1 and so on.
The input_path argument of the VidStab.stabilize method can accept integers that will be passed directly to cv2.VideoCapture as a device index. You can also pass a device index to the --input argument for command line usage.
One notable difference between live feeds and video files is that webcam footage does not have a definite end point.
The options for ending a live video stabilization are to set the max length using the max_frames argument or to manually stop the process by pressing the Esc key or the Q key.
If max_frames is not provided then no progress bar can be displayed for live video stabilization processes.
Example
from vidstab import VidStab

stabilizer = VidStab()
stabilizer.stabilize(input_path=0,
                     output_path='stable_webcam.avi',
                     max_frames=1000,
                     playback=True)

Transform file writing & reading
Generating and saving transforms to file
import numpy as np
from vidstab import VidStab, download_ostrich_video

# Download video if needed
download_ostrich_video(INPUT_VIDEO_PATH)

# Generate transforms and save to TRANSFORMATIONS_PATH as csv (no headers)
stabilizer = VidStab()
stabilizer.gen_transforms(INPUT_VIDEO_PATH)
np.savetxt(TRANSFORMATIONS_PATH, stabilizer.transforms, delimiter=',')
File at TRANSFORMATIONS_PATH is of the form shown below. The 3 columns represent delta x, delta y, and delta angle respectively.
-9.249733913760086068e+01,2.953221378387767970e+01,-2.875918912994855636e-02
-8.801434576214279559e+01,2.741942225927152776e+01,-2.715232319470826938e-02
Reading and using transforms from file
Below example reads a file of transforms and applies to an arbitrary video. The transform file is of the form shown in above section.
import numpy as np
from vidstab import VidStab

# Read in csv transform data, of form (delta x, delta y, delta angle):
transforms = np.loadtxt(TRANSFORMATIONS_PATH, delimiter=',')

# Create stabilizer and supply numpy array of transforms
stabilizer = VidStab()
stabilizer.transforms = transforms

# Apply stabilizing transforms to INPUT_VIDEO_PATH and save to OUTPUT_VIDEO_PATH
stabilizer.apply_transforms(INPUT_VIDEO_PATH, OUTPUT_VIDEO_PATH)

