敢兴趣的可以关注公众号!

PyTestReport
一个由HTMLTestRunner项目为灵感,并基于HTMLTestRunner进行二次开发的一个项目。主要在API调用、报告样式、扩展性等方面进行了增强。
点击查看HTMLTestRunner的官网。HTMLTestRunner是基于Python单元测试官方实现的TextTestResult为参考,实现了对应的HTMLTestResult版本。
安装与使用
安装
通过pip安装
pip install PyTestReport 通过安装包
可通过发布的安装包进行安装,具体安装包可在dist目录查找。
pip install PyTestReport-0.1.X-py3-none-any.whl通过源码(最新版本)
pip install git+https://github.com/five3/PyTestReport.git或者
git clone https://github.com/five3/PyTestReport.git
cd PyTestReport
python setup.py build
python setup.py install
使用
PyTestReport可用通过多种方式运行,分别如下:
- 单元测试(unittest, pytest)
- lib库引入
- 命令行
- REST API
样例说明
单元测试样例(unittest)
import unittest
import pytestreport

class MyTest(unittest.TestCase):
    def testTrue(self):
        self.assertTrue(True)

if __name__ == '__main__':
pytestreport.main(verbosity=2)以这种方式执行之后,默认会在当前文件夹下生成一个PyTestReport.html日志文件,且这个文件名和样式模板都不可以重新指定的。
注意:这种方式执行时,如果使用Pycharm等IDE,确保不是以IDE的内建单元测试框架来执行的;或者直接通过命令行来执行。
import unittest
from pytestreport import TestRunner

class MyTest(unittest.TestCase):
    def testTrue(self):
        self.assertTrue(True)

if __name__ == '__main__':
    suite = unittest.TestSuite()
    suite.addTests(unittest.TestLoader().loadTestsFromTestCase(MyTest))

    with open(r'/path/to/report.html', 'wb') as fp:
        runner = TestRunner(fp, title='测试标题', description='测试描述', verbosity=2)
        runner.run(suite)
这种方式适合批量加载和执行测试用例,从测试文件的外部来导入测试用例并执行。这里可以指定具体的结果文件路径和测试标识等信息。
这里使用的是默认模板主题,如果想要使用其它模板主题,可以通过制定模板的主题文件来实现。比如:使用遗留模板的方式如下所示。
from pytestreport import TestRunner
...
runner = TestRunner(fp, title='测试标题', description='测试描述', verbosity=2, theme='legency')
单元测试样例(pytest)
对于pytest框架,收集其测试结果信息是通过pytest插件形式实现的。使用之前只要确保正常安装了PyTestReport即可。具体使用方式如下:
import pytest

def testTrue():
    assert True

def testFalse():
    assert False

def testError():
    1 / 0

@pytest.mark.skip(reason="misunderstood the API")
def testSkip():
    assert 1 == 1

@pytest.mark.xfail(reason="Xpass")
def testXPass():
    assert True

@pytest.mark.xfail(reason="Xfail")
def testXFail():
    assert False


if __name__ == '__main__':
pytest.main(["-s", "pytest_Demo.py", "--pytest_report", "Pytest_Report.html"])需要注意的是,pytest框架想要使用本测试报告框架,在调用时需要带上--pytest_report参数,并指定一个报告的文件路径即可。当然你也可以同时指定一个非默认主题。比如:
import pytest

if __name__ == '__main__':
    pytest.main(["-s", "pytest_Demo.py", "--pytest_report", "Pytest_Report.html",
    "--pytest_title", "report title", "--pytest_desc", "report desc",
    "--pytest_theme", "new_theme"])
另外,你也可以通过命令行的方式来启动pytest执行单元测试。比如:
pytest -s pytest_Demo.py --pytest_report Pytest_Report.html --pytest_theme new_themeAPI库引入样例
from pytestreport.api import make_report

data = {
    "generator": "PyTestReport 0.1.4",
    "title": "默认主题",
    "description": "默认主题描述",
    "report_summary": {
        "start_time": "2019-05-12 23:07:49",
        "duration": "0:00:00.002000",
        "suite_count": 1,
        "status": {
            "pass": 1,
            "fail": 0,
            "error": 0,
            "skip": 0,
            "count": 1
        }
    },
    "report_detail": {
        "tests": [
            {
                "summary": {
                    "desc": "utDemo.UTestPass",
                    "count": 1,
                    "pass": 1,
                    "fail": 0,
                    "error": 0,
                    "skip": 0,
                    "cid": "testclass1",
                    "status": "pass"
                },
                "detail": [
                    {
                        "has_output": False,
                        "tid": "testpass.1.1",
                        "desc": "testTrue",
                        "output": "",
                        "status": "pass",
                        "status_code": 0
                    }
                ]
            }
        ],
        "count": "1",
        "pass": "1",
        "fail": "0",
        "error": "0",
        "skip": "0"
    }
}
with open('API_Report.html', 'wb') as fp:
    make_report(fp, data)
# will be create API_Report.html file at current directory.
同样的,你也可以指定特定的主题或者样式。比如:
...
with open('API_Report.html', 'wb') as fp:
    make_report(fp, data, theme='new_theme', stylesheet='new_stylesheet_2.css')
命令行样例
命令行样式,以data的json文件为参数,同时可选的参数有主题,样式、js等。
PyTestReport.shell /path/to/data/file.json [reportfile theme htmltemplate stylesheet javascript]
# will be create html report at current directory, the content of data.json should same as the data object in API sample.
实际运行时,需要把符合规范的测试结果数据存放到data.json文件中。比如:当前data.json的数据已与API样例中的data数据等同。
PyTestReport.shell data.json output.htmlREST API样例
暂未支持开发相关
PyTestReport对原项目进行了改进,使用了Jinjia2作为模板引擎。且CSS、JS、HTML文件都进行了分离,所以可以通过改变单独或者全部文件来达到修改模板的目的。当然这里的修改通常指新增一个文件,而在执行时只要指定使用该新文件即可。
目前默认保留了2个主题的模板:一个是HTMLTestRunner原来的模板样式(legency),一个是依据原模板进行UI优化的模板样式(default)。
另外,后期会收集和添加其它更丰富的模板,也欢迎大家来踊跃的为该项目添加新模板和样式。
如何更新样式
样式文件被存放在static/css/目录下,默认保留了2个样式:default.css, legency.css。想要修改样式的方式2两种:
- 直接修改当前主题对应的css文件
- 复制当前主题的css文件,在进行修改(推荐)
第一种方式修改之后重新执行单元测试会直接生效。第二种方式则需要修改下实例化PyTestReport.TestRunner的style参数。比如:
from pytestreport import TestRunner
...
runner = TestRunner(fp, title='测试标题', description='测试描述', verbosity=2, stylesheet='new_style.css')
如何更新JS
JS文件被存放在static/js/目录下,默认保留了2个JS:default.js, legency.js。修改JS的方式和修改样式一样有2种,同样我们推荐复制并修改新JS文件的方式。指定新JS文件的使用方式如下:
from pytestreport import TestRunner
...
runner = TestRunner(fp, title='测试标题', description='测试描述', verbosity=2, javaScript='new_js.js')
如何更新模板
HTML的模板被存放在templates目录下,默认保留了2个模板:default.html, legency.html。
如果你选择修改模板,那么一般情况下你可能同时也需要修改CSS或JS文件。所以我们更推荐的方式是直接新增一个主题(包括html、css、js),并且在主题功能完善之后发送一个pull request,贡献到本项目中提供给更多的人使用!
新模板的使用方式如下:
from pytestreport import TestRunner
...
runner = TestRunner(fp, title='测试标题', description='测试描述', verbosity=2,
                    htmltemplate='new_theme.html', stylesheet='new_theme.css', javascript='new_theme.js')
或者
from pytestreport import TestRunner
...
runner = TestRunner(fp, title='测试标题', description='测试描述', verbosity=2, theme='new_theme')
这里需要注意的是,如果新模板需要引用第三方库(js、css),请优先使用CDN链接而非本地静态文件。
Jinjia2模板传入数据格式
使用Jinjia2模板来渲染HTML报告时,会传入相应的测试结果集的数据对象。这里列出一个简要的样例及说明,为希望添加新主题的同学提供参考。
{
"generator": "PyTestReport 0.1.3",
"title": "默认主题", # 本次单元测试的主标题
"description": "默认主题描述", # 本次单元测试的描述
"stylesheet": "\nbody { font-family: verdana, arial, helvetica, sans-serif; font-size: 80%; }\ntable { font-size: 100%; }\npre { }\n\n/* -- heading ---------------------------------------------------------------------- */\n.heading {\n margin: 10px;\n}\n.heading .attribute {\n margin-top: 1ex;\n margin-bottom: 0;\n}\n\n/* -- css div popup ------------------------------------------------------------------------ */\na.popup_link {\n}\na.popup_link:hover {\n color: red;\n}\n.popup_window {\n display: none;\n position: relative;\n left: 0px;\n top: 0px;\n /*border: solid #627173 1px; */\n padding: 10px;\n background-color: #E6E6D6;\n font-family: \"Lucida Console\", \"Courier New\", Courier, monospace;\n text-align: left;\n font-size: 8pt;\n width: 500px;\n}\n\n/* -- report ------------------------------------------------------------------------ */\n#show_detail_line {\n margin-top: 3ex;\n margin-bottom: 1ex;\n}\n#result_table {\n width: 80%;\n border-collapse: collapse;\n border: 1px solid #4682B4;\n}\n#header_row {\n font-weight: bold;\n color: white;\n background-color: #4682B4;\n}\n#result_table td {\n border: 1px solid #a09d9d;\n padding: 2px;\n}\n#total_row { font-weight: bold; }\n.passClass { background-color: #00ff3733; }\n.failClass { background-color: #f5091f3d; }\n.errorClass { background-color: #0662bb2e; }\n.skipClass { background-color: #40403f38; }\n.passCase { color: #28a745; }\n.failCase { color: #dc3545; font-weight: bold; }\n.errorCase { color: #0c6cff; font-weight: bold; }\n.skipCase { color: #40403f; }\n.hiddenRow { display: none; }\n.testcase { margin-left: 2em; }\n\n/* -- ending ---------------------------------------------------------------------- */\n#ending {\n min-height: 30px;\n}\n",
"javascript": "\noutput_list = Array();\n/* level - 0:Summary; 1:Failed; 2:Skip; 3:All */\n\nfunction showCase(level) {\n trs = document.getElementsByTagName(\"tr\");\n for (var i = 0; i < trs.length; i++) {\n tr = trs[i];\n id = tr.id;\n\n if (level === 0 && tr.getAttribute('type') === 'case') {\n tr.className = 'hiddenRow';\n } else if (level === 1) {\n if (id.substr(0,2) === 'ft') {\n tr.className = '';\n } else if (tr.getAttribute('type') === 'case') {\n tr.className = 'hiddenRow';\n }\n } else if (level === 2) {\n if (id.substr(0,2) === 'et') {\n tr.className = '';\n } else if (tr.getAttribute('type') === 'case') {\n tr.className = 'hiddenRow';\n }\n } else if (level === 3) {\n if (id.substr(0,2) === 'st') {\n tr.className = '';\n } else if (tr.getAttribute('type') === 'case') {\n tr.className = 'hiddenRow';\n }\n } else if (level === 4 && tr.getAttribute('type') === 'case') {\n tr.className = '';\n }\n }\n}\n\nfunction showClassDetail(cid, count) {\n var tr_list = document.querySelectorAll('tr[cid='+cid+']');\n var toHide = 1;\n\n for (var i = 0; i < count; i++) {\n if (tr_list[i].className) {\n toHide = 0;\n }\n }\n for (var i = 0; i < count; i++) {\n if (toHide) {\n tr_list[i].className = 'hiddenRow';\n } else {\n tr_list[i].className = '';\n }\n }\n}\n\nfunction showTestDetail(div_id){\n var details_div = document.getElementById(div_id)\n var displayState = details_div.style.display\n // alert(displayState)\n if (displayState != 'block' ) {\n displayState = 'block'\n details_div.style.display = 'block'\n }\n else {\n details_div.style.display = 'none'\n }\n}\nfunction html_escape(s) {\n s = s.replace(/&/g,'&');\n s = s.replace(/</g,'<');\n s = s.replace(/>/g,'>');\n return s;\n}\n\n\n",
"report_summary": { # 报告总体概要数据
"start_time": "2019-05-12 23:07:49",
"duration": "0:00:00.002000",
"suite_count": 1,
"status": {
"pass": 1,
"fail": 0,
"error": 0,
"skip": 0,
"count": 1
}
},
"report_detail": { # 报告详情数据
"tests": [
{
"summary": { # 测试用例类的概要数据
"desc": "utDemo.UTestPass", # 测试用例类的名称
"count": 1,
"pass": 1,
"fail": 0,
"error": 0,
"skip": 0,
"cid": "testclass1", # 唯一标识测试用例类的id:testclass1--表示排序后的第1个测试用例类
"status": "pass"
},
"detail": [ # 测试用例的详情
{
"has_output": false, # 标识该测试用例是否有输出内容,通常PASS是没有输出内容的。
"tid": "testpass.1.1", # 唯一标识测试用例的id,格式为:test{测试结果状态}.{所属测试用例类的序号}.{当前测试用例的序号}
"desc": "testTrue", # 测试用例名称
"output": "", # 输出内容,如果该测试用例有输出的话
"status": "pass",
"status_code": 0 # 测试结果状态码,0为PASS,1为FAIL,2为ERROR,3为SKIP
}
]
}
],
"count": "1",
"pass": "1",
"fail": "0",
"error": "0",
"skip": "0"
}
}另外,在你进行新主题模板调试时,也可以通过如下的方式获取真实的模板数据和渲染之后的html内容。
import json
from pytestreport import TestRunner
...
runner = TestRunner(fp, title='默认主题', description='默认主题描述', verbosity=2)
result = runner.run(suite)
print(json.dumps(result.pytestreport_data, ensure_ascii=False, indent=2))     # 传入Jinjia2模板的数据对象
print(result.pytestreport_html)         # 渲染成功之后的HTML内容
模板展示
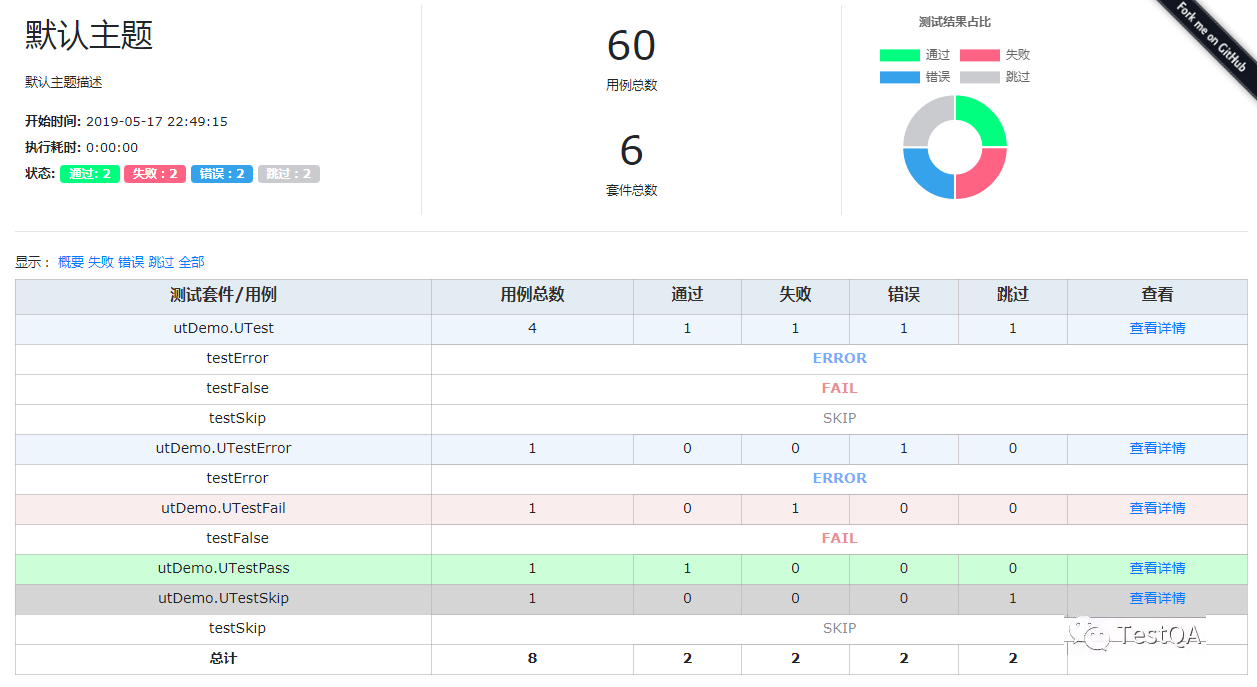
默认主题
合作
对此项目感兴趣的朋友,欢迎为加入我们的行列,贡献你的一份力量。你可以:
- 添加新的测试报告模板
- 添加新的测试报告样式
- 开发并扩展可用功能
- 提出需求和宝贵意见
另外使用过程中如果有任何问题或疑惑,你可以:
- 在testqa.cn
PyTestReport的小组进行提问和讨论 - 在github上给本项目提ISSUE
