vishwakarma

Vishwakarma can be used to create a Kubernetes cluster in AWS by leveraging HashiCorp Terraform and CoreOS. And There are two kind of K8S Master within vishwakarma, one leverages AWS EKS, the other one is ElastiKube (Self-Hosted). Of course, we didn't develop it from scratch, we refer to CoreOS Tectonic and terraform-aws-eks, before starting to dive into the detail, let's experience it first
Dependencies
-
Terraform: All of the AWS resource will be create by Terraform, hence, you need to install it and confirm the permission setup correctly, then Terraform have the permission to create AWS resource automatically
-
kubectl: After AWS EKS cluster created completely, there is a Kubernetes ConfigMap aws-auth need to be created through kubectl, so need to install it
-
heptio-authenticator-aws: AWS EKS access permission integrate with AWS IAM, in order to let AWS EKS know whether you have the right to access, heptio-authenticator-aws need to be installed in the client side
-
Key Pair: In order to access worker node through ssh protocol, please create a key pair in example region US West (Oregon) us-west-2
Getting Started
Before to start to create the K8S cluster, Below are two kind of K8S cluster building block, depend on you requirement to choose one
-
AWS EKS: AWS Kubernetes Cluster As A Service, it can solve most people's problem, and user don't need to worry how to maintain it, but it only supprt in the US East (N. Virginia) and US West (Oregon) Regions now, and there are some limitions.
-
ElastiKube (Self-Hosted): If you want to use K8S in AWS un-support region, and you want more customized feature of the K8S cluster, then you should use ElastiKube
First, Acquire Vishwakarma from github!!
~$ git clone https://github.com/getamis/vishwakarma.git
Second, before the operation, user need to create a AWS EC2 key pairs first, and input it when there is command line prompt during the operation
# need to input the key pair name
var.key_pair_name
  The key pair name for access bastion ec2
Enter a value:
AWS EKS
Start to create the EKS cluster!
# switch to eks_worker example folder

~$ cd examples/eks-cluster

# initial for sync terraform module and install provider plugins

~$ terraform init

# create the network infrastructure

~$ terraform apply -target=module.network

# create the eks compoment

~$ terraform apply -target=module.eks

# create the on demand and spot k8s worker group
~$ terraform apply
Verify the Kubernetes cluster is up! (Still keep in the same folder)
# setup kubeconfig for kubectl to access eks

~$ export KUBECONFIG=./kubeconfig

# check whether there is 4 worker register successfully, it will takes several
minutes...

~$ kubectl get node

NAME                          STATUS    ROLES     AGE       VERSION
ip-10-0-48-247.ec2.internal   Ready     spot      2m        v1.12.7
ip-10-0-66-127.ec2.internal   Ready     spot      2m        v1.12.7
ip-10-0-71-121.ec2.internal   Ready     on-demand 22s       v1.12.7
ip-10-0-86-182.ec2.internal   Ready     on-demand 2m        v1.12.7
ElastiKube (Self-Hosted)
Please create a ssh key pair in ~/.ssh/ with the name id_rsa.pub and id_rsa, this example use the key pair for the etcd, k8s master, k8s node EC2 instance (refer to Here for the more detail information)
# switch to elastikube_cluster example folder
~$ cd examples/elastikube_cluster

# initial for sync terraform module and install provider plugins

~$ terraform init

# create the network infrastructure

~$ terraform apply -target=module.network

# create the kubernetes master compoment

~$ terraform apply -target=module.kubernetes

# create the general and spot k8s worker group
~$ terraform apply
Verify the Kubernetes cluster is up! (Still keep in the same folder)
# Get the kubeconfig from S3 (The bucket name is demo-elastikube-xxxxxxxx. The prefix demo-elastikube is the cluster name defined in main.tf and the rest part is an MD5

# setup kubeconfig for kubectl to access eks

~$ export KUBECONFIG=#{The Path You Put kubeconfig}/kubeconfig

# check whether there is 4 worker register successfully, it will takes several
minutes...

~$ kubectl get node

NAME                          STATUS    ROLES     AGE       VERSION
ip-10-0-48-247.ec2.internal   Ready     master    9m        v1.13.4
ip-10-0-48-117.ec2.internal   Ready     master    9m        v1.13.4
ip-10-0-66-127.ec2.internal   Ready     on-demand 5m        v1.13.4
ip-10-0-66-127.ec2.internal   Ready     on-demand 6m        v1.13.4
ip-10-0-71-121.ec2.internal   Ready     spot      3m        v1.13.4
ip-10-0-86-182.ec2.internal   Ready     spot      4m        v1.13.4
What’s Going On?
You have completed one Kubernetes cluster the same as below picture, and let me briefly explain how Vishwakarma achieves it
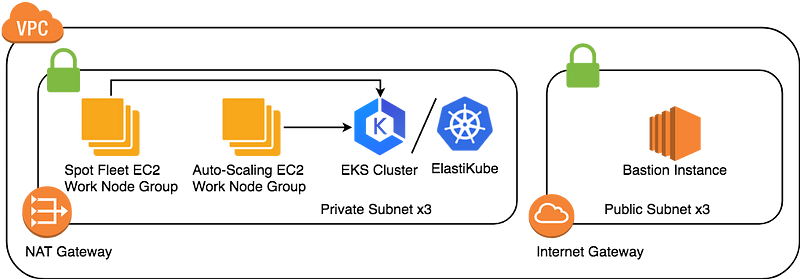
Modules
Vishwakarma include serveral major modules:
aws/network
Create one AWS VPC including private and public subnet, and one ec2 instance called bastion hosts in public subnet, hence, one can access the resource hosting in the private subnet, refer aws/network for the detail variable inputs
aws/eks and aws/elastikube
This two modules creates the K8S control plane (AWS EKS and ElastiKube), Terraform is responsible for the complicated k8s compoments, and it takes about 10~15 minutes to complete, refer aws/eks and aws/eks for the detail variable inputs
aws/eks-worker-asg and aws/kube-worker
Create a AWS auto-scaling group with CoreOS container linux and leverage ignition to provision and register to EKS cluster or ElastiKube automatically.
Due to using AWS launch template, hence, it's up to user to choose spot or on demand instance type by changing the variable, refer aws/eks-worker and aws/kube-worker for the detail variable inputs
Contributing
There are several ways to contribute to this project:
- Find bug: create an issue in our Github issue tracker.
- Fix a bug: check our issue tracker, leave comments and send a pull request to us to fix a bug.
- Make new feature: leave your idea in the issue tracker and discuss with us then send a pull request!
Change log
The changelog captures all important release notes.
License
This project is licensed under the Apache 2.0 License - see the LICENSE file for details


