An easy-to-use Python UI Framework on top of Qt (PySide6). Simple things are simple, hard things are not any harder than they are in Qt.
Features
- Cross Platform: Tested on Windows and macOS
- Low Boilerplate: Save, load and autosave functionality out of the box
- A unified API to set and retrieve data in UI elements
- Layout using tabs, segments, a sidebar and a grid system
Row,Col - Singe instance enforcement
- Installation UI based on PyInstaller (Windows only)
Getting Started
Install formify using PyPi:
pip install formify
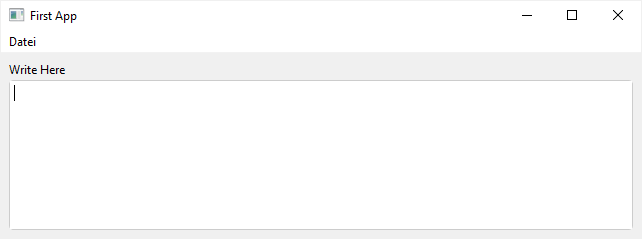
Write your first App featuring a text area with save, load, and autosave functionality.
from formify import *

ui = ControlTextarea("Write Here", variable_name="text")

MainWindow(ui, title="First App", margin=8)
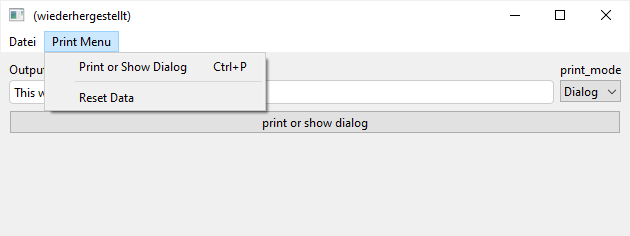
A more complex Example
...including a menu and basic grid layout:
from formify import *


def reset_value():
    # set the values of our UI elements with variable names.
    # This works because we wrapped out UI in a "Form"
    ui.value = {'text': 'This will be printed!', 'print_mode': 'Dialog'}


def print_text():
    _text = ui.value["text"]
    if ui.value["print_mode"] == "Dialog":
        tools.ok_dialog("Title", _text)
    else:
        print(_text)


# Create a grid layout by nesting "Row" and "Col" as needed
# Wrap the layout in "Form" to enable querying: ui.value["text"]
ui = Form(Col(
    Row(
        # provide variable names to enable save, load and autosave functionality as a JSON file
        ControlText(label="Output Text", variable_name="text", value="This will be printed!"),
        # if no label is provided, the variable name is treated as the name
        ControlSelect(items=["Dialog", "Print"], variable_name="print_mode"),
    ),
    ControlButton("print or show dialog", on_click=print_text),
))

# create the main menu as a dict
menu = {
    "Print Menu": {
        # The value can either be a tuple (callable, shortcut)
        # or just a callable
        "Print or Show Dialog": (print_text, "ctrl+p"),
        # If the key starts with "-" its treated as a separator.
        # The number of dashes does not matter.
        "-": None,
        "Reset Data": reset_value
    }
}

# create the main window. If you do not pass auto_run=False, the app launches.
MainWindow(ui, menu=menu, margin=8)
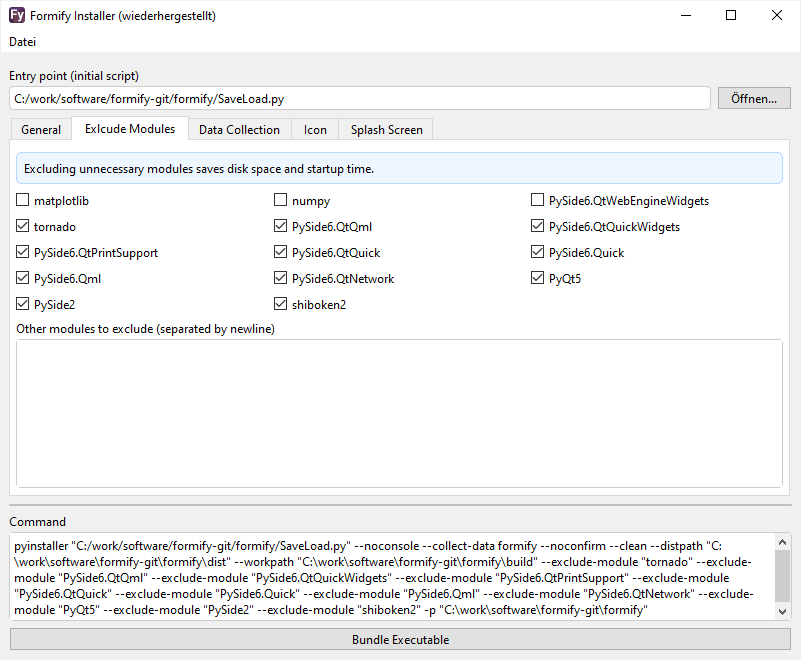
Bundle Your App
Your app can be bundled into an executable using PyInstaller. Make sure to pyinstaller <your_app.py> --collect-data formify collect all data from the formify module. Otherwise, the css files won't make it resulting in an import error.
If you're running Windows, use formify-install: